SPL: Reading and Writing Excel Files
Excel files are widely used. There are some points you need to pay attention to when reading and writing them:
1. Header row: It contains field names. The header row can be absent and, in that case, data records begin from the first row.
2. Large files: A large Excel file is one whose data cannot be wholly loaded into the memory.
3. Sheet: Name of the Sheet to be read or written in a specific Excel file.
4. Specified rows or columns: Sometimes we read data only from certain columns or rows.
It would be convenient to handle the above points if you use SPL to read and write Excel files.
1. Data reading
SPL opens an Excel file using file function and reads data from it as a table sequence or a cursor. When the file can fit into the memory, just read it as a table sequence. When the file is too large to fit into the memory, read it as a cursor to reduce memory usage. SPL also supports reading data in a specified cell, or data in cells of a specified range.
Let’s look at some examples of reading and writing rowwise Excel files.
1.1 Read simple rowwise files
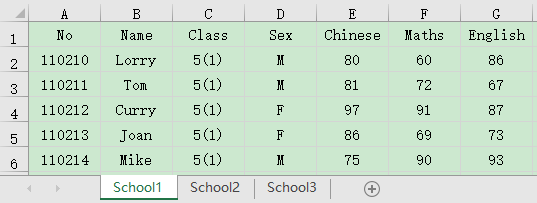
In a rowwise Excel file, each row is a record and all rows have same columns. The file is similar to a database table.

=file("e:/scores.xlsx").xlsimport@t()
The parameter in file function can be the target file’s absolute path or relative path (which is relative to the mainPath configured in SPL configuration file). The xlsimport function, by default, reads all rows and columns in the file’s first Sheet to generate a table sequence. @t option enables reading the first row as headers, and column values in this row are column names in the table sequence. The absence of @t option means no header row, and columns will be referenced using their ordinals, such as #1 and #2.
1.2 Read part of the Excel file
=file("e:/scores.xlsx").xlsimport@t(No,Name,Class,Maths)
The above statement specifies column name parameters to read values from No, Name, Class and Maths fields only.
=file("e:/scores.xlsx").xlsimport@t(;,1:100)
The statement reads all columns from row 1 to row 100 in the file’s first Sheet.
=file("e:/scores.xlsx").xlsimport@t(;,1:-10)
The statement reads all columns from the first row to the 10th from the last row in the file’s first Sheet. A negative number represents a row ordinal counted backwards.
1.3 Read a specified Sheet
=file("e:/scores.xlsx").xlsimport@t(;"School2")
The statement reads all columns in a Sheet named School2.
1.4 Read Sheet information
As the above Excel file has more than one Sheets, SPL xlsopen function opens the file and generates an Excel object, which is a table sequence containing information of the Sheets.
=file("e:/scores.xlsx").xlsopen()
Below is data in the Excel object:

Each row records information of a Sheet. The column names (stname, nrows and ncols) represents sheet name, number of rows and number of columns respectively.
1.5 Remove spaces at both ends of each column value
=file("e:/scores.xlsx").xlsimport@tn()
In the statement, @n option is used to remove white spaces at both ends of each string at data reading and read an empty string as null.
1.6 Read file as a double-level sequence
Sometimes data in an Excel file cannot be directly read as a table sequence, and needs to be converted into a double-level sequence for further computations. On the first level, there is a sequence consisting of rows. On the second level, each row is a sequence whose members are its cell values.
In the following file, each column is a record:

=file("e:/courses.xlsx").xlsimport@w()
@w option enables reading the data as a double-level sequence, as shown below:

Then we can convert it into an ordinary table sequence using the SPL transpose function.
1.7 Read file as a TAB string
=file("e:/courses.xlsx").xlsimport@s()
@s option reads all to-be-read data as a string, where rows are separated by \n and cells in each row are separated by Tab (\t).
1.8 Read a file with complicated heading
Some Excel files have the complicated, multirow heading containing a series of information, such as table title, project name, person completing the form, entry date, page number, etc. Data reading should skip the heading to read detail data and specify column names.
Below is part of the project price file (itemPrices.xlsx) that has such a heading:

=file("e:/itemPrices.xlsx").xlsimport(;,5)
A starting row parameter is specified to let the data reading begin from row 5.
1.9 Read a large file
=file("e:/scores.xlsx").xlsimport@tc()
If the Excel file – which must be of xlsx format - to be read is huge, use @c option to read it as a cursor. Parameters for reading a huge file are the same as reading a small file except that a negative cannot be used to specify the ending row parameter.
1.10 Read a file with free-form layout
In an Excel file with free-form layout, a record may span across multiple rows, a cell containing a column value may be next to or directly below a cell containing a column name, or there may be merged cells spanning columns or rows. Yet each record covers the same number of rows of same structure. The circular data reading will read each record according to the number of rows it covers.
To read data in specified cells, SPL xlsopen function reads the Excel file as an Excel object and then calls xlscell function to read data from the object.
Below is part of an Excel file (employee.xlsx) with the free-style layout:

SPL has the following script to do the data reading:
A |
B |
C |
|
1 |
=create(ID,Name,Sex,Position,Birthday,Phone,Address,PostCode) |
||
2 |
=file(“e:/excel/employe.xlsx").xlsopen() |
||
3 |
[C,C,F,C,C,D,C,C] |
[1,2,2,3,4,5,7,8] |
|
4 |
For |
=A3.(~/B3(#)).(A2.xlscell(~)) |
|
5 |
if len(B4(1))==0 |
break |
|
6 |
>A1.record(B4) |
||
7 |
>B3=B3.(~+9) |
||
A1 Create an empty table sequence made up of ID, Name, Sex, Position, Birthday, Phone, Address and PostCode columns.
A2 Open the target Excel file and generate an Excel object.
A3 Define a sequence of column numbers commanding cells containing employee information.
B3 Define a sequence of row numbers commanding cells containing employee information.
A4 Read information of employees circularly using the for statement.
B4 A3.(~/B3(#)) gets the sequence of cells containing information of the current employee and then reads in the cell values to generate a sequence of employee information. The first round of reading gets [C1,C2,F2,C3,C4,D5,C7,C8] and the second round gets [C10,C11,F11,C12,C13,D14,C16,C17] and so on, by adding 9 to the row number each time.
B5 Check whether the current employee ID is null, and exit the loop and terminate the data reading if it is null.
B6 Append an employee record to A1’s table sequence.
B7 Add 9 to row numbers of the current employee to read information of the next employee.
Below is the data retrieved from cell A1:

1.11 Read a crosstab
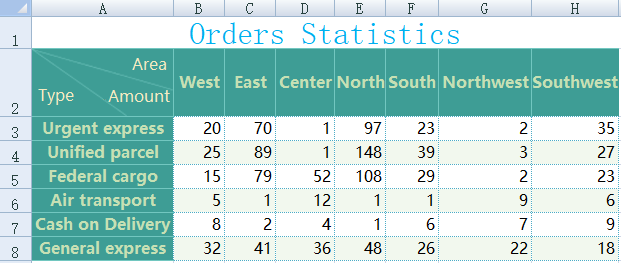
In statistics, a crosstab is a type of matrix table for displaying the quantitative relationship clearly between two variables. After data in a crosstab is read row by row, we can define a base column variable and perform a row-to-column transposition between another column variable and the cross values, or a column-to-row transposition between another row variable and the cross values.
Below is a crosstab (cross.xlsx) storing orders areas and freight types:

SPL has the following script to read data from a crosstab:
A |
Description |
|
1 |
=file("e:/excel/cross.xlsx").xlsimport@t(;1,2) |
Import the first sheet in the Excel file staring from row 2 and row 1 is read as column headers |
2 |
=A1.rename(#1:Type) |
Rename the first column Type |
3 |
=A2.pivot@r(Type;Area,Amount) |
According to Type, perform transposition on A2’s table sequence and the new column names after transposition are Area and Amount; @r enables a row-to-column transposition |
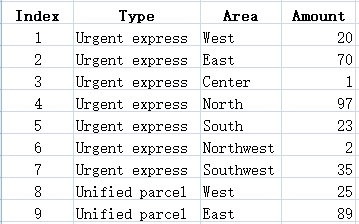
Below is part of the data in cell A3:

1.12 Read data from a primary and sub table
Each sheet contains one primary record under which there are N sub records. The number of primary records is the number of sheets in the Excel file. To read data from such a primary and sub table, we need to create two tables to store records of the primary table and those of the sub table respectively.
We have a staff information file (staff.xlsx), each sheet contains information of an employee and that of their family. We are trying to read the employee information and family information as two separate data tables. Below is one sheet of the original file:

We have the following SPL script to do the data reading task:
A |
B |
C |
|
1 |
=create(IDCard,Name,Sex,Birthday,Nation,Phone,Depart,Home,Marital,Entry) |
||
2 |
=create(IDCard,Name,Relation,Workplace,Phone) |
||
3 |
[B4,B3,D3,F3,H3,F4,H4,B5,F5,H5] |
||
4 |
=file(“e:/excel/staff.xlsx").xlsopen() |
||
5 |
for A4 |
=A3.(A4.xlscell(~,A5.stname)) |
>A1.record(B5) |
6 |
=A4.xlsimport@t(Family,Name,Relation,Workplace,Phone;A5.stname,6) |
||
7 |
=B6.rename(Family:IDCard) |
>B7.run(IDCard=B5(1)) |
|
8 |
>A2.insert@r(0:B7) |
||
A1 Create an empty table sequence having columns IDCard, Name, Sex, Birthday, Nation, Phone, Depart, Home, Marital and Entry for storing the primary table’s employee information.
A2 Create an empty table sequence having columns IDCard, Name, Relation, Workplace and Phone for storing the sub table’s family information.
A3 Define the sequence of cells containing the primary tables’ employee information.
A4 Open the original Excel file and generate an Excel object.
A5 Read data from each sheet of the Excel file by loop.
B5 Get the sequence of employee information.
C5 Store the employee information retrieved by B5 into A1’s table sequence.
B6 Read family information beginning from row 6; only five specified columns – Family, Name, Relation, Workplace and Phone – are read.
B7 Rename column Family in B6’s table sequence IDCard.
C7 Assign IDCard values in employee information to IDCard column in B7’s table sequence.
B8 Append B7’s family information to A2’s table sequence.
Below is part of the data in A1:

Here is part of the data in A2:

Refer to xlsimport() and xlscell() to learn more about reading data from Excel files in SPL.
2. Data writing
SPL offers file function to open an Excel file, and xlsexport function to write data in a table sequence or a cursor to the Excel file. The xlsopen function opens an Excel file as an Excel object and call the object’s xlscell function to write data into the specified cells in the Excel file.
Below are some examples of writing data to Excel files.
2.1 Write as simple rowwise files
Suppose cell A1 in the SPL script has the table sequence data to be written into the Excel file.
=file("e:/scores.xlsx").xlsexport@t(A1)
The above statement writes all data in A1’s table sequence into the first Sheet in scores.xlsx. @t option enables writing column names in the first row, that is, making the first row the column header row. The absence of @t option means no header row.
=file("e:/scores.xlsx").xlsexport@t(A1,No,Name,Class,Maths)
The above statement specifies column name parameters to write only No, Name, Class and Maths columns to the Excel file.
2.2 Write into the specified Sheet
=file("e:/scores.xlsx").xlsexport@t(A1;2)
The statement writes all data in A1’s table sequence to the second Sheet in scores.xlsx.
=file("e:/scores.xlsx").xlsexport@t(A1; "School2")
The statement writes all data in A1’s table sequence to the Sheet named School2 in scores.xlsx.
2.3 Append data and specify the format
=file("e:/scores.xlsx").xlsexport@a(A1)
@a means that, when the target Excel file already exists, append all data in A1’s table sequence to the first Sheet in scores.xlsx according to the format of the last row.
In order to write data to an Excel file with pre-defined format, we can pre-create the file and, in each column of the last row, define the data type for the corresponding column. Then we use @a option to perform append-style writing to write data according to the defined format.
We define the file format as follows, for instance:

Then we delete data from the second row to make it empty. Data appending will identify the last non-empty row as the header row and the next row to it as the beginning of detail rows. Below is the Excel file fed with data:

2.4 Write double-level sequence or a TAB string to Excel
=file("e:/scores.xlsx").xlsexport@w(A1)
@w means that the to-be-written data object A1 is a double-level sequence or a TAB string.
=file("e:/scores.xlsx").xlsexport@wp(A1)
@p option means that the to-be-written data object A1 is a double-level sequence and that a row-to-column transposition is needed before data is written to the target file. The option p must work with option w.
2.5 Write big data into Excel
Suppose A1 in the SPL script contains cursor data to be written into an Excel file.
=file("e:/scores.xlsx").xlsexport@tc(A1)
The above statement uses @c option to write big data in a cursor into an Excel file in a stream style. The target file should be of xlsx format and the parameters are the same as those for writing data from small files.
2.6 Write as Excel files of fixed row and column formats
In an Excel file, the number of rows and columns, as well as the cell format, are fixed. There are also empty cells, to which certain data will be entered. SPL xlsopen function reads the Excel file as an Excel object and calls the object’s xlscell function to write data to specific cells.
Based on the following Excel table, a fund company’s head office requires that each branch office fill data in it and sends the table back.

Below is the SPL script for performing the data filling task:
A |
B |
C |
D |
E |
F |
|
1 |
Mengniu Funds |
2017 |
3 |
58.2 |
364 |
300 |
2 |
8.5 |
50 |
200 |
100 |
400 |
200 |
3 |
182.6 |
76.3 |
43.7 |
28.5 |
16.4 |
|
4 |
120 |
1.07 |
30 |
0.27 |
90 |
0.8 |
5 |
154 |
6 |
4 |
|||
6 |
=file("e:/excel/result.xlsx") |
=A6.xlsopen() |
||||
7 |
=C6.xlscell("B2",1;A1) |
=C6.xlscell("J2",1;B1) |
=C6.xlscell("L2",1;C1) |
|||
8 |
=C6.xlscell("B3",1;D1) |
=C6.xlscell("G3",1;E1) |
=C6.xlscell("K3",1;F1) |
|||
9 |
=C6.xlscell("B6",1;[A2:F2].concat("\t")) |
=C6.xlscell("H6",1;[A3:E3].concat("\t")) |
||||
10 |
=C6.xlscell("B9",1;[A4:F4].concat("\t")) |
=C6.xlscell("B11",1;[A5:C5].concat("\t")) |
||||
11 |
=A6.xlswrite(C6) |
|||||
Suppose the data to be filled in is already prepared (which is stored in the first five rows). In the above example Excel table, the first six empty cells in which data will be entered are separated and discontinuous. Each time data can only be entered into one cell. From the sixth row, cells to be filled in are continuous. Now we concatenate the to-be-entered data into a string separated by \t and fill in data from the specified cell in turn. When data entry is finished, we write C6’s Excel object back to result.xlsx.
Below is the finished Excel table result.xlsx:

Refer to xlsexport() and xlscell() to learn more about writing data to Excel files in SPL.
SPL Official Website 👉 https://www.scudata.com
SPL Feedback and Help 👉 https://www.reddit.com/r/esProcSPL
SPL Learning Material 👉 https://c.scudata.com
SPL Source Code and Package 👉 https://github.com/SPLWare/esProc
Discord 👉 https://discord.gg/2bkGwqTj
Youtube 👉 https://www.youtube.com/@esProc_SPL


Chinese version