

How to integrate SPL into your own Snowflake environment
1. Preface
In the Snowflake cloud environment, users can set up a development environment for SPL application package and generate App installation package. After installing the App, you can call esProc through the SPL function to perform data operations and return the calculation results to users. Users can not only access table data, file data, executable scripts, and other resources, but also access cloud resources such as AWS S3, Azure, and Google GCS.
2.Native App Framework
Refer to:https://docs.snowflake.com/en/developer-guide/native-apps/native-apps-about
In the Snowflake Native App Framework environment, integrate esProc SPL into Snowflake, generate, test, and use SPL interfaces, and generate App installation packages for users to install and use on the consumer end.
Taking the generation of the application package myspl_mackage as an example to illustrate how to implement SPL integration.
2.1 Create application package
Execute script operations in the snowsight or snowsql tool environment:
GRANT CREATE APPLICATION PACKAGE ON ACCOUNT TO ROLE accountadmin;
CREATE APPLICATION PACKAGE myspl_package;
USE APPLICATION PACKAGE myspl_package;
CREATE SCHEMA myspl_stage;
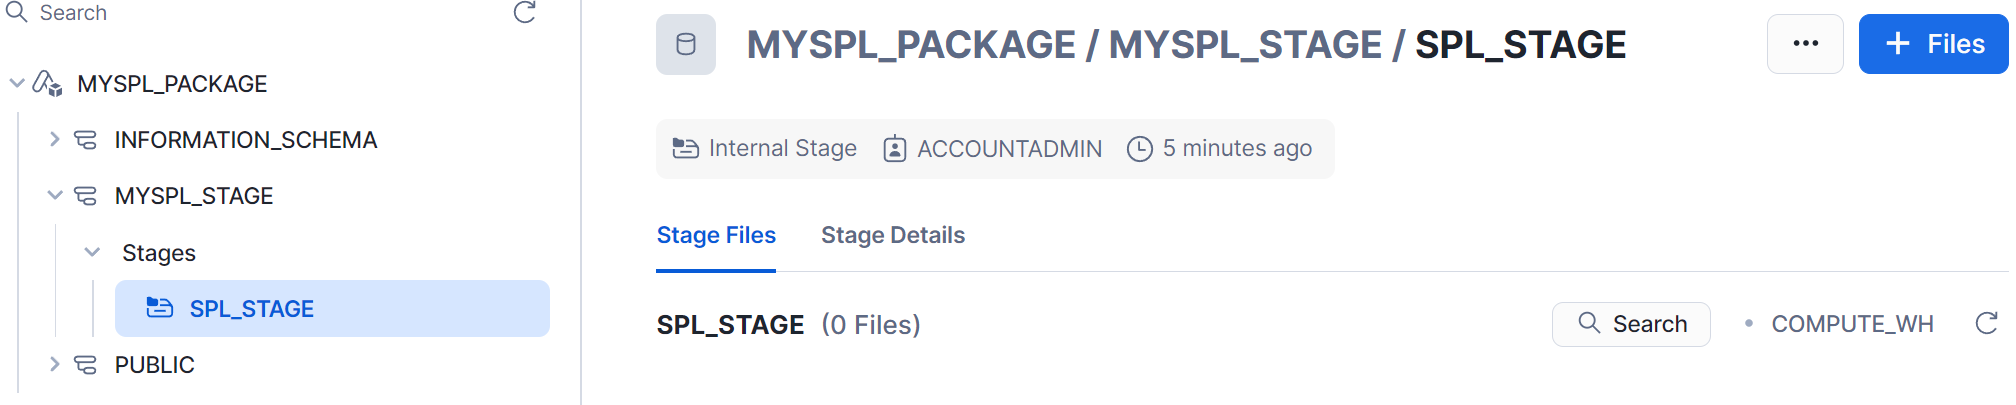
CREATE OR REPLACE STAGE myspl_package.myspl_stage.spl_stage
FILE_FORMAT = (TYPE = 'csv' FIELD_DELIMITER = '|' SKIP_HEADER = 1);
myspl_package is a development environment for generating SPL interfaces.
2.2 Add data table
use schema myspl_package.public;
CREATE TABLE IF NOT EXISTS accounts (ID INT, NAME VARCHAR, VALUE VARCHAR);
INSERT INTO accounts VALUES
(1, 'Nihar', 'Snowflake'),
(2, 'Frank', 'Snowflake'),
(3, 'Benoit', 'Snowflake'),
(4, 'Steven', 'Acme');
2.3 Script setupspl.sql
The App development script 'setupspl.sql' defines SPL interfaces, dependency jars, interface authorization, and more./********** application start *******************/
CREATE APPLICATION ROLE app_public;
CREATE OR ALTER VERSIONED SCHEMA myschema;
GRANT USAGE ON SCHEMA myschema TO APPLICATION ROLE app_public;
/********** to java spl *******************/
CREATE OR REPLACE PROCEDURE myschema.runSPL (spl VARCHAR)
RETURNS TABLE()
LANGUAGE JAVA
RUNTIME_VERSION = '11'
PACKAGES = ('com.snowflake:snowpark:latest')
IMPORTS = ('/java/esproc-bin-new.jar',
'/java/spl-java-func.jar',
'/java/bcpkix-jdk18on-1.75.jar',
'/java/bcprov-jdk18on-1.75.jar',
'/java/snowflake-jdbc-3.14.1.jar',
'/java/lz4-1.3.0.jar',
'/java/fastjson-1.2.28.jar')
HANDLER = 'com.scudata.lib.snowflake.PlusProcedure.run';
GRANT USAGE ON PROCEDURE myschema.runSPL (VARCHAR) TO APPLICATION ROLE app_public;
/********** to java spl2 *******************/
CREATE OR REPLACE PROCEDURE myschema.runSPL (spl VARCHAR, required_arg variant)
RETURNS TABLE()
LANGUAGE JAVA
RUNTIME_VERSION = '11'
PACKAGES = ('com.snowflake:snowpark:latest')
IMPORTS = ('/java/esproc-bin-new.jar',
'/java/spl-java-func.jar',
'/java/bcpkix-jdk18on-1.75.jar',
'/java/bcprov-jdk18on-1.75.jar',
'/java/snowflake-jdbc-3.14.1.jar',
'/java/lz4-1.3.0.jar',
'/java/fastjson-1.2.28.jar')
HANDLER = 'com.scudata.lib.snowflake.PlusProcedure.run';
GRANT USAGE ON PROCEDURE myschema.runSPL (VARCHAR, variant) TO APPLICATION ROLE app_public;
/********** to java spl3 *******************/
CREATE OR REPLACE function myschema.runUdf (spl VARCHAR)
RETURNS VARIANT
LANGUAGE JAVA
RUNTIME_VERSION = '11'
PACKAGES = ('com.snowflake:snowpark:latest')
IMPORTS = ('/java/esproc-bin-new.jar',
'/java/spl-java-func.jar',
'/java/bcpkix-jdk18on-1.75.jar',
'/java/bcprov-jdk18on-1.75.jar',
'/java/snowflake-jdbc-3.14.1.jar',
'/java/lz4-1.3.0.jar',
'/java/fastjson-1.2.28.jar')
HANDLER = 'com.scudata.lib.snowflake.PlusScudata.calculate';
GRANT USAGE ON function myschema.runUdf(VARCHAR) TO APPLICATION ROLE app_public;
/********** to java spl4 *******************/
CREATE OR REPLACE function myschema.runUdf (spl VARCHAR, argv variant)
RETURNS VARIANT
LANGUAGE JAVA
RUNTIME_VERSION = '11'
PACKAGES = ('com.snowflake:snowpark:latest')
IMPORTS = ('/java/esproc-bin-new.jar',
'/java/spl-java-func.jar',
'/java/bcpkix-jdk18on-1.75.jar',
'/java/bcprov-jdk18on-1.75.jar',
'/java/snowflake-jdbc-3.14.1.jar',
'/java/lz4-1.3.0.jar',
'/java/fastjson-1.2.28.jar')
HANDLER = 'com.scudata.lib.snowflake.PlusScudata.calculate';
GRANT USAGE ON function myschema.runUdf (VARCHAR, variant) TO APPLICATION ROLE app_public;
Define two interfaces, runSPL and runUDF, with types of procedure and function, under myschema. The interface and SPL Java association program is placed in spl-java-func. jar.
The content of the setupspl.sql script can be adjusted as needed.
2.4 Upload files
Referring to the requirements of the Native App Framework for generating App applications, the following is a list of file directory structures that App generation depends on. After uploading to the cloud platform, these directory structures remain relatively unchanged. These file resources are stored in the splShell folder and packaged into splShell.zip as attachments to this article, which can be downloaded if needed. The directory and files used to create the app are as follows:splShell :
manifest.yml
readme.md
splShell/java :
bcpkix-jdk18on-1.75.jar
bcprov-jdk18on-1.75.jar
esproc-bin-new.jar
fastjson-1.2.28.jar
lz4-1.3.0.jar
snowflake-jdbc-3.14.1.jar
spl-java-func.jar
splShell/scripts :
setupspl.sql
// The location of customized SPL scripts and data file
splShell/splx :
vmTable.splx
query.splx
car_sales.json
Except for lz4-1.3.0. jar, esproc-bin-xxx.jar, and snowflake-jdbc-xxx.jar, all other yml, jar, splx, and other files are stored in splShell.zip. Simply unzip the zip file to restore the directory structure of these files.
Among them, manifest.yml is placed in the splShell directory of the splShell.zip file, serving as the entrance to the App application and defining the required installation scripts scripts/setupspl.sql.
The jars that the SPL interface depends on are placed in the splShell/Java directory of the splShell.zip file.
lz4-1.3.0.jar, esproc-bin-xxx.jar: Extracted from the esproc installation package, can be downloaded from the SPL official website,
snowflake-jdbc-xxx.jar: Download from the Snowflake official website.
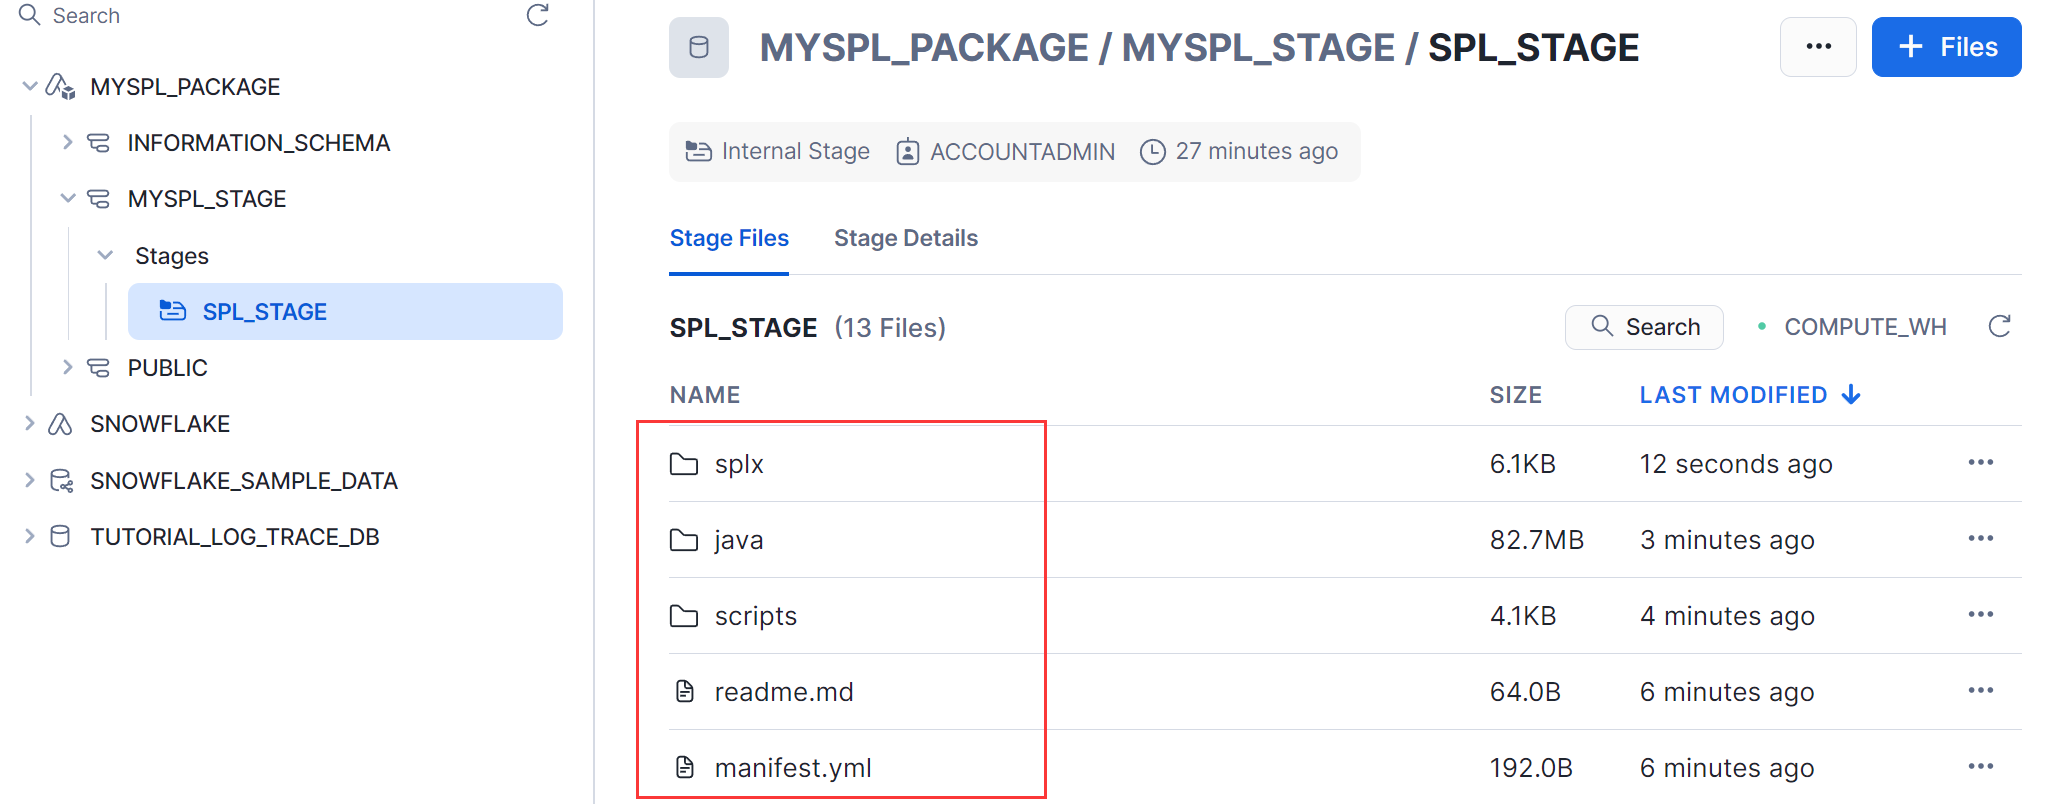
Upload the jars, test data files, test data files, scripts, and other resources to stage: @ myspl_package.myspl_stage.spl_stage under the snowsql tool (refer to the appendix).
PUT file://D:/splShell/manifest.yml @myspl_package.myspl_stage.spl_stage overwrite=true auto_compress=false;
PUT file://D:/splShell/readme.md @myspl_package.myspl_stage.spl_stage overwrite=true auto_compress=false;
PUT file://D:/splShell/java/*.jar @myspl_package.myspl_stage.spl_stage/java overwrite=true auto_compress=false;
PUT file://D:/splShell/scripts/setupspl.sql @myspl_package.myspl_stage.spl_stage /scripts overwrite=true auto_compress=false;
The scripts and data used for testing.
PUT file://D:/splShell/splx/vmTable.splx @myspl_package.myspl_stage.spl_stage/splx overwrite=true auto_compress=false;
PUT file:// D:/splShell/splx/query.runUDF @myspl_package.myspl_stage.spl_stage/splx overwrite=true auto_compress=false;
PUT file:// D:/splShell/splx/car_sales.json @myspl_package.myspl_stage.spl_stage/splx overwrite=true auto_compress=false;
2.5 Generate App
The defined SPL interface generates App through application packages.DROP APPLICATION myspl_app; (If myspl_app exists, execute this statement; otherwise skip)
CREATE APPLICATION myspl_app
FROM APPLICATION PACKAGE myspl_package
USING '@myspl_package.myspl_stage.spl_stage';
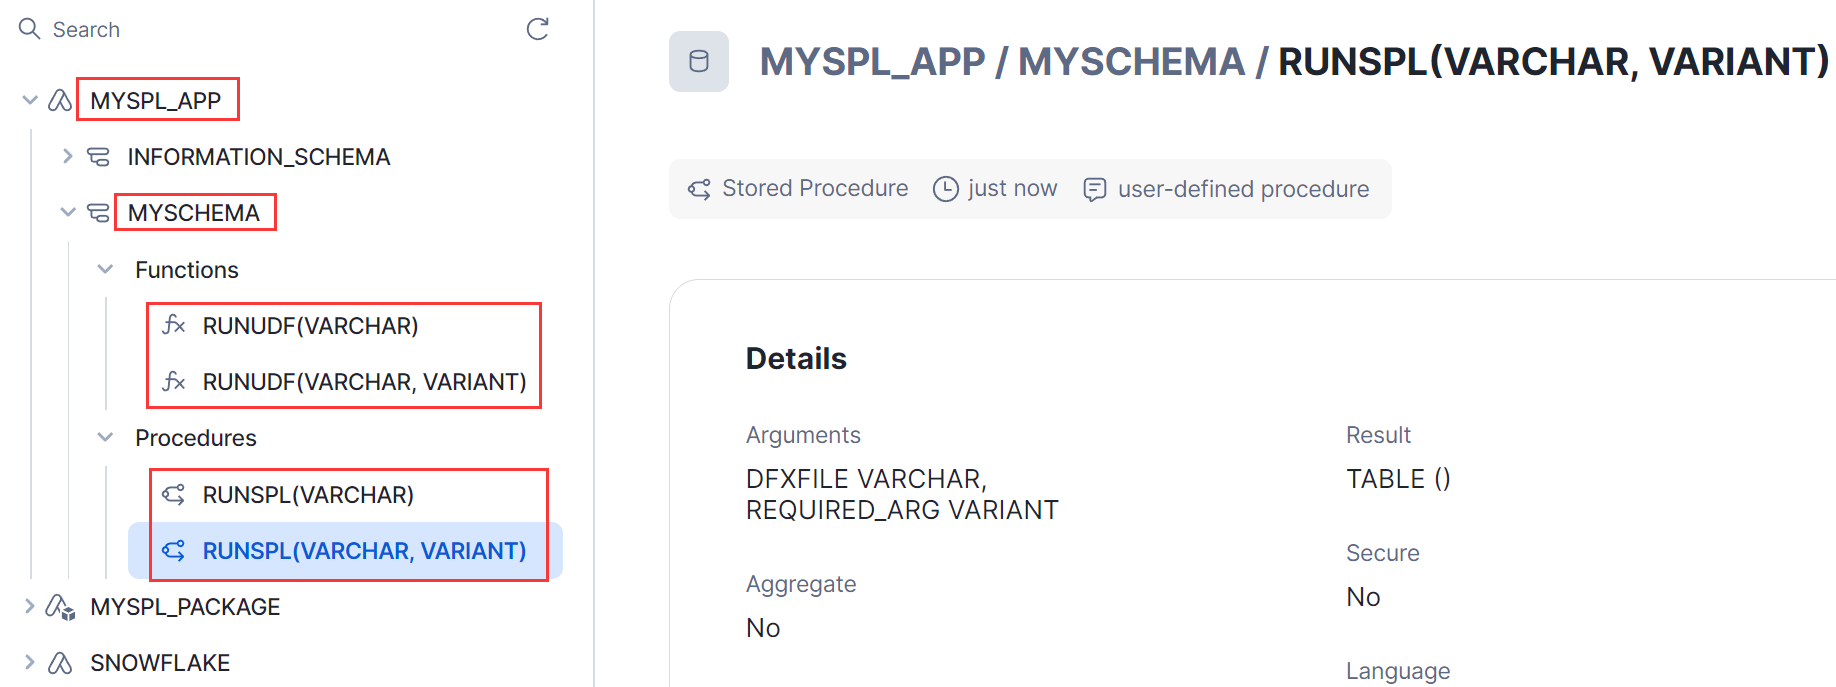
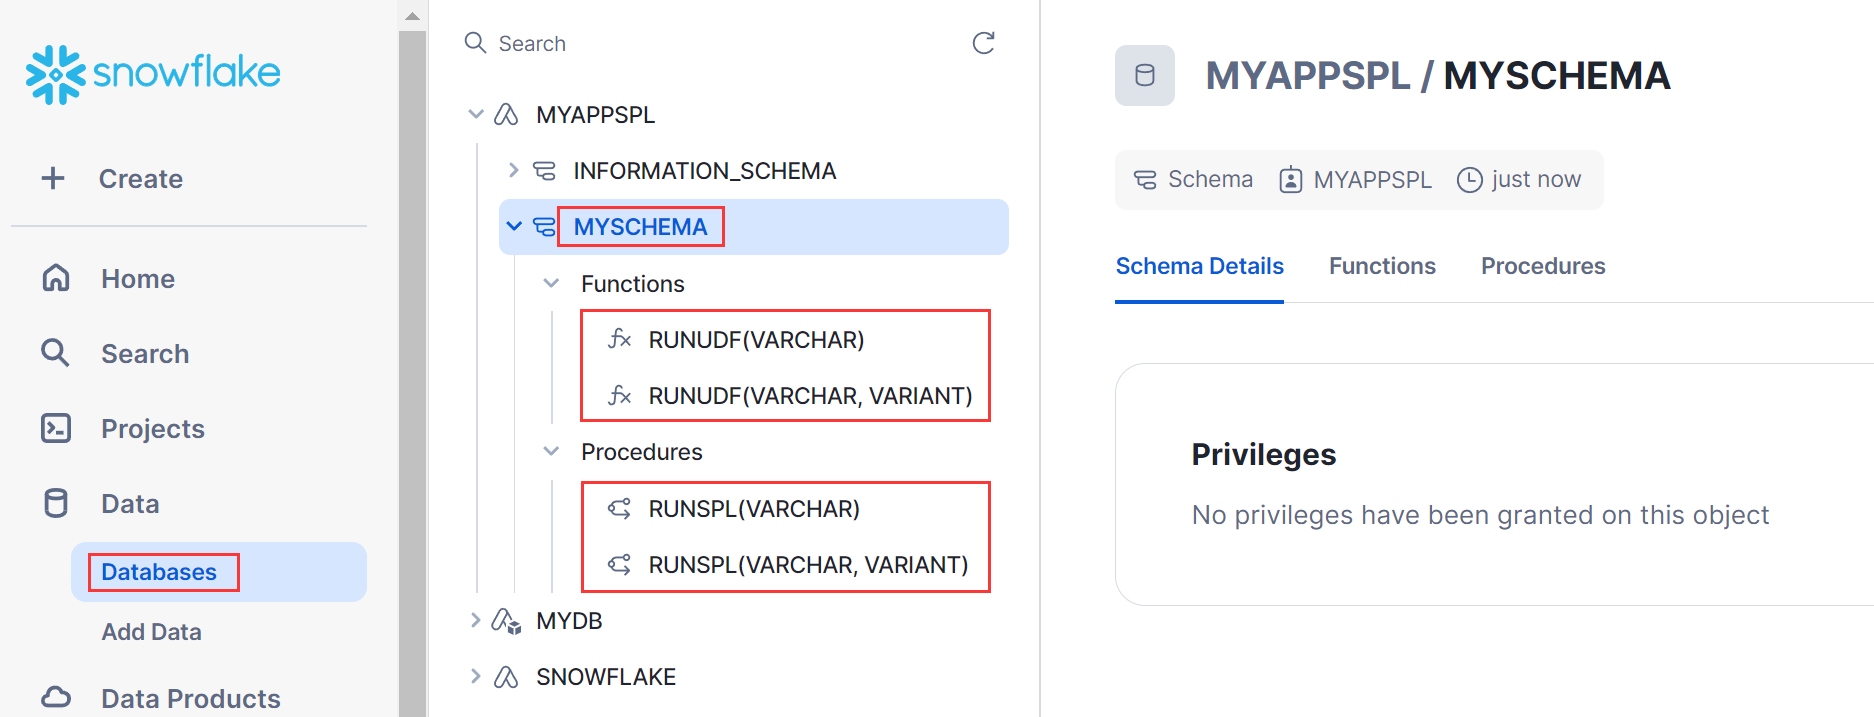
Call the script 'setupspl.sql' when running, if there is an exception during execution, an error message will be displayed. Please correct the error and execute again; After successful execution, you can see the SPL interface runSPL and runUDF under databases->myspl_app->myschema.
2.6 Authorize App
Authorize the required data tables and files to the App before testing, so that the SPL interface can access them normally.GRANT USAGE ON DATABASE myspl_package to APPLICATION myspl_app;
GRANT USAGE ON SCHEMA myspl_stage to APPLICATION myspl_app;
GRANT READ,WRITE ON STAGE myspl_stage.spl_stage to APPLICATION myspl_app;
GRANT USAGE ON SCHEMA public to APPLICATION myspl_app;
GRANT SELECT ON TABLE public.accounts TO APPLICATION myspl_app;
2.7 Test the interface simply
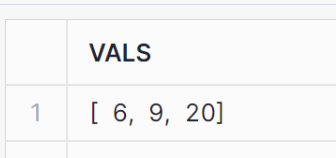
Test whether SPL interface calls can run normally. A. runUDF test: Call in SQL statements as a function.
select myspl_app.myschema.runUDF('=?.(~.array().sum())',[[1,2,3],[2,3,4],[5,6,9]]) as vals;
B. runSPL test: Call as a stored procedure.
call myspl_app.myschema.runSPL('@MYDB.PUBLIC.MYSTAGE/vmTable.splx');
During the development phase, if the SPL interface fails to be called on the cloud platform, there will be no specific exception reason or Java program log output in the return log, making it difficult to track. Snowflake provides an event table mechanism to record the output logs during execution (refer to the appendix).
3. Generate App Installation Package
The installation package for esProc App is published in Snowflake MarketPlace and can be downloaded, installed, and used by users. When creating the installation package, the app release version number is required.3.1 Generate release version number
ALTER APPLICATION PACKAGE myspl_package ADD VERSION v1_0 USING '@myspl_package.myspl_stage.spl_stage';ALTER APPLICATION PACKAGE myspl_package SET DEFAULT RELEASE DIRECTIVE
VERSION = v1_0
PATCH = 0;
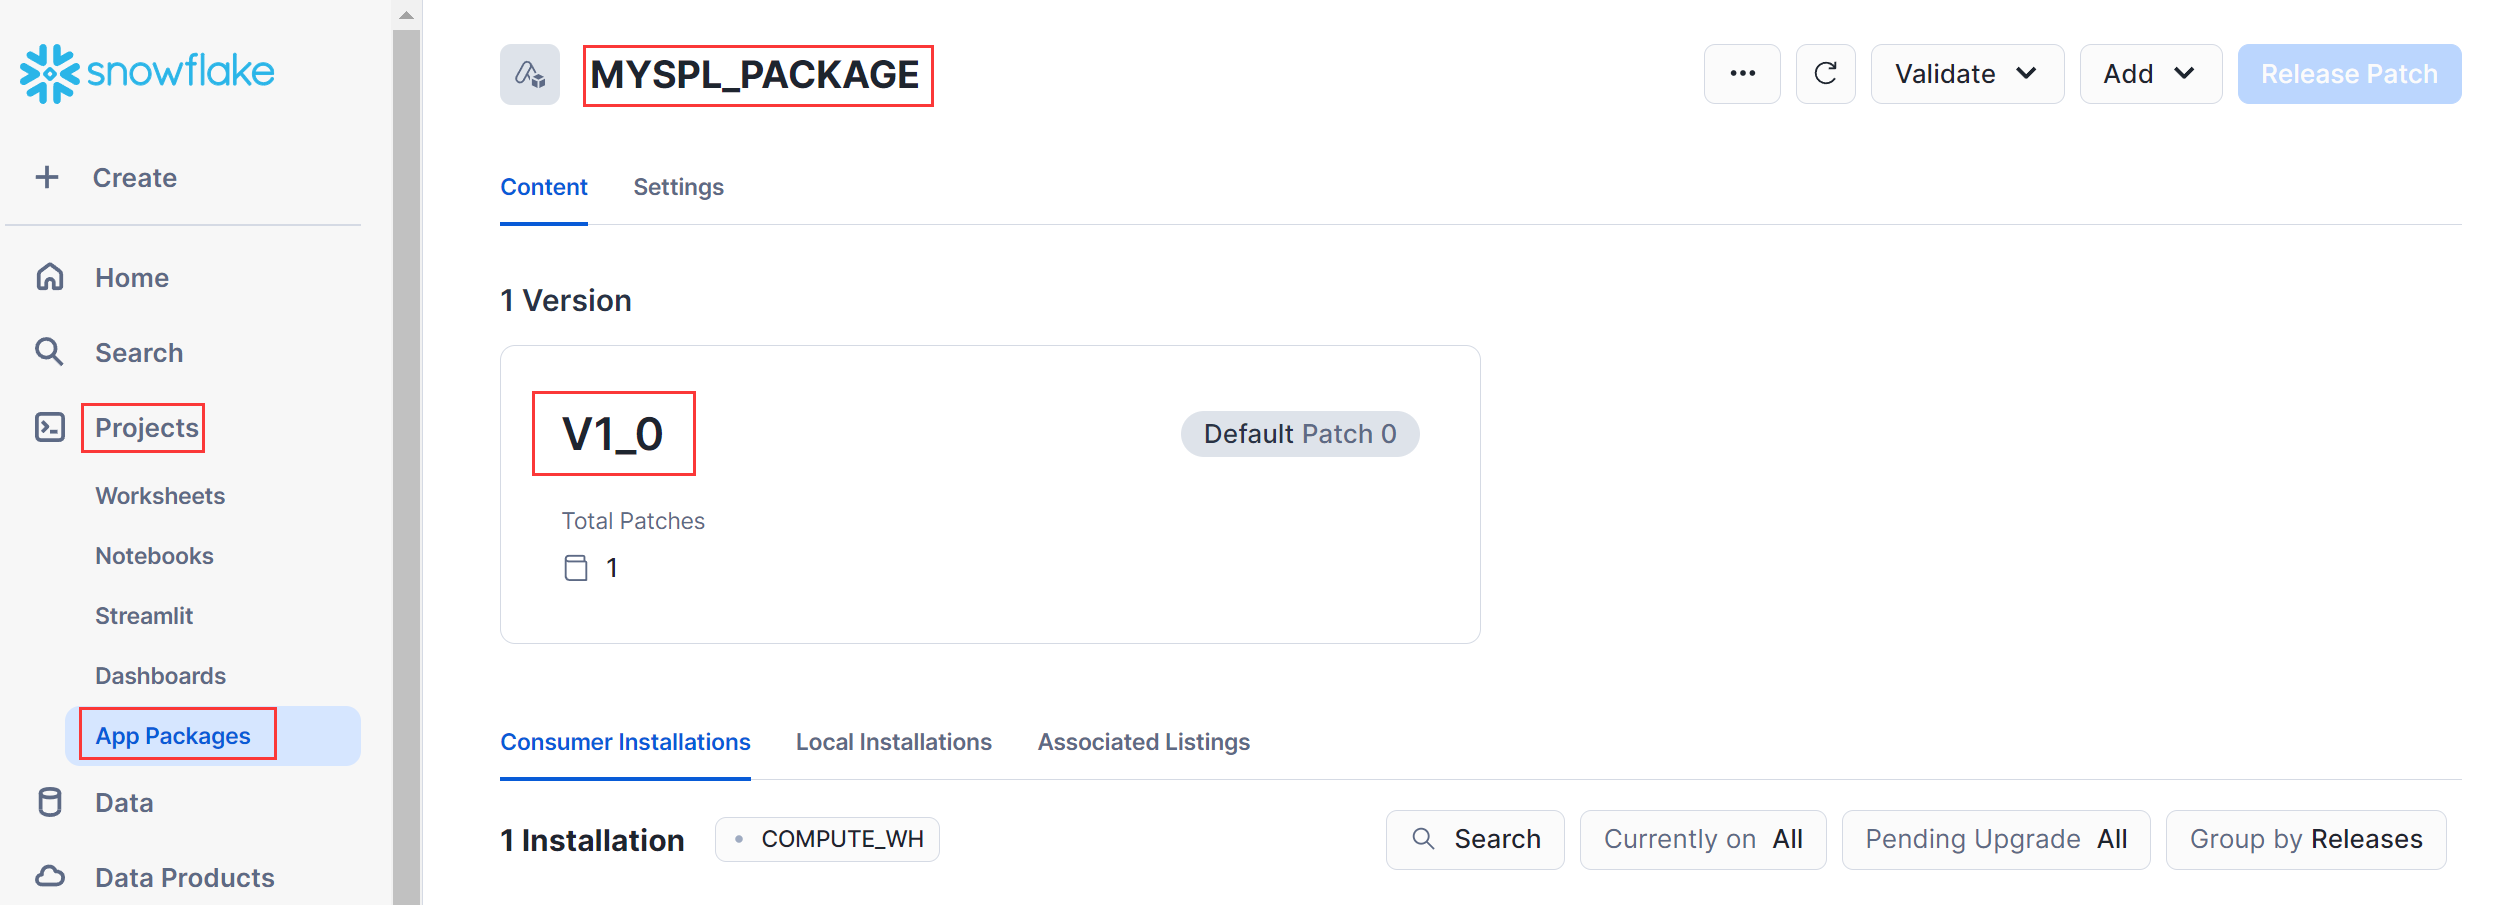
SHOW RELEASE DIRECTIVES IN APPLICATION PACKAGE myspl_package;
You can also view the application package release version number in Projects ->App Packages:
3.2 Generate installation package
Generate SPL App installation package under Data Products ->Provider Studio ->Listings.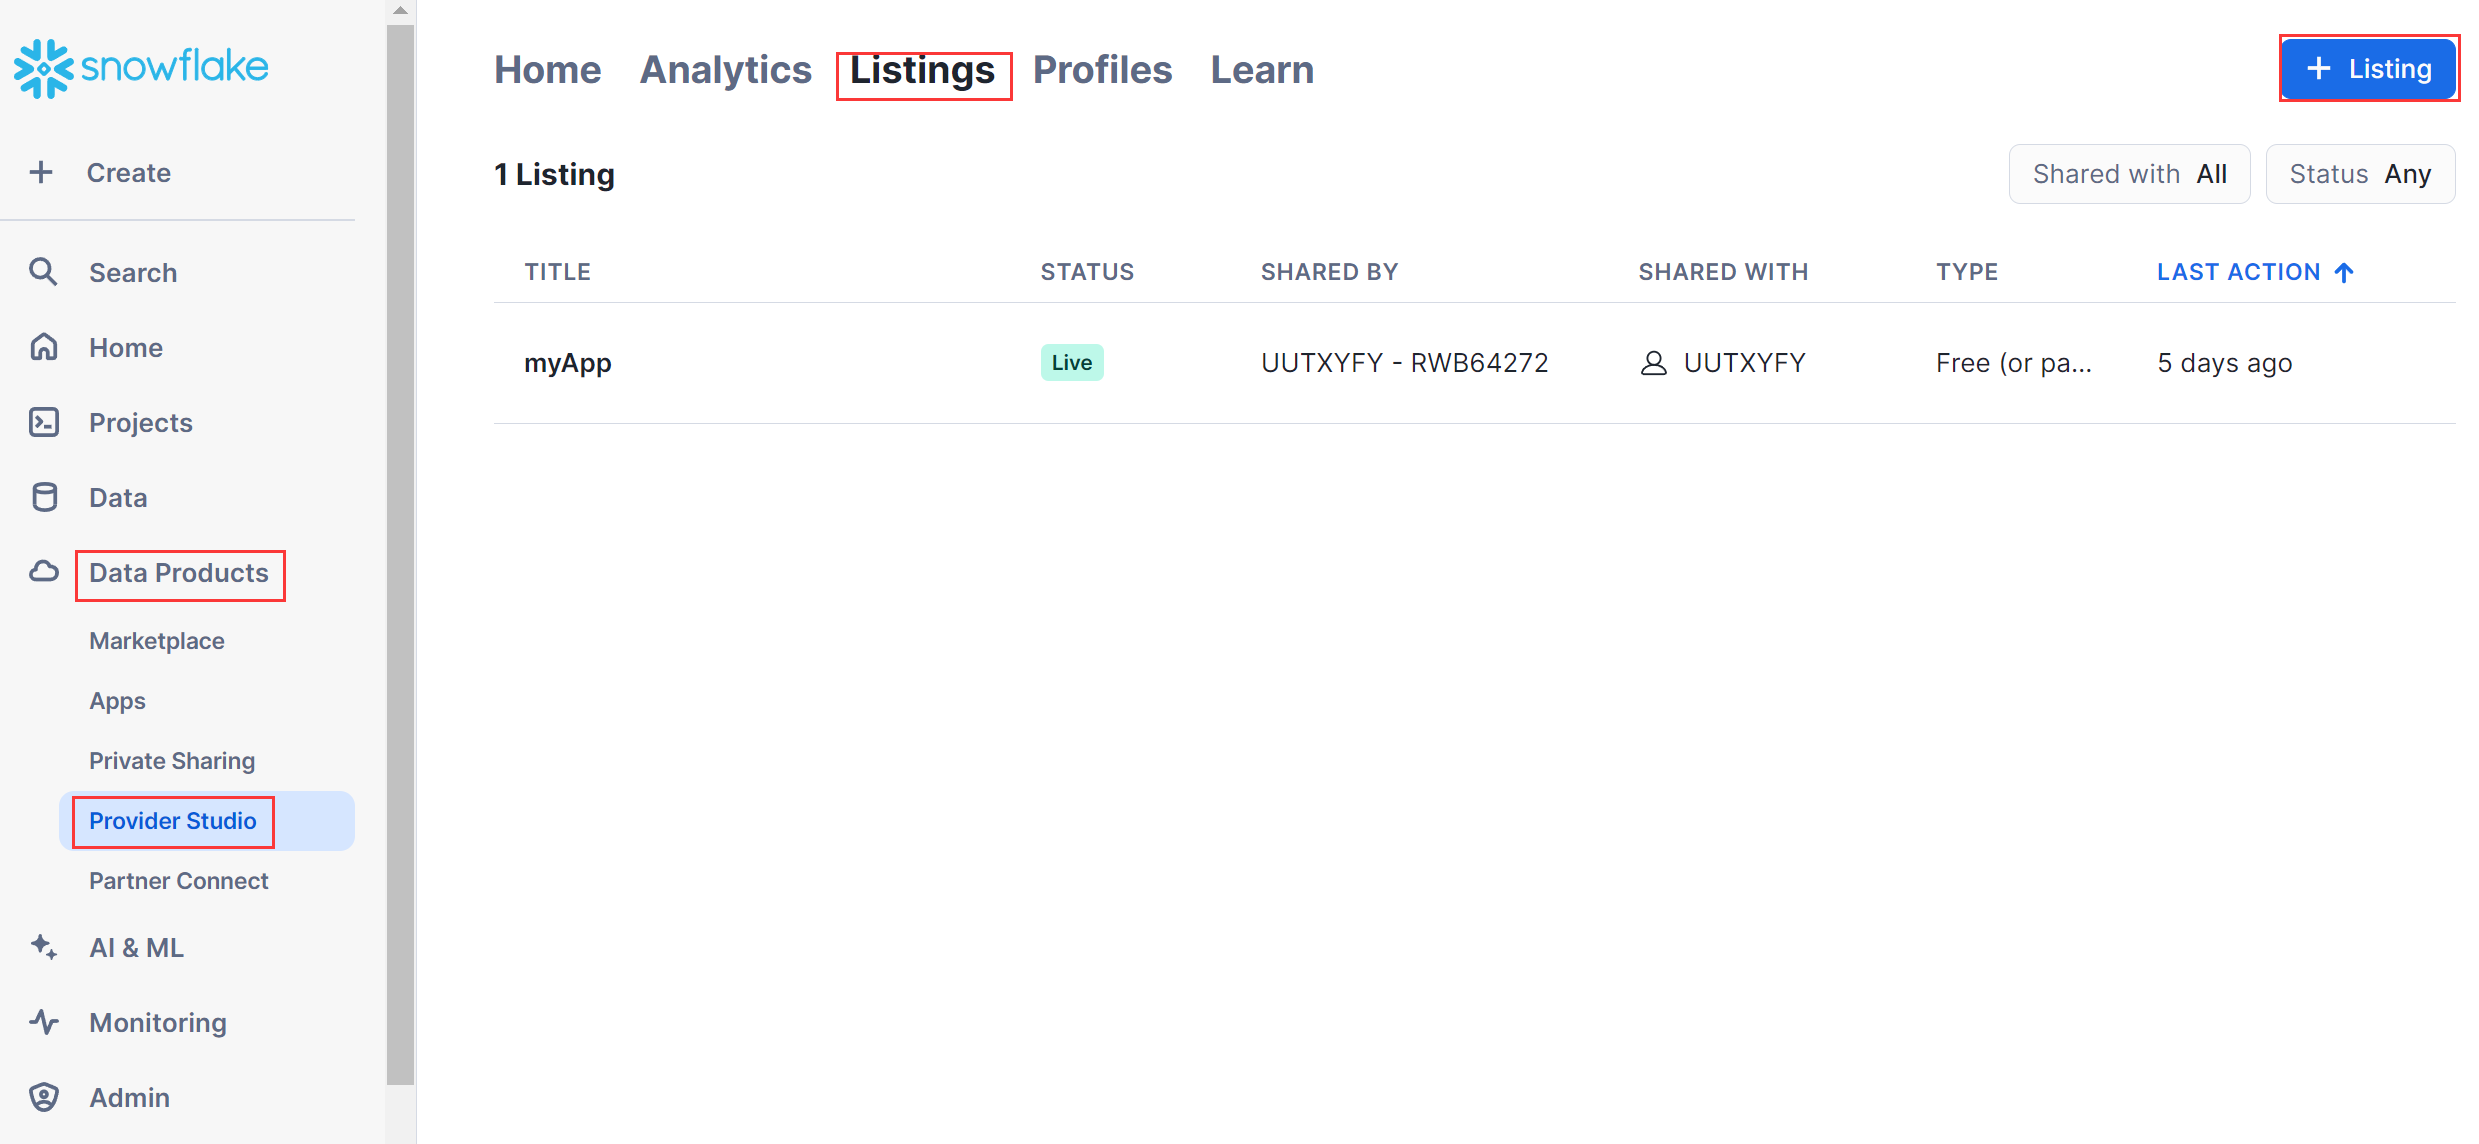
Fill in App Name: myAppSpl
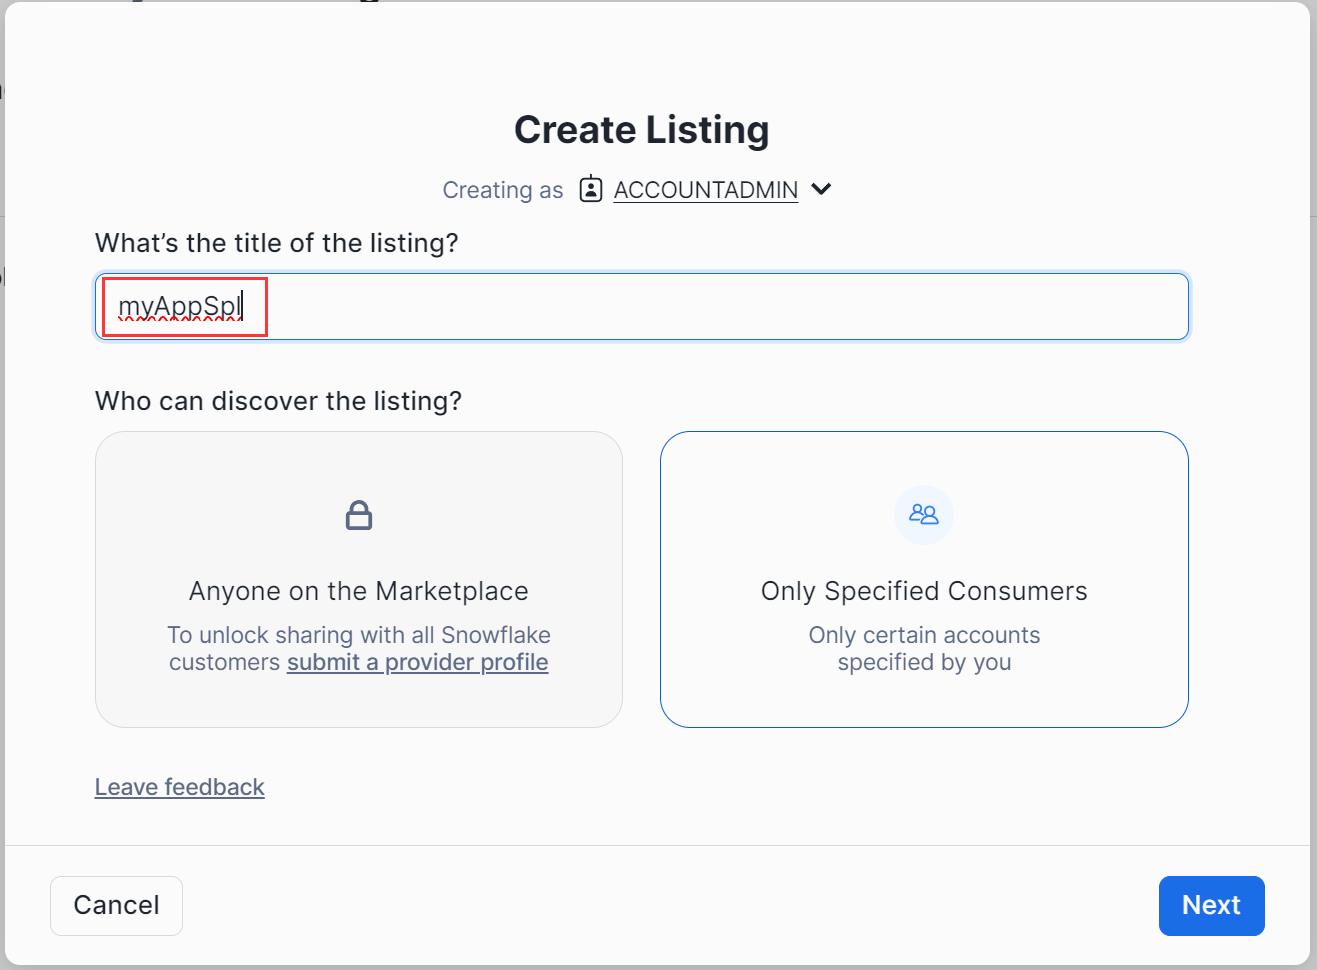
As it is an internal testing, select the option 'Only Specified Consumers'
Choose package:myspl_package
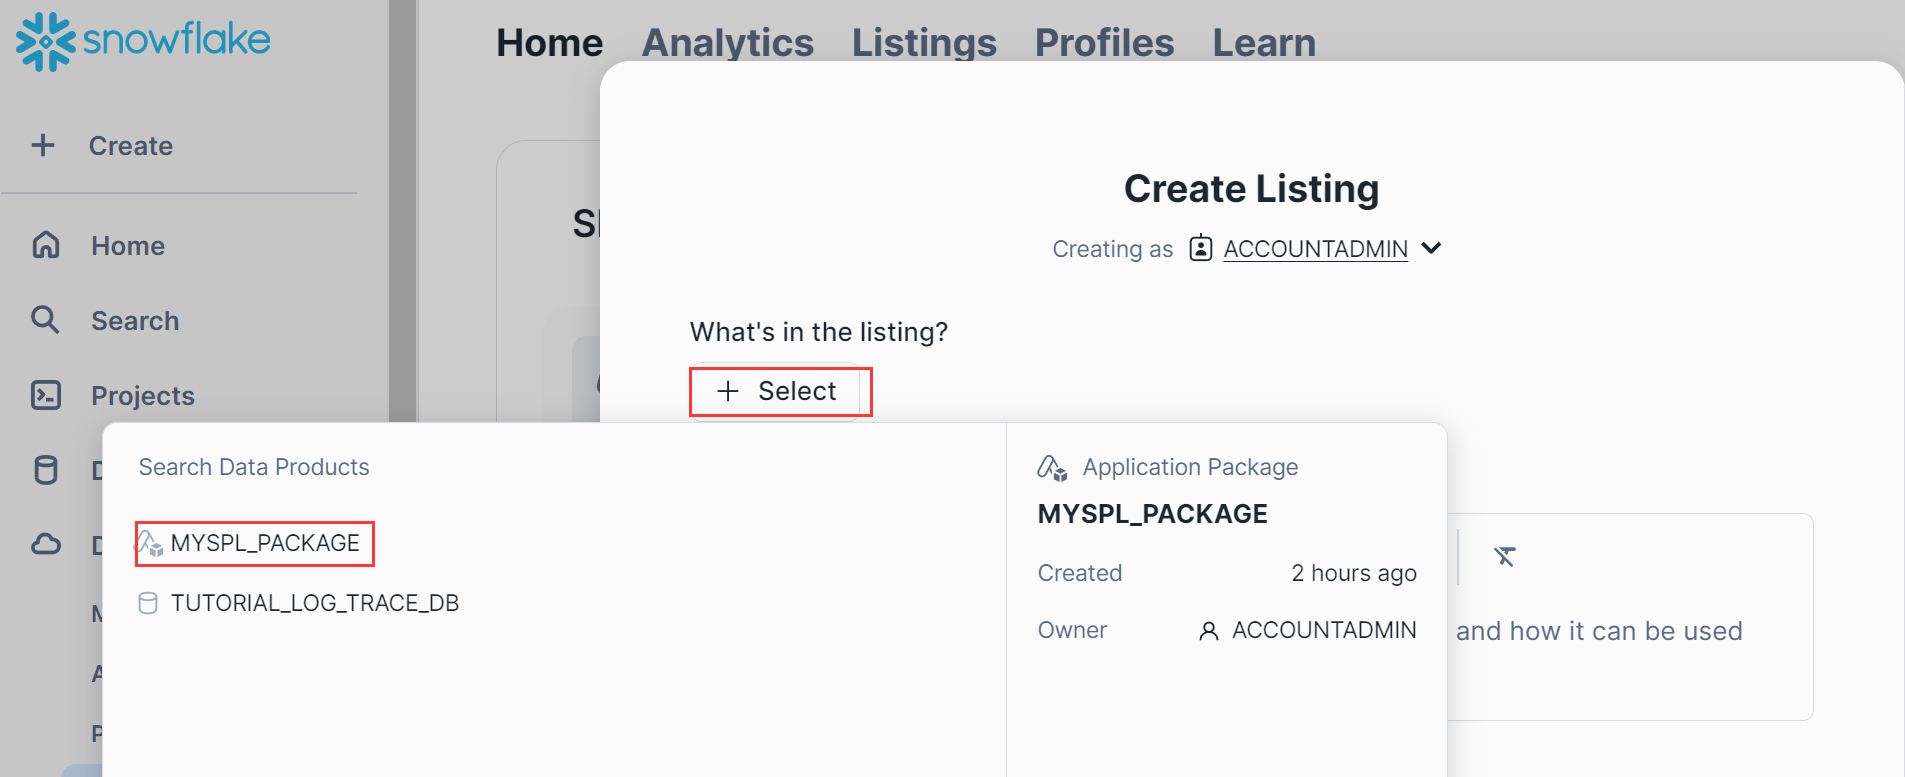
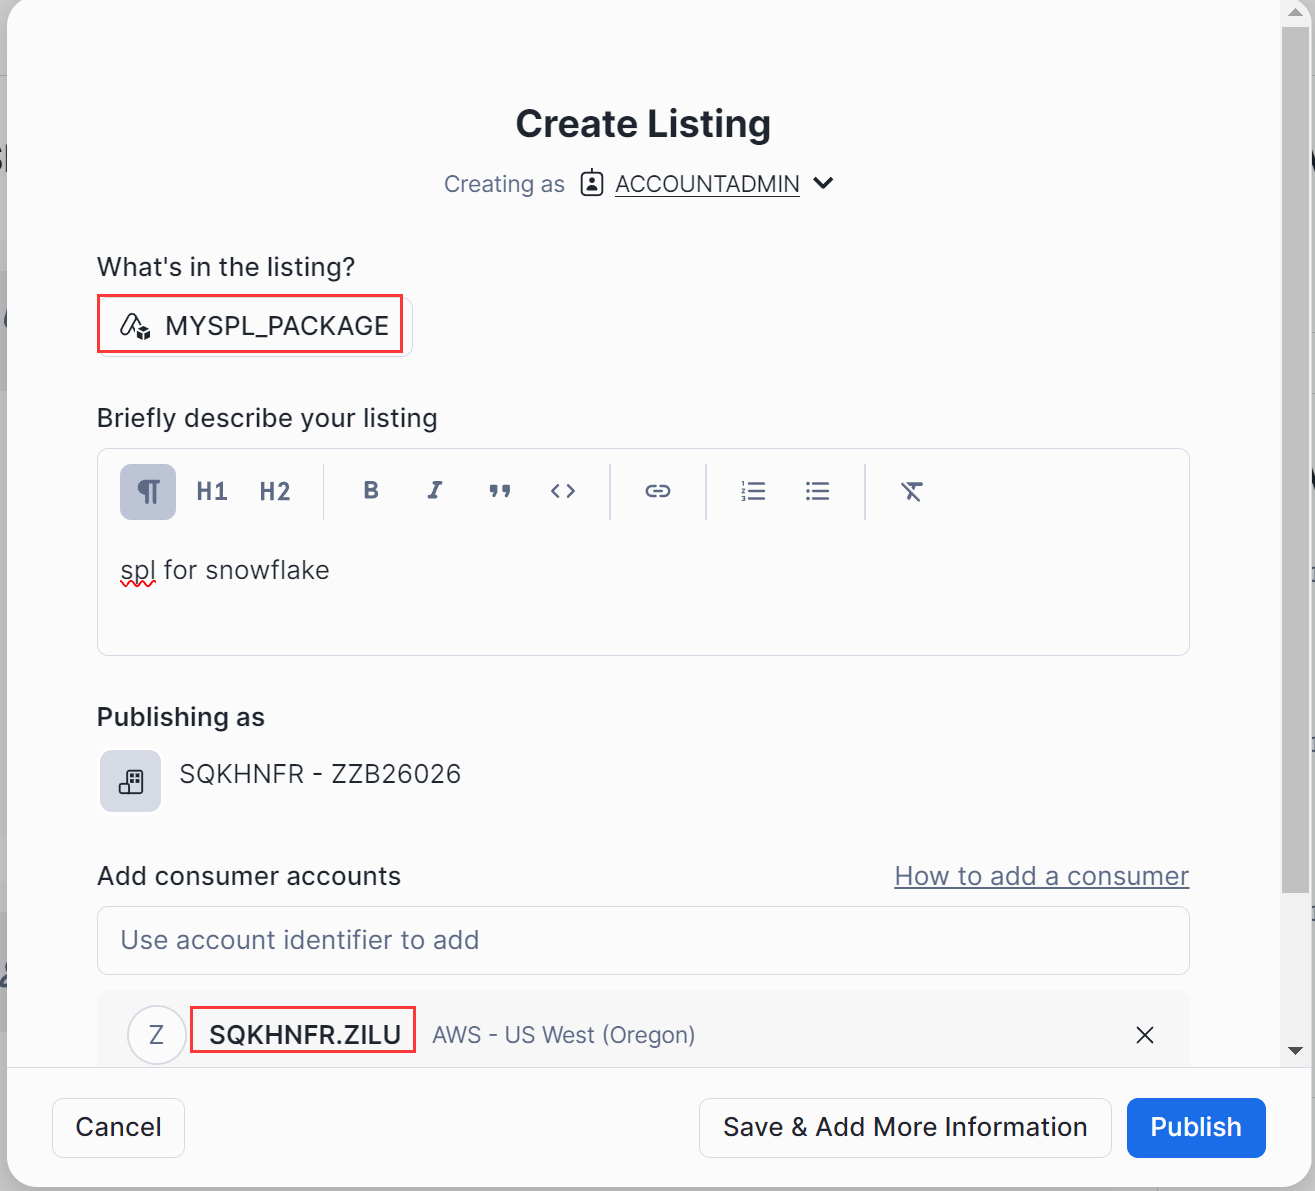
After filling in the consumer account, click "publish" to return to the list of published packages as follows:

3.3 Maintain the release package
If there are changes to the Java program or the setupspl.sql script, the following steps need to be taken:1. If there are changes to the Java program, it is necessary to update the spl-java-func.jar.
2. If the dependency jars changes, it is necessary to modify the dependency library of the interface defined by setupspl.sql.
3. Upload the change files (jar, setupspl.sql, etc.) to the corresponding directory in the stage.
4. Regenerate the app:
DROP APPLICATION myspl_app;
CREATE APPLICATION myspl_app;
FROM APPLICATION PACKAGE myspl_package
USING '@myspl_package.myspl_stage.spl_stage';
5. Regarding the feedback on step 4, analyze the feedback logs and make modifications. Test the SPL interface until the issue is solved. (If there are no issues, you can skip this step)
6. Before regenerating the App installation package, it is necessary to change the version number, otherwise the regenerated installation package will still be the same as before instead of after the change.
ALTER APPLICATION PACKAGE myspl_package DROP VERSION v2_0;
ALTER APPLICATION PACKAGE myspl_package
ADD VERSION v2_0 USING '@myspl_package.myspl_stage.spl_stage';
ALTER APPLICATION PACKAGE myspl_package SET DEFAULT RELEASE DIRECTIVE
VERSION = v2_0
PATCH = 0;
7. Refer to section 3.2 to regenerate the app installation package.
Administrators use snowsql or SQL worksheet to generate application packages, upload the required jar files, scripts, files, and other resources for defining interfaces, and test the SPL interface to generate App installation packages.
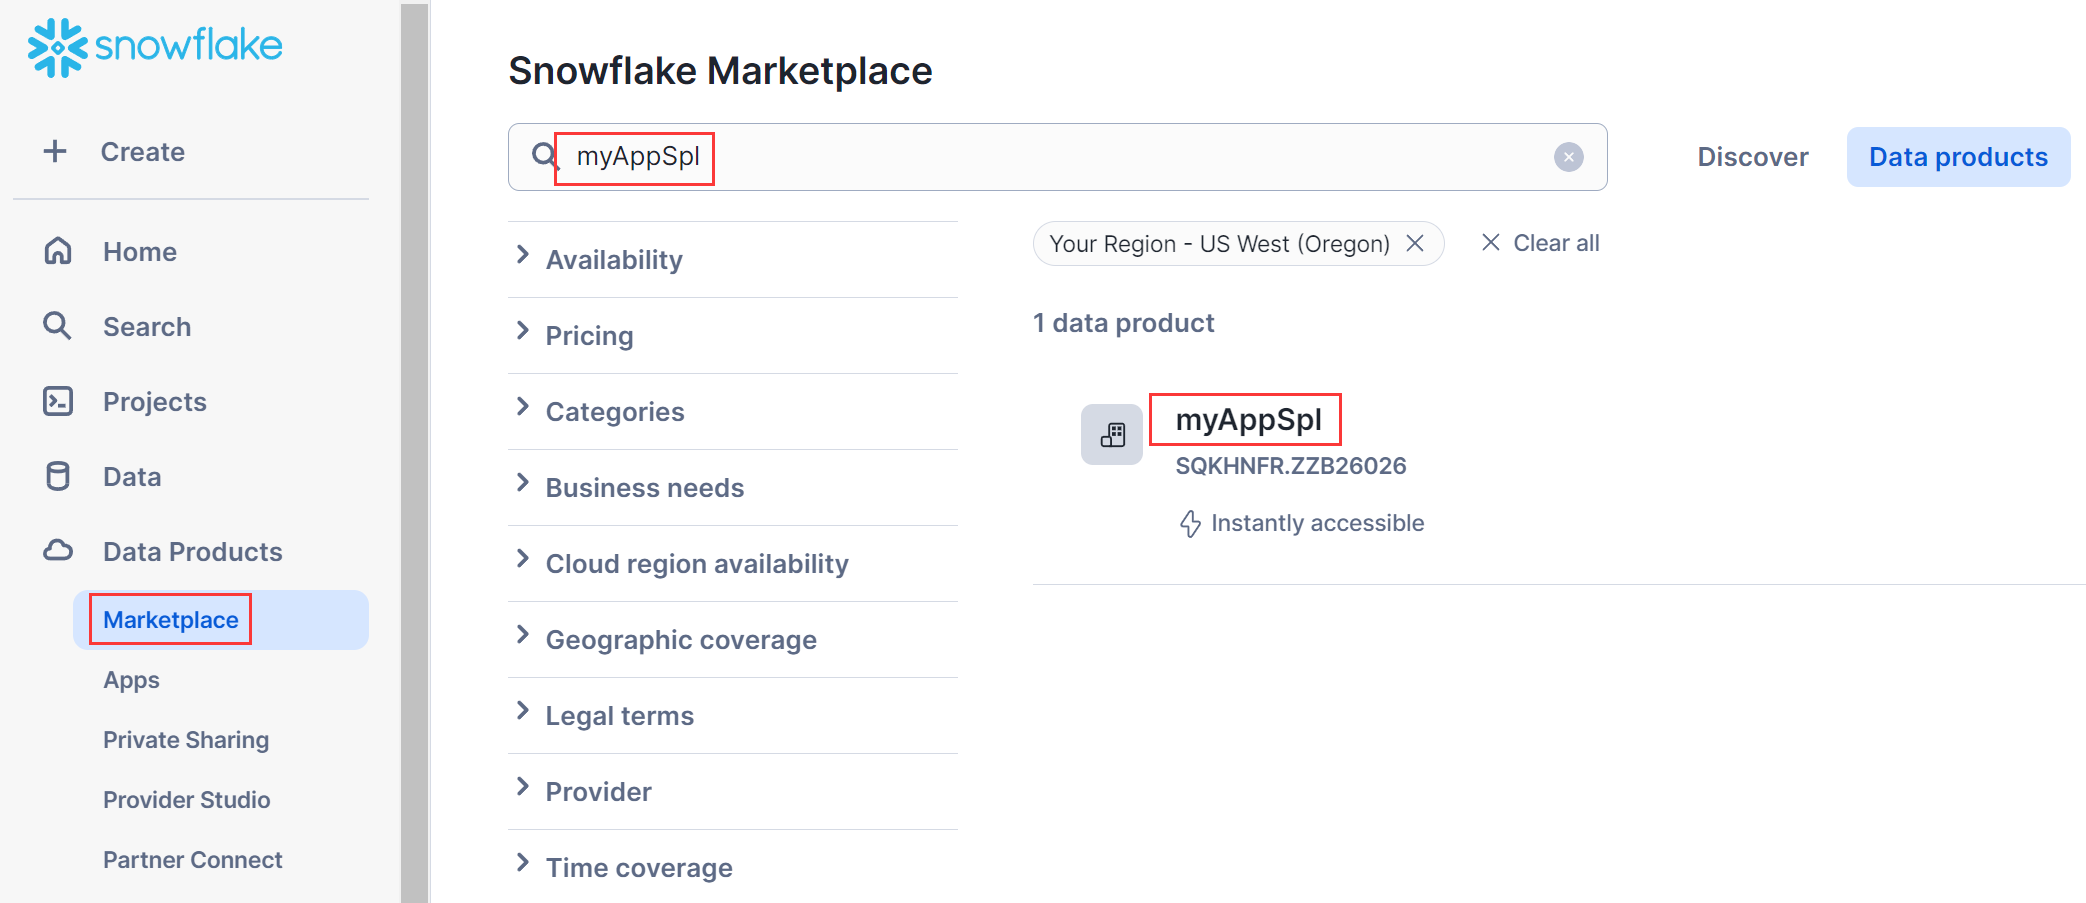
4.Install App
If you want to quickly use the SPL interface, you can install the myAppSpl package, authorize table data and stages to the application myAppSpl where the SPL interface is located, and then call the SPL interface. Let's take the example of a consumer account logging into the Snowflake cloud platform with the role of accountAdmin .On the Data Products ->Marketplace page, find the installation package myAppSpl

Alternatively, you can directly view myAppSpl under the 'Apps' navigation bar
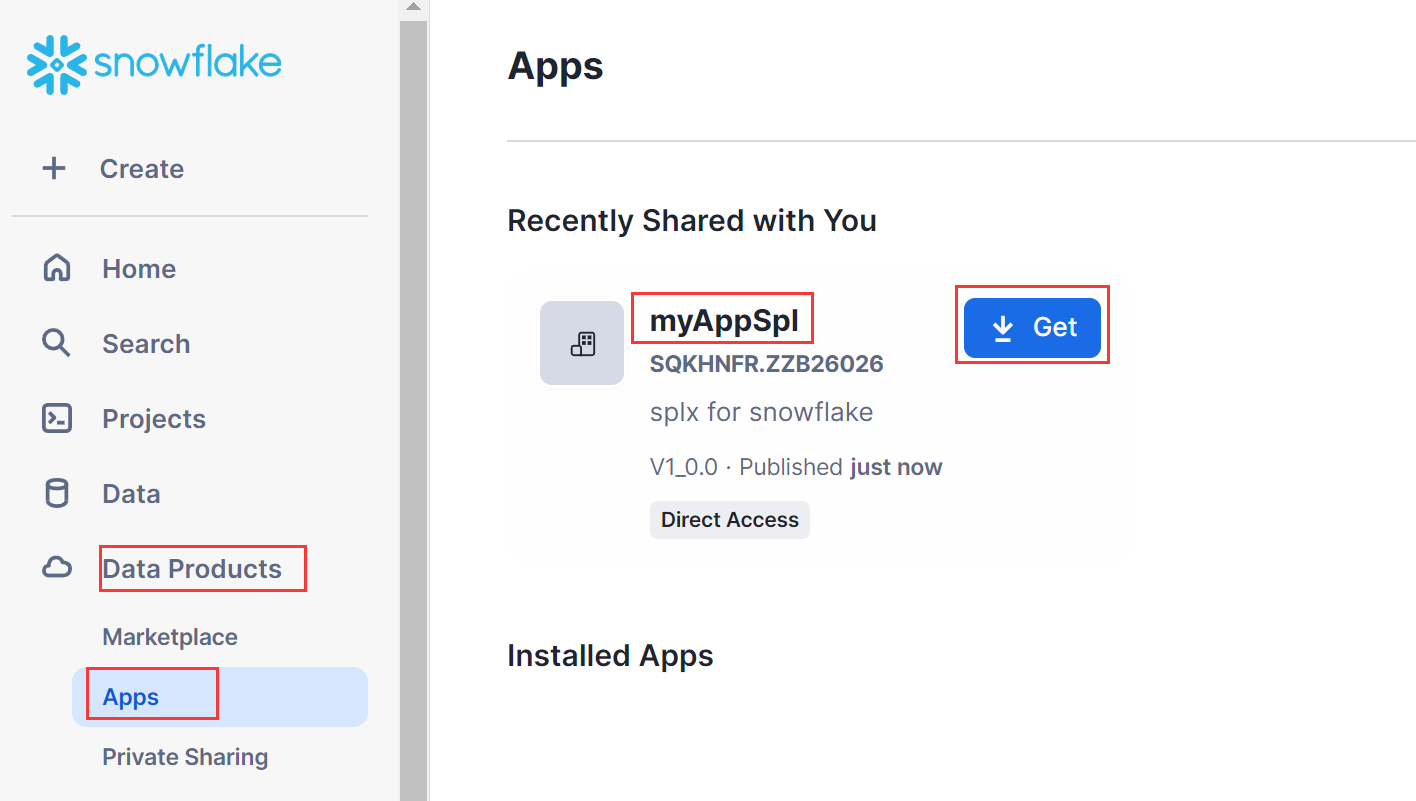
Click the 'Get' button to install.

Select SPL_DEMO in the warehouse option and click "Get". After installation is complete, return to the list of installed apps:

You can see the function: runUDF and procedure: runSPL interfaces in Data ->Databases ->myAppSpl ->myschema.
5. Create database
Although the myAppSpl application includes SPL interfaces runUDF and runSPL, its library is in read-only mode and cannot store table data, scripts, files, and other resources. Accessing data requires other databases to provide it.
Using the example of creating a new database, data table, storing SPLX scripts, and data files to illustrate.
5.1 Create a New Database
Create a new database under Data ->Database;

Enter database name: mydb.

You can also run “create database mydb” under SQL WorkSheet;
By default, a schema named 'public' will be generated.
5.2 Create stage
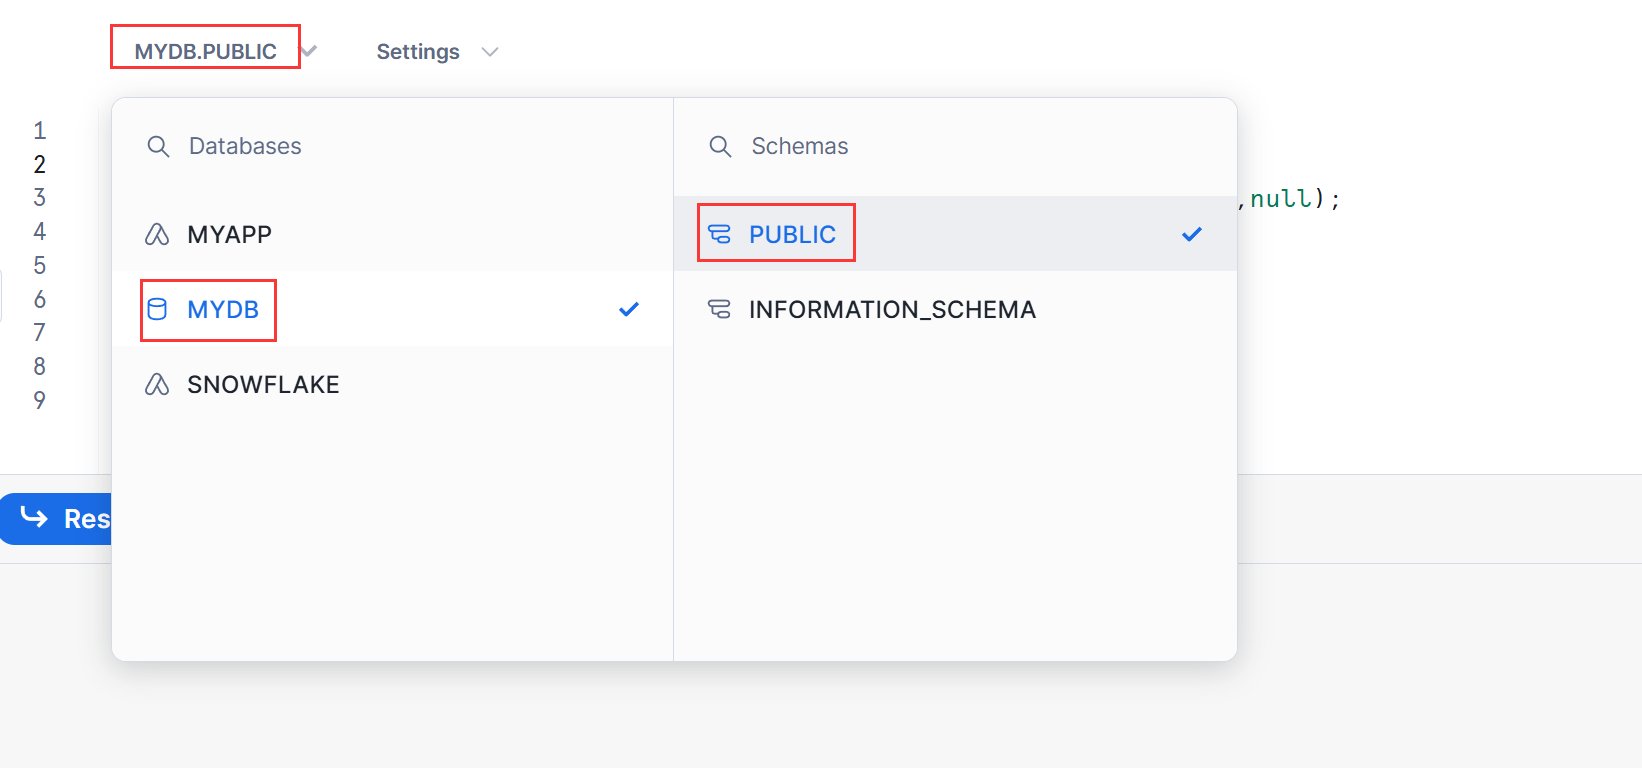
In the SQL WorkSheet, specify the current location mydb.public and proceed with the operation,
CREATE OR REPLACE STAGE mydb.public.mystage
FILE_FORMAT = (TYPE = 'csv' FIELD_DELIMITER = '|' SKIP_HEADER = 1);
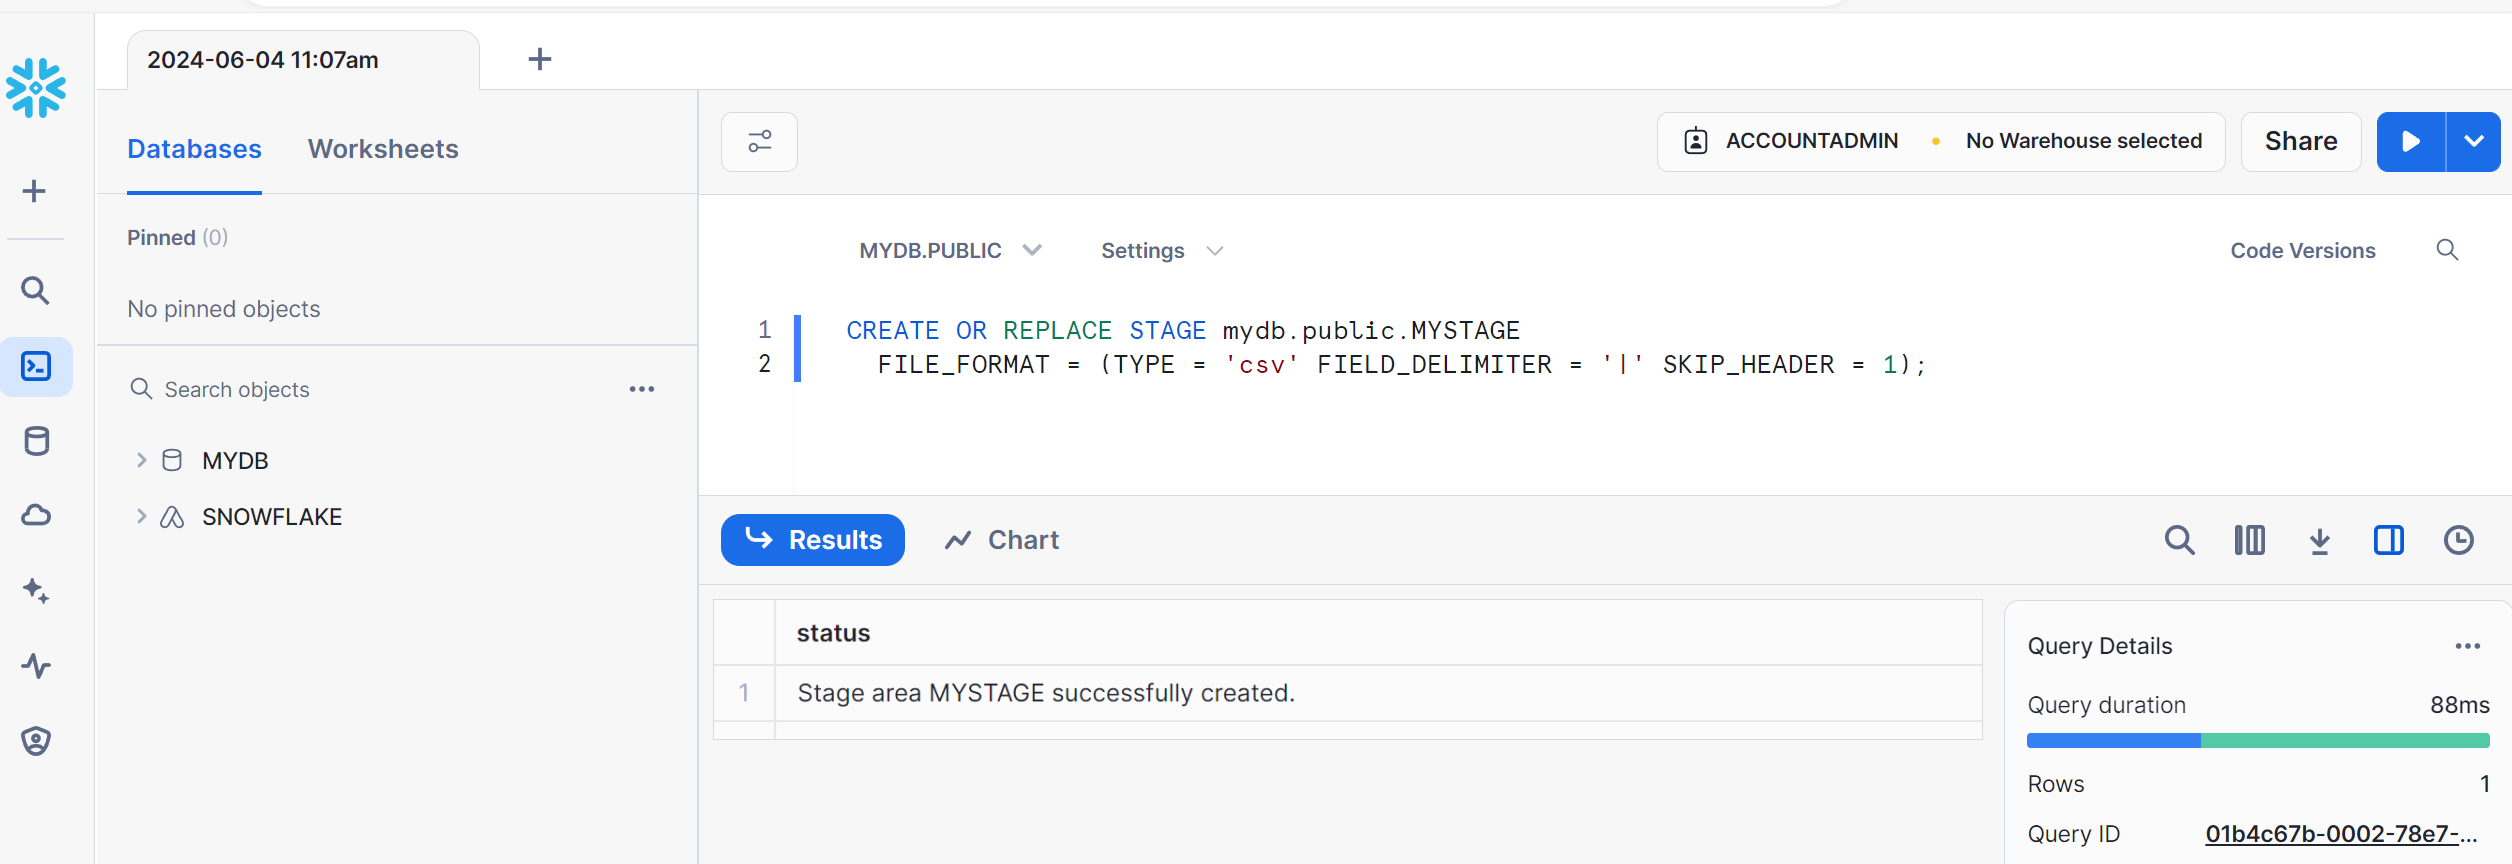
Choose a warehouse for mystage, such as SPL_DEMO.
5.3 Upload files
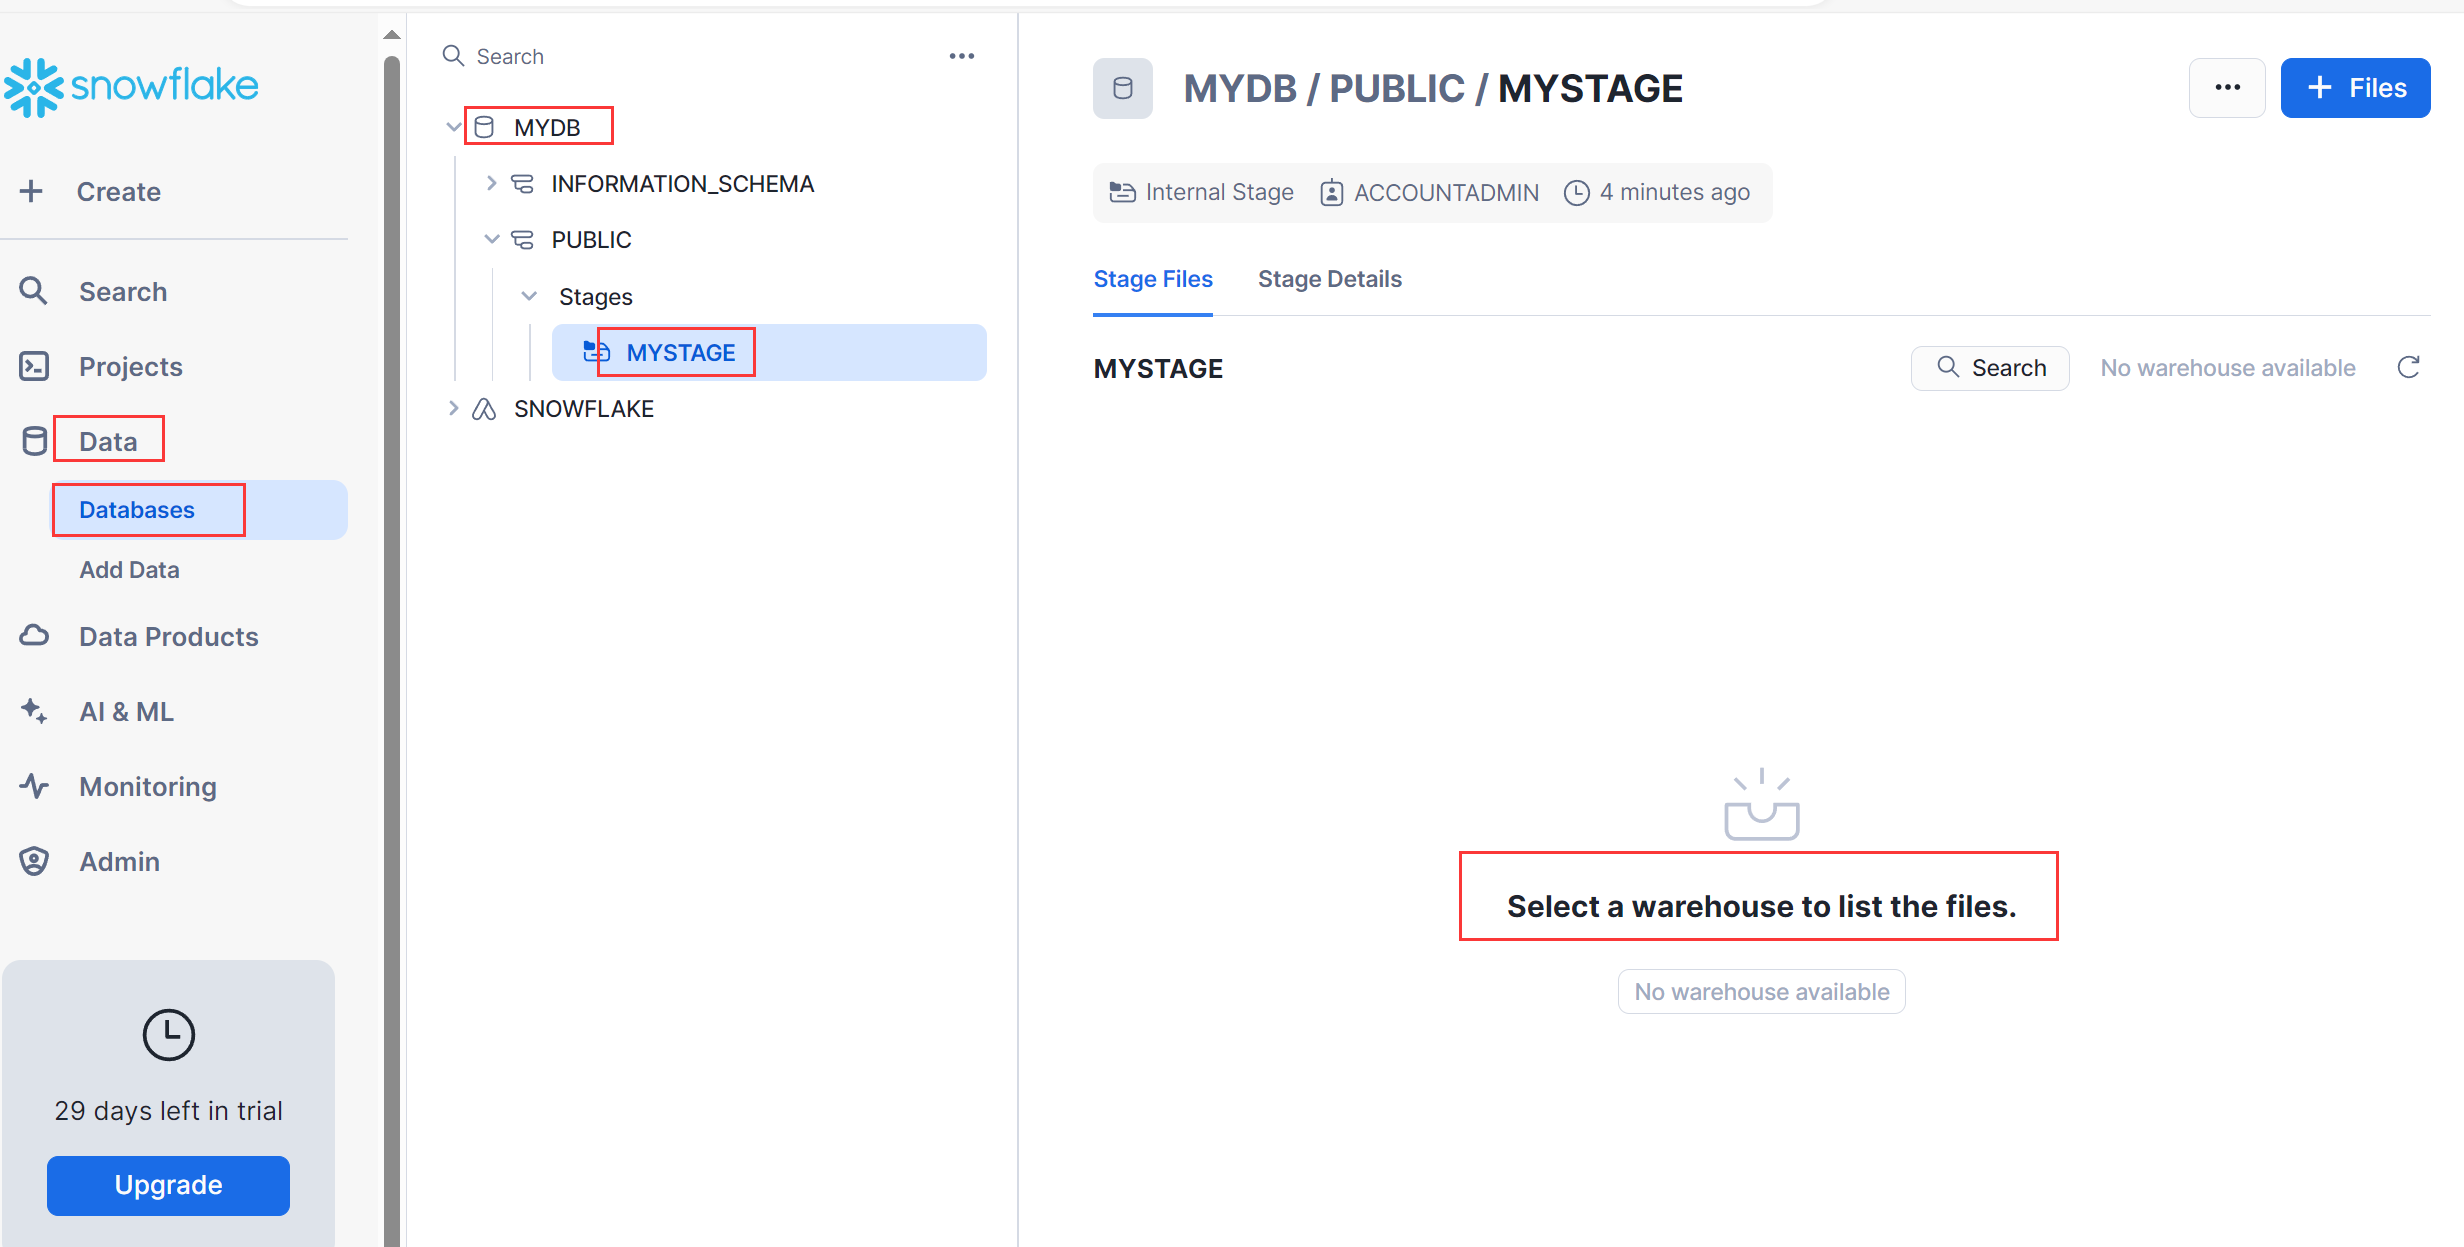
Save the uploaded files to mydb.public.mystage.
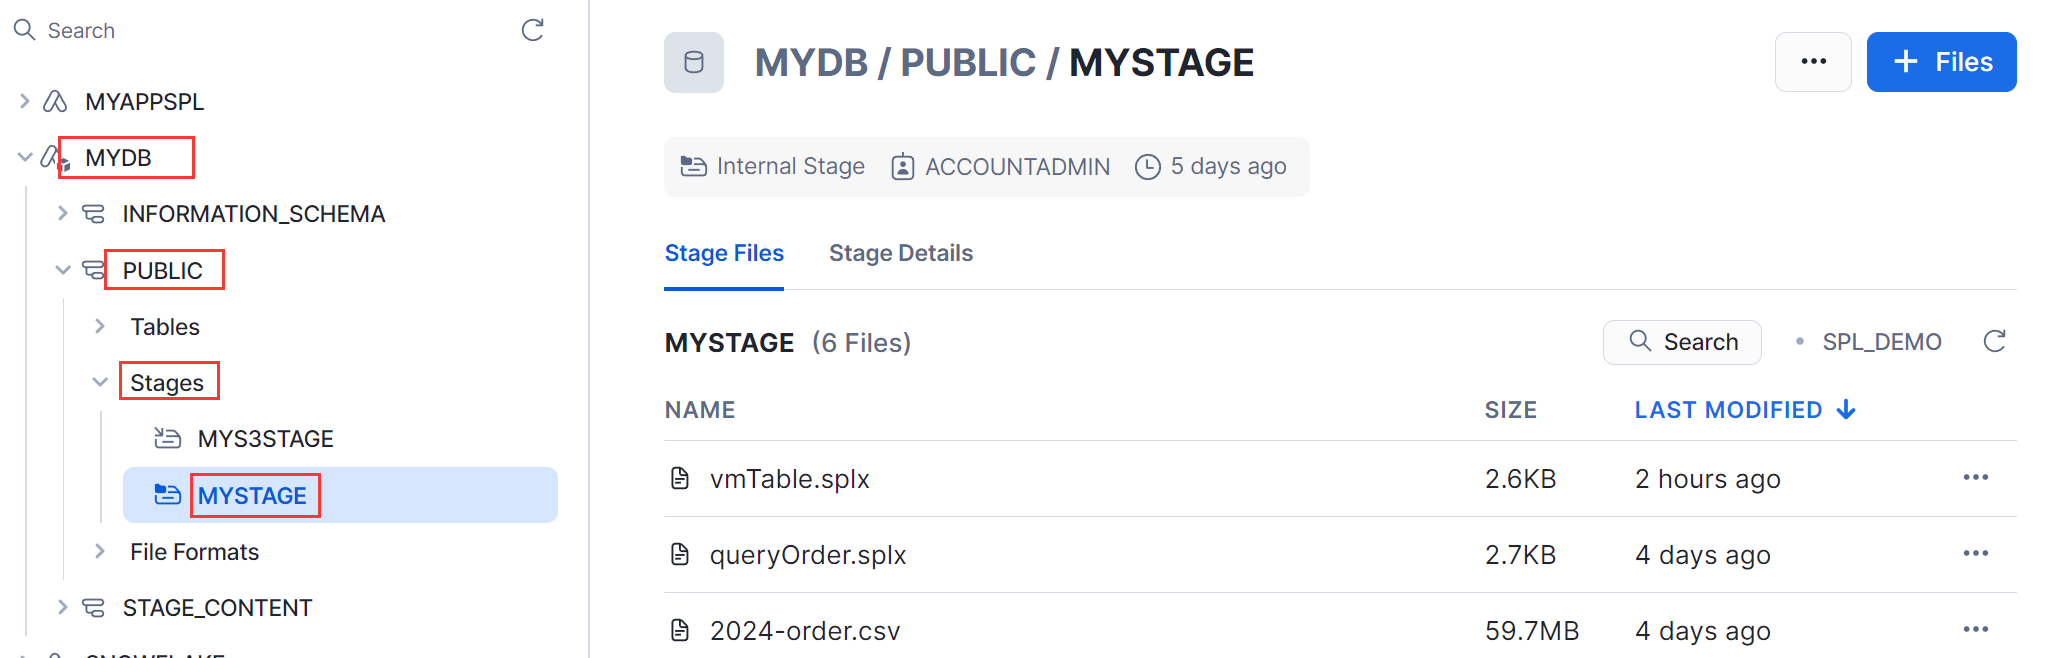
You can upload files through the Files button:
Upload the local script file vmTable.splx with the following content:
| A |
B |
|
| 1 |
=create(Athlete,Event,age) |
|
| 2 |
>A1.insert(0,70:age,"s1":Athlete,"Vault":Event) |
|
| 3 |
>A1.insert(0:2,70+#:age,"s2"+string(#):Athlete,"Floor":Event) |
|
| 4 |
return A1 |
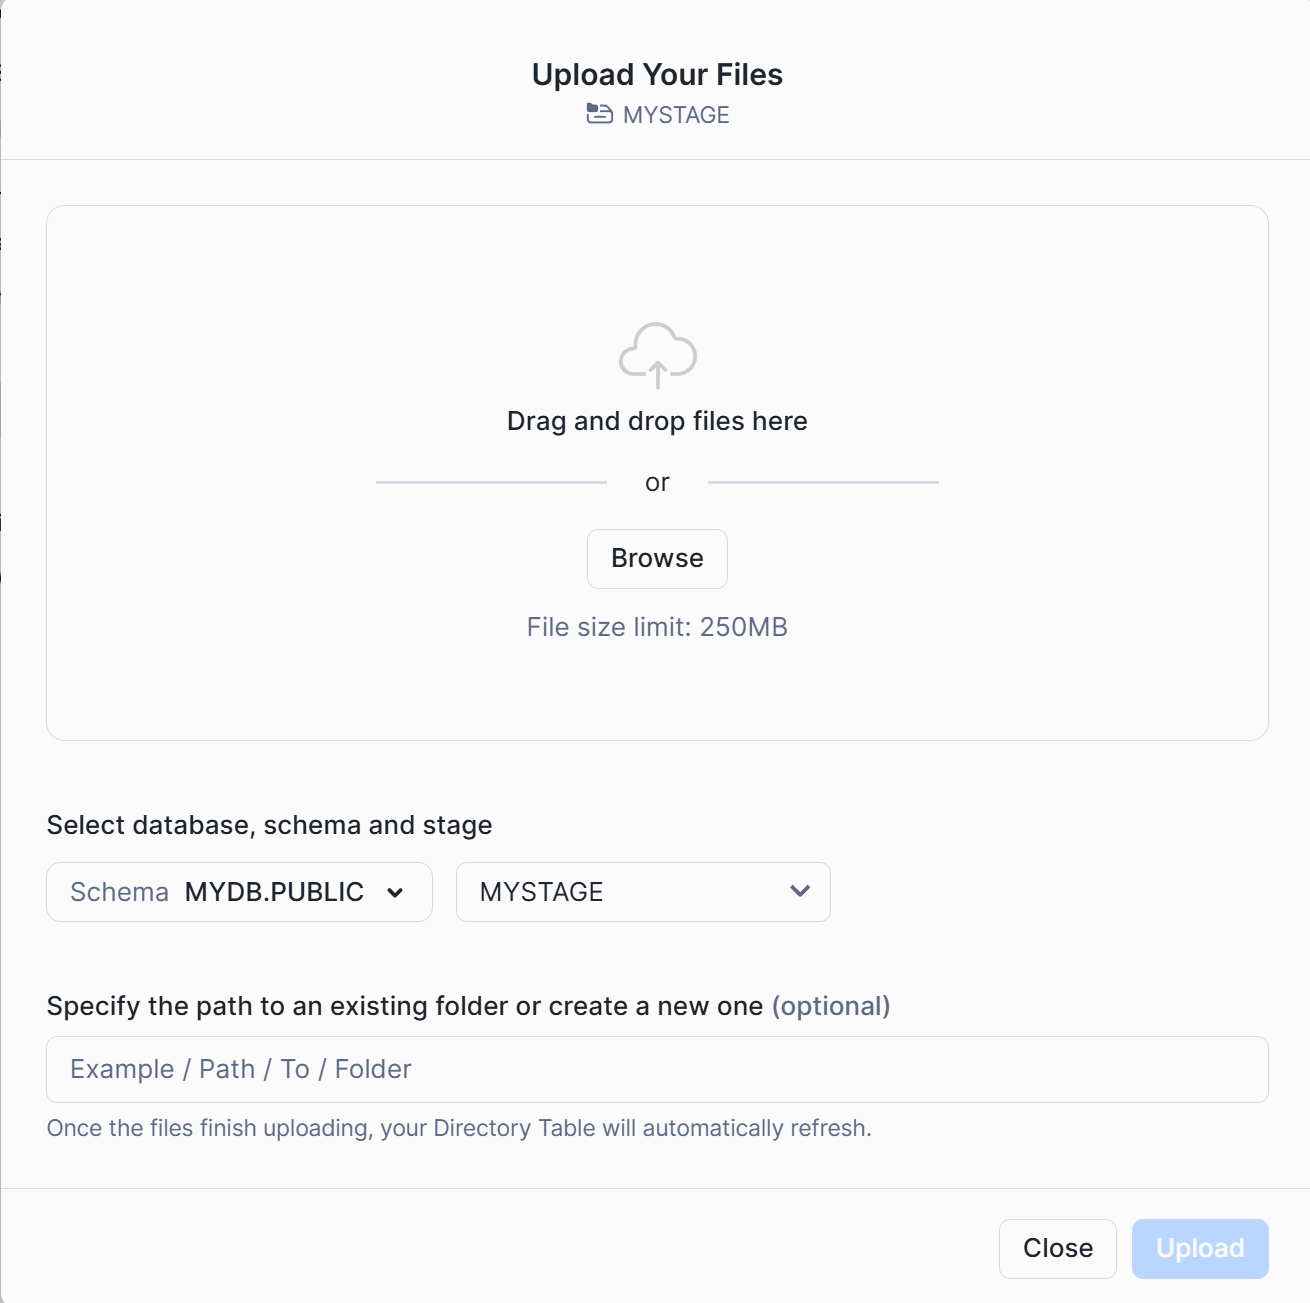
Drag and drop to the upload page, click the "upload" button to upload.
5.4 Create Table Data
use SCHEMA mydb.public;
CREATE OR REPLACE TABLE sample_product_data (id INT, parent_id INT, category_id INT, name VARCHAR, serial_number VARCHAR, key INT, "3rd" INT);
INSERT INTO sample_product_data VALUES
(1, 0, 5, 'Product 1', 'prod-1', 1, 10),
(2, 1, 5, 'Product 1A', 'prod-1-A', 1, 20),
(3, 1, 5, 'Product 1B', 'prod-1-B', 1, 30),
(4, 0, 10, 'Product 2', 'prod-2', 2, 40),
(5, 4, 10, 'Product 2A', 'prod-2-A', 2, 50),
(6, 4, 10, 'Product 2B', 'prod-2-B', 2, 60),
(7, 0, 20, 'Product 3', 'prod-3', 3, 70),
(8, 7, 20, 'Product 3A', 'prod-3-A', 3, 80),
(9, 7, 20, 'Product 3B', 'prod-3-B', 3, 90),
(10, 0, 50, 'Product 4', 'prod-4', 4, 100),
(11, 10, 50, 'Product 4A', 'prod-4-A', 4, 100),
(12, 10, 50, 'Product 4B', 'prod-4-B', 4, 100);
5.5 Import table data
The SPL interface cannot directly access the built-in database SNOWFLAKE_SAMPLE_DATA.TPCH_SF1, but the tables can be imported into MYDB.PUBLIC.TABLE through methods such as CREATE TABLE... AS SELECT.
The SQL statement for importing table orders is:
CREATE TABLE MYDB.PUBLIC.ORDERS AS SELECT SNOWFLAKE_SAMPLE_DATA.TPCH_SF1.ORDERS;
load data into Table method: You can also export the TPCH_SF1.ORDERS table data to a file and import the MYDB.PUBLIC.ORDERS table through the file “load data” method.
5.6 Authorization
Authorize the database MYDB and its data tables, files, etc. to the application myAppSpl, so that the SPL function interface can access the resources under it.
GRANT USAGE ON DATABASE mydb to APPLICATION myAppSpl;
GRANT USAGE ON SCHEMA mydb.public to APPLICATION myAppSpl;
GRANT READ,WRITE ON STAGE mydb.public.mystage to APPLICATION myAppSpl;
GRANT SELECT ON TABLE mydb.public.orders TO APPLICATION myAppSpl;
GRANT SELECT ON TABLE mydb.public.sample_product_data TO APPLICATION myAppSpl;
The file access needs to authorize stage, while data table access authorization requires to specify table name.
6. Function Description
6.1 Function capabilities
Consumer users can install myAppSpl to obtain SPL, which provides two functions runUDF and runSPL, which can be used in Java and SQL WorkSheet.
A. The runSPL function is called as a stored procedure, i.e. call runSPL(), and the computed result is returned to the function caller in the format of a DataFrame.
B. The runUDF function is a UDF interface used in SQL statements, such as select runUDF() from table.
6.2 Function Parameters
Both runUDF and runSPL receive two parameters, spl and array, in the (spl, [array]) format. The parameter spl specifies the written script file, calculation expression, SQL statement, etc. The array is the corresponding parameter in spl and is passed in array format. If there is none, it can be omitted.
7. Function Calling
7.1 Calling method
Write a Java program that calls the interfaces runSPL and runUDF. RunUDF is used in SQL to call SQL statements through the Java SQL interface; RunSPL is a stored procedure function that is called through a Java stored procedure interface. When calling, include the location of the App where the interface is located to prevent the problem of not being able to find the interface.
import java.util.HashMap;
import java.util.Map;
import com.snowflake.snowpark_java.Session;
public class InvokeTest {
private static final String PRIVATE_KEY_FILE = "D:/MySnowFlake/secret/rsa_key.p8";
private Session m_session;
public InvokeTest() {
initDefaultSession()
}
// Connection information settings
private void initDefaultSession() {
try {
Map<String, String> prop = new HashMap<>();
String url = "https://sqkhnfr-zilu.snowflakecomputing.com";
prop.put("WAREHOUSE", "SPLX_WH");
prop.put("DB", "MYDB");
prop.put("SCHEMA", "PUBLIC");
prop.put("USER", "un");
prop.put("URL", url);
prop.put("PRIVATE_KEY_FILE", PRIVATE_KEY_FILE);
prop.put("PRIVATE_KEY_FILE_PWD", "rootpwd");
prop.put("ROLE", "ACCOUNTADMIN");
prop.put("LEVEL", "WARNING");
m_session = Session.builder().configs(prop).create();
} catch (Exception e) {
e.printStackTrace();
}
}
// Calling stored procedure
public void testStoredProcedure(String shell) {
m_session.storedProcedure("myAppSpl.myschema.runSPL", shell).show();
}
// Call UDFs in SQL
public void testUdfs(String sql) {
m_session.sql(sql).show();
}
public static void main(String[] args) {
try {
InvokeTest cls = new InvokeTest();
String shell = "@mydb.public.mystage/vmTable.splx";
cls.testStoredProcedure(shell);
String sql = "select myAppSpl.myschema.runUDF('=?', OBJECT_CONSTRUCT(*)) as jsons from public.sample_product_data";
cls.testUdfs(sql);
} catch (Exception e) {
e.printStackTrace();
}
}
}
Please refer to the appendix for the generation of the public key file for PRIVATE_KEY_FILE.
7.2 Script calculation using table data
Write the script queryOrder.splx to calculate using data from the orders table as follows:
| A |
B |
|
| 1 |
=Squery("SELECT O_ORDERDATE, O_ORDERSTATUS, O_TOTALPRICE FROM MYDB.PUBLIC.ORDERS where O_ORDERKEY<3000000") |
|
| 2 |
=A1.groups(year(O_ORDERDATE):year,O_ORDERSTATUS:status;sum(O_TOTALPRICE):amount) |
|
| 3 |
return A2 |
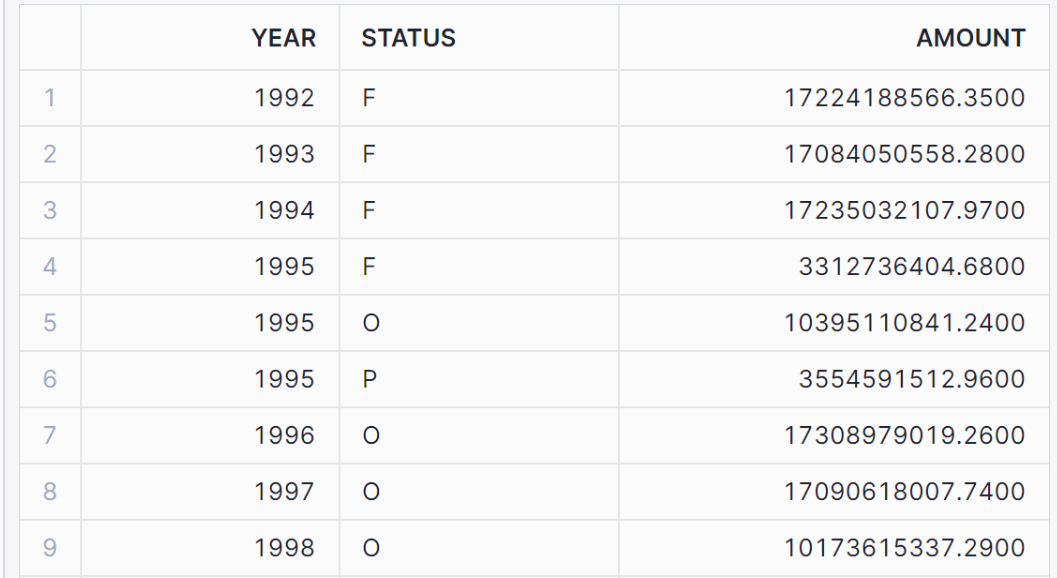
The script uses Squery(sql) to retrieve table data, places the script under @mydb.public.mystage, and executes it in Sql WorkSheet:
call myAppSpl.myschema.runSPL('@mydb.public.mystage/queryOrder.splx);
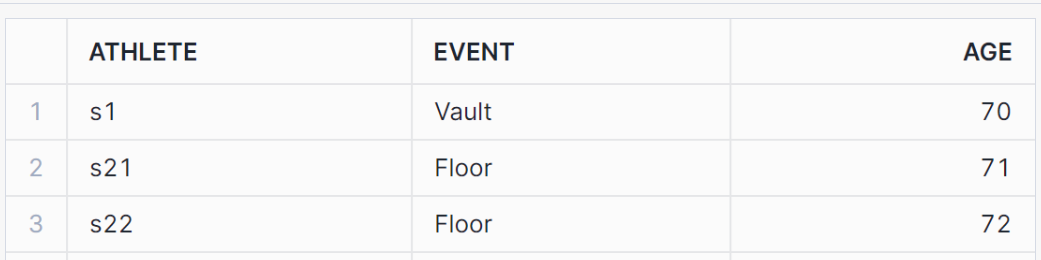
Return result:
7.3 Script calculation using composite table data
Write the script ctxScore.splx to calculate using score composite table data as follows:| A |
B |
|
| 1 |
=Sfile("@MYDB.PUBLIC.MYSTAGE/score.ctx") |
|
| 2 |
=A1.open() |
|
| 3 |
=A2.cursor().fetch(100) |
|
| 4 |
>A2.close() |
|
| 5 |
return A3 |
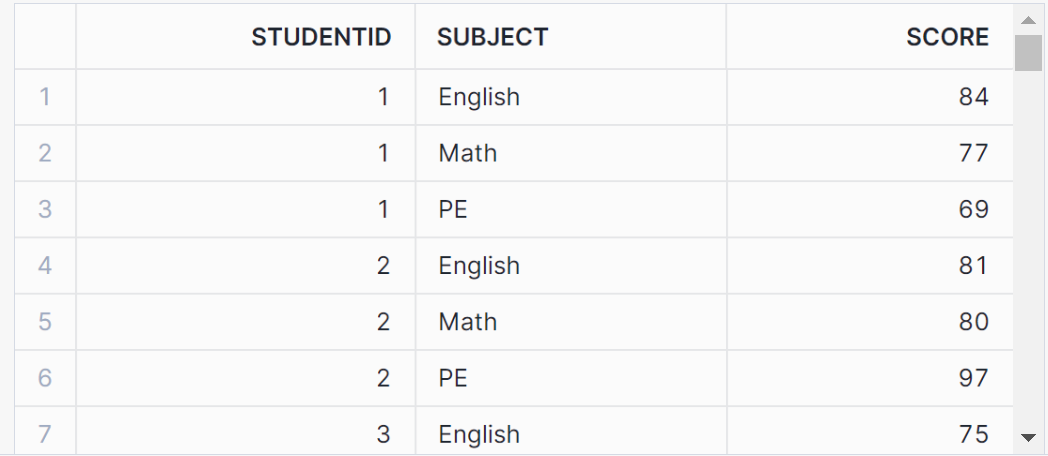
The script uses Sfile(@file) to read files and retrieve data. The script is placed under @mydb.public.mystage and executed in SQL WorkSheet:
call myAppSpl.myschema.runSPL('@mydb.public.mystage/ctxScore.splx);
Return result:
7.4 Accessing S3 file data
Import the S3 bucket files into Snowflake's mydb database,1. Generate file format
create or replace file format mys3csv
type = 'CSV'
field_delimiter = ','
skip_header = 1;
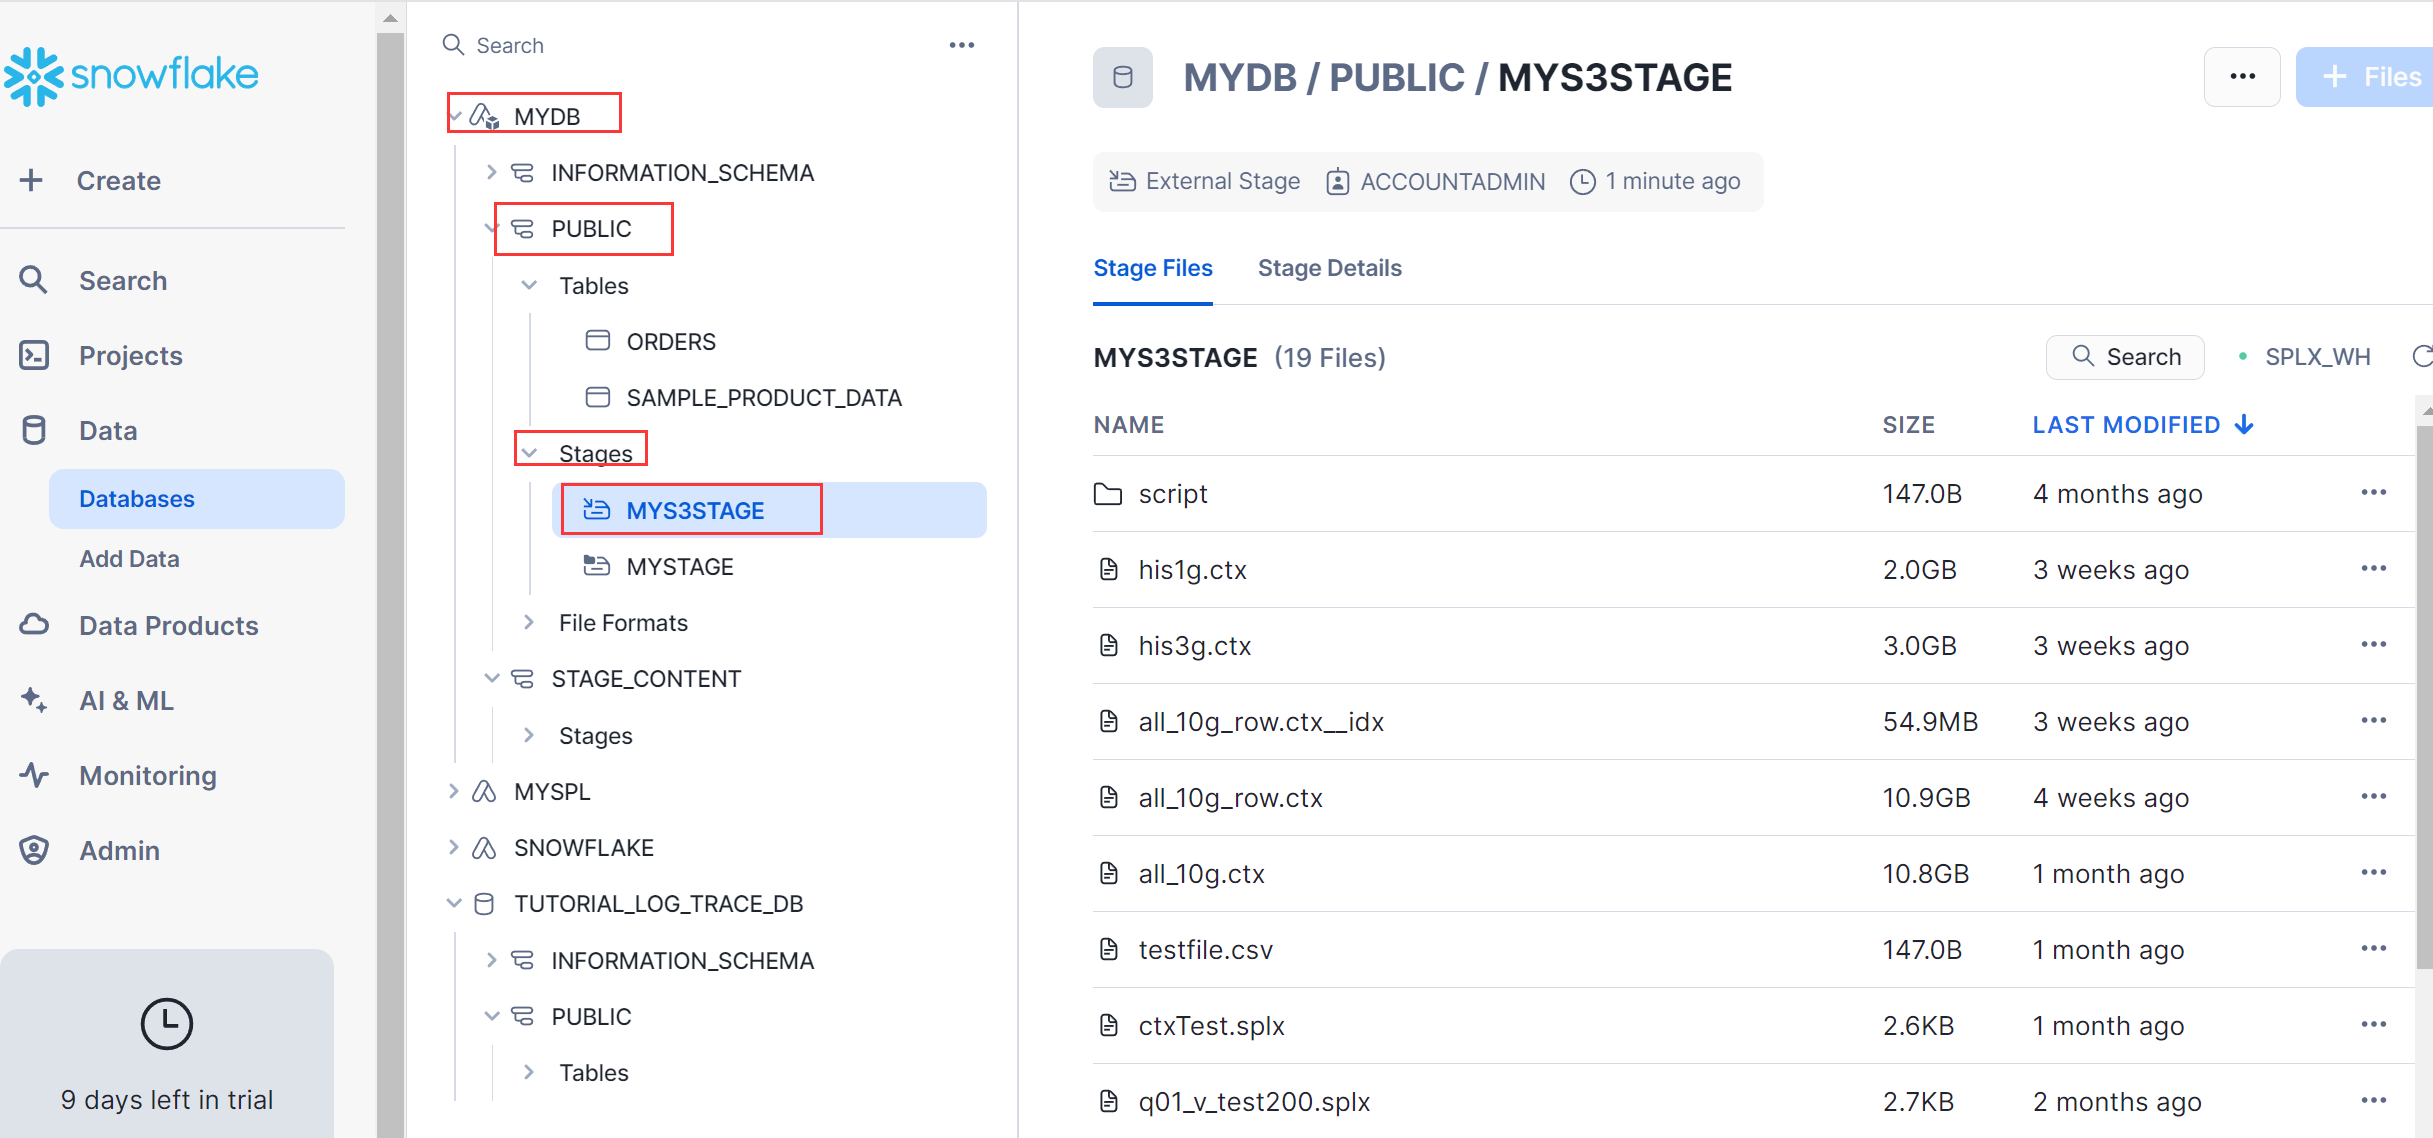
2. Create storage MYS3STAGE
create or replace stage MYS3STAGE url='s3://un-bucket101/'
CREDENTIALS=(aws_key_id='xxxx' aws_secret_key='xxxxx')
file_format = mys3csv;
The URL is the bucket name of S3, and both aws_key_id and aws_secret_key need to be specified;
After successful creation, you can see that the files under s3://un-bucket101 have been synchronized to MYS3STAGE:
Accessing resources under MYS3STAGE requires authorization to myAppSpl:
GRANT READ,WRITE ON STAGE MYDB.PUBLIC.MYS3STAGE to APPLICATION myAppSpl;
Call interface to access:
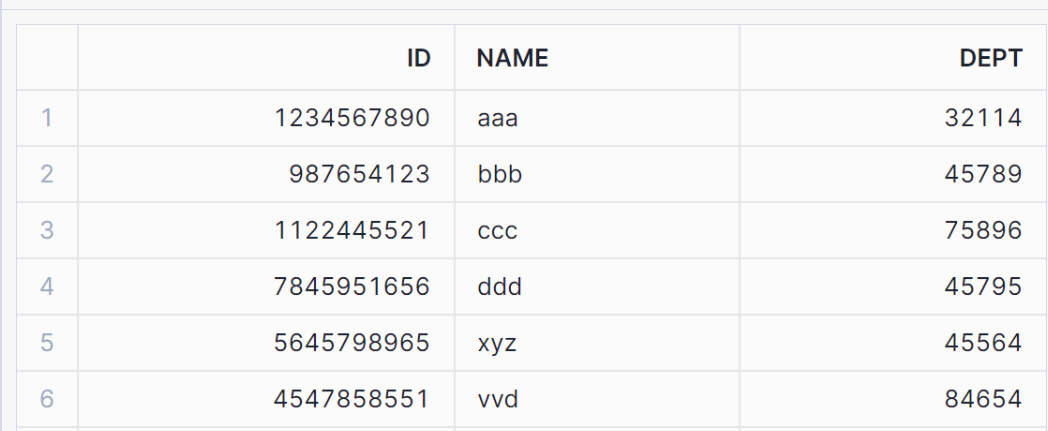
call myAppSpl.MYSCHEMA.runSPL('=Sfile("@MYDB.PUBLIC.MYS3STAGE/testfile.csv").import@tc()');
Return the calculation result:
Snowflake not only supports AWS S3, but also supports Microsoft Azure and Google GCS storage. Access configuration can refer to Snowflake's official documentation.
7.5 Function runUDF usage
runUDF is a UDFs function that is called in SQL query format.
The reference script can be called in sql in combination with the built-in functions ARRAY_AGG (col...) (Merged by column) and ARRAY_CONSTRUCT (col...) (Merged by row) of snowflake:
with temp_1 as
(
SELECT 'John' AS my_col, 20 as age
UNION ALL
SELECT 'John' AS my_col, 21 as age
UNION ALL
SELECT 'John' AS my_col, 22 as age
UNION ALL
SELECT 'doe' AS my_col, 27 as age
UNION ALL
SELECT 'doe' AS my_col, 28 as age
UNION ALL
SELECT 'Tom' AS my_col, 30 as age
)
select a.my_col as names, runUDF('=?.(~.array().count())', ARRAY_AGG(ARRAY_CONSTRUCT(a.my_col)) ) as num
from temp_1 a group by names;
Return result:
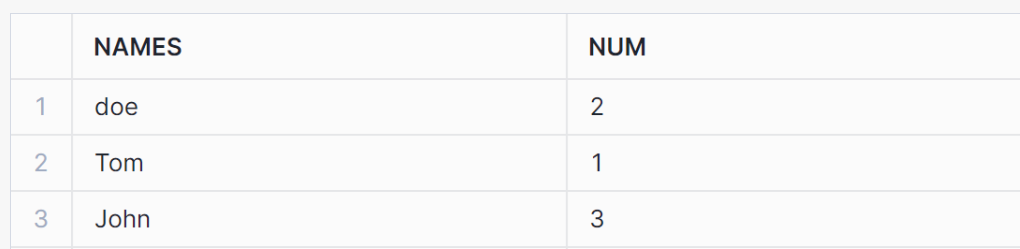
The data passed by array is converted from one-dimensional array to sequence, and two-dimensional array to table sequence.
Appendix
Appendix A: Registering a Snowflake Account
Users need to register for Snowflake via enterprise email, but personal email registration is not supported. Taking AWS as an example, S3 storage is required for testing.
A.1 Registration entrance
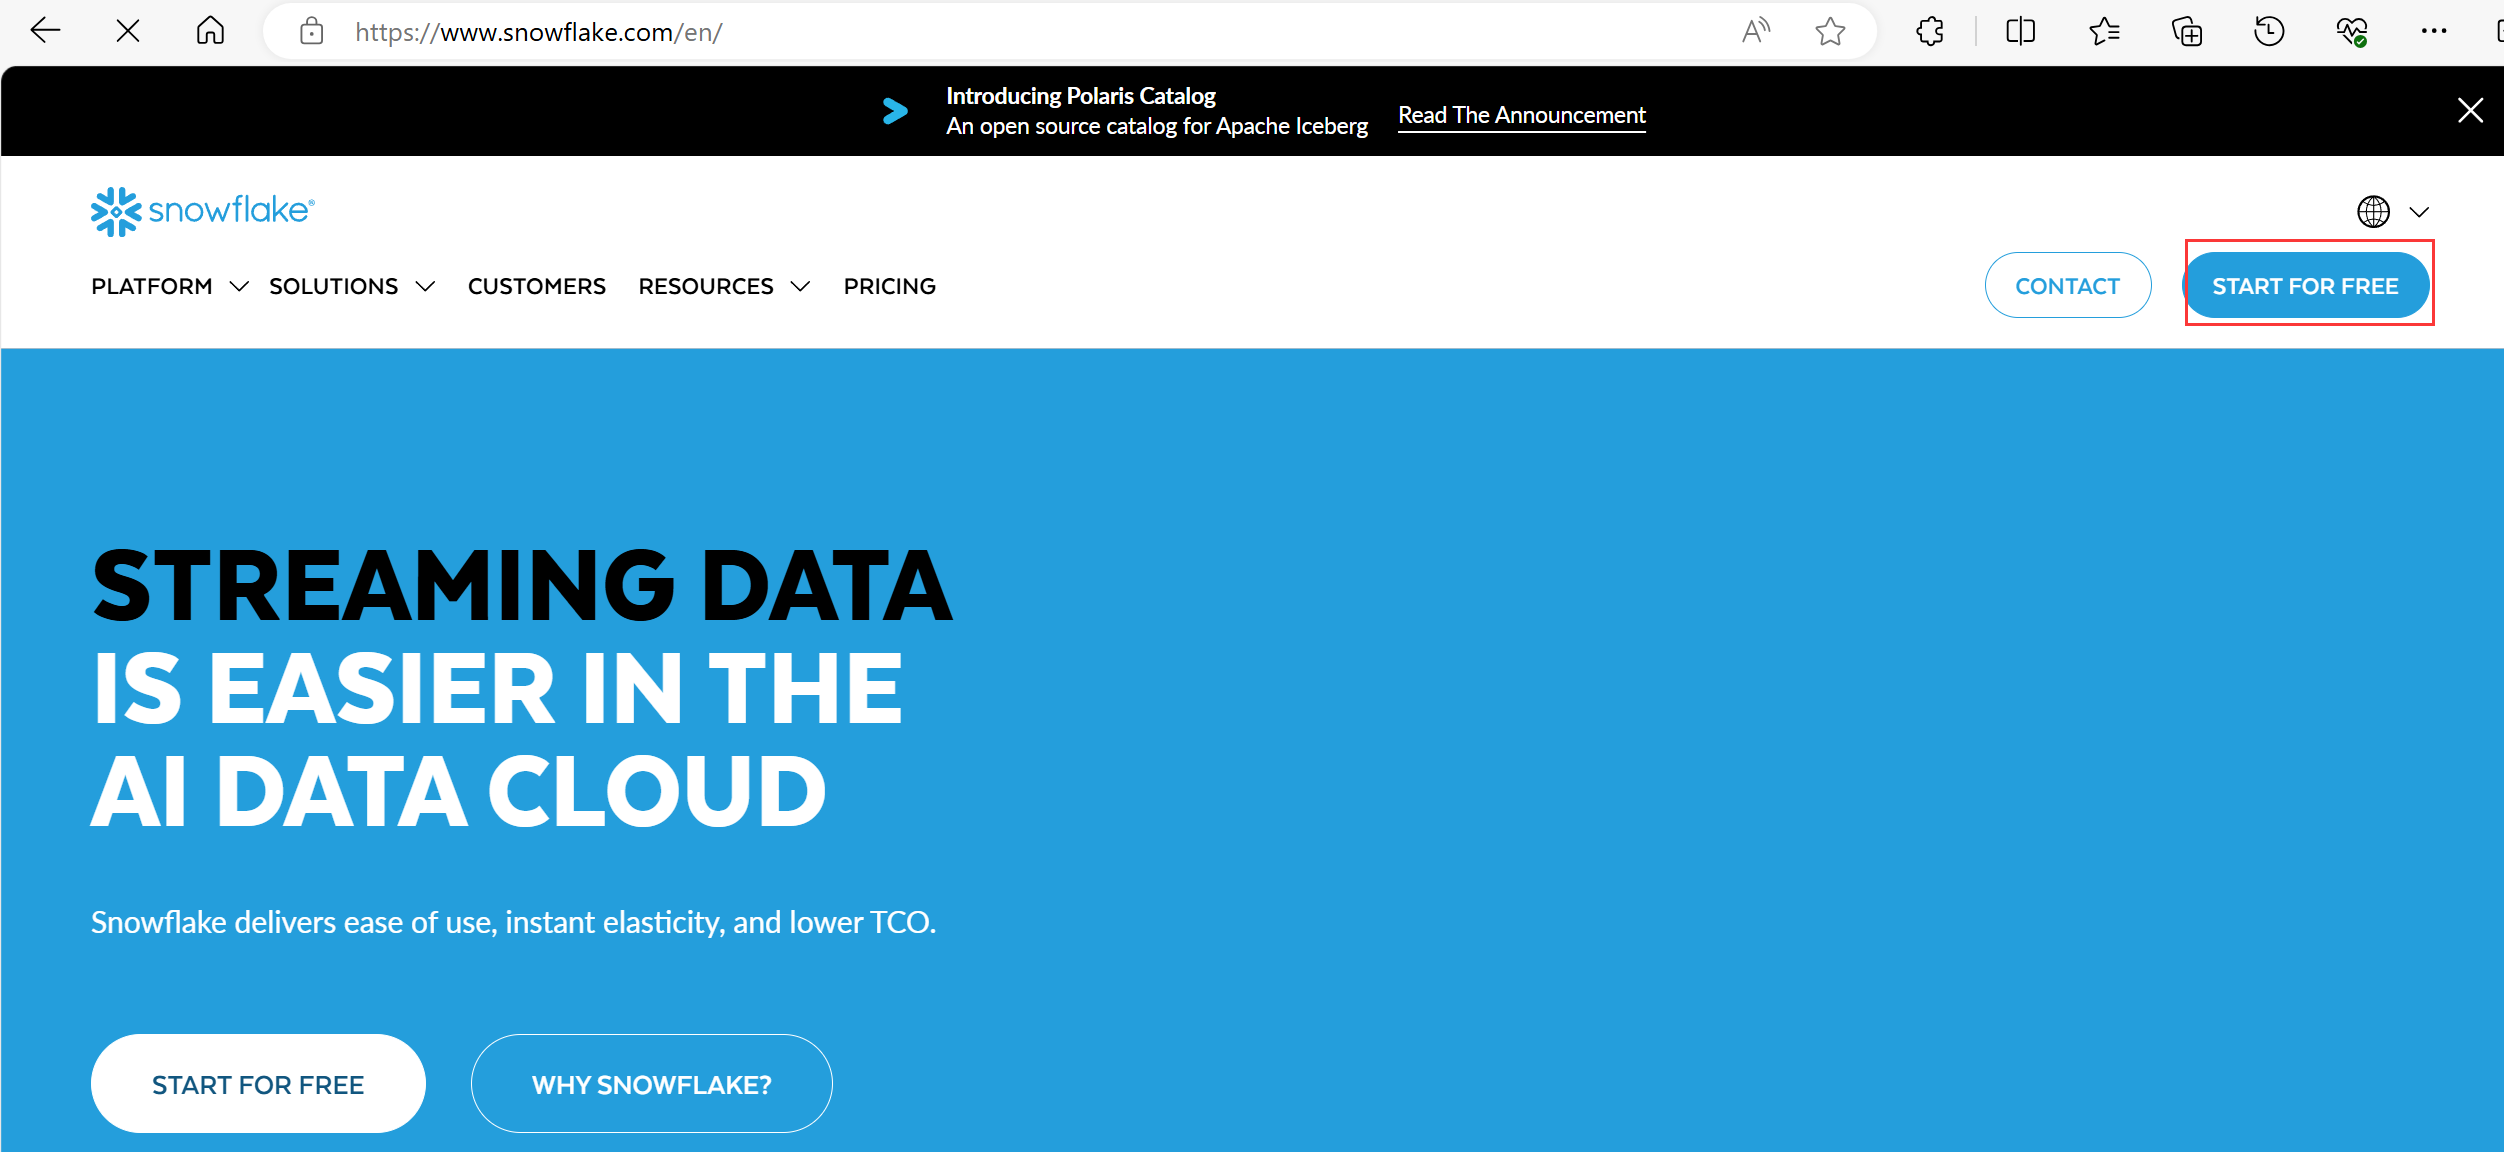
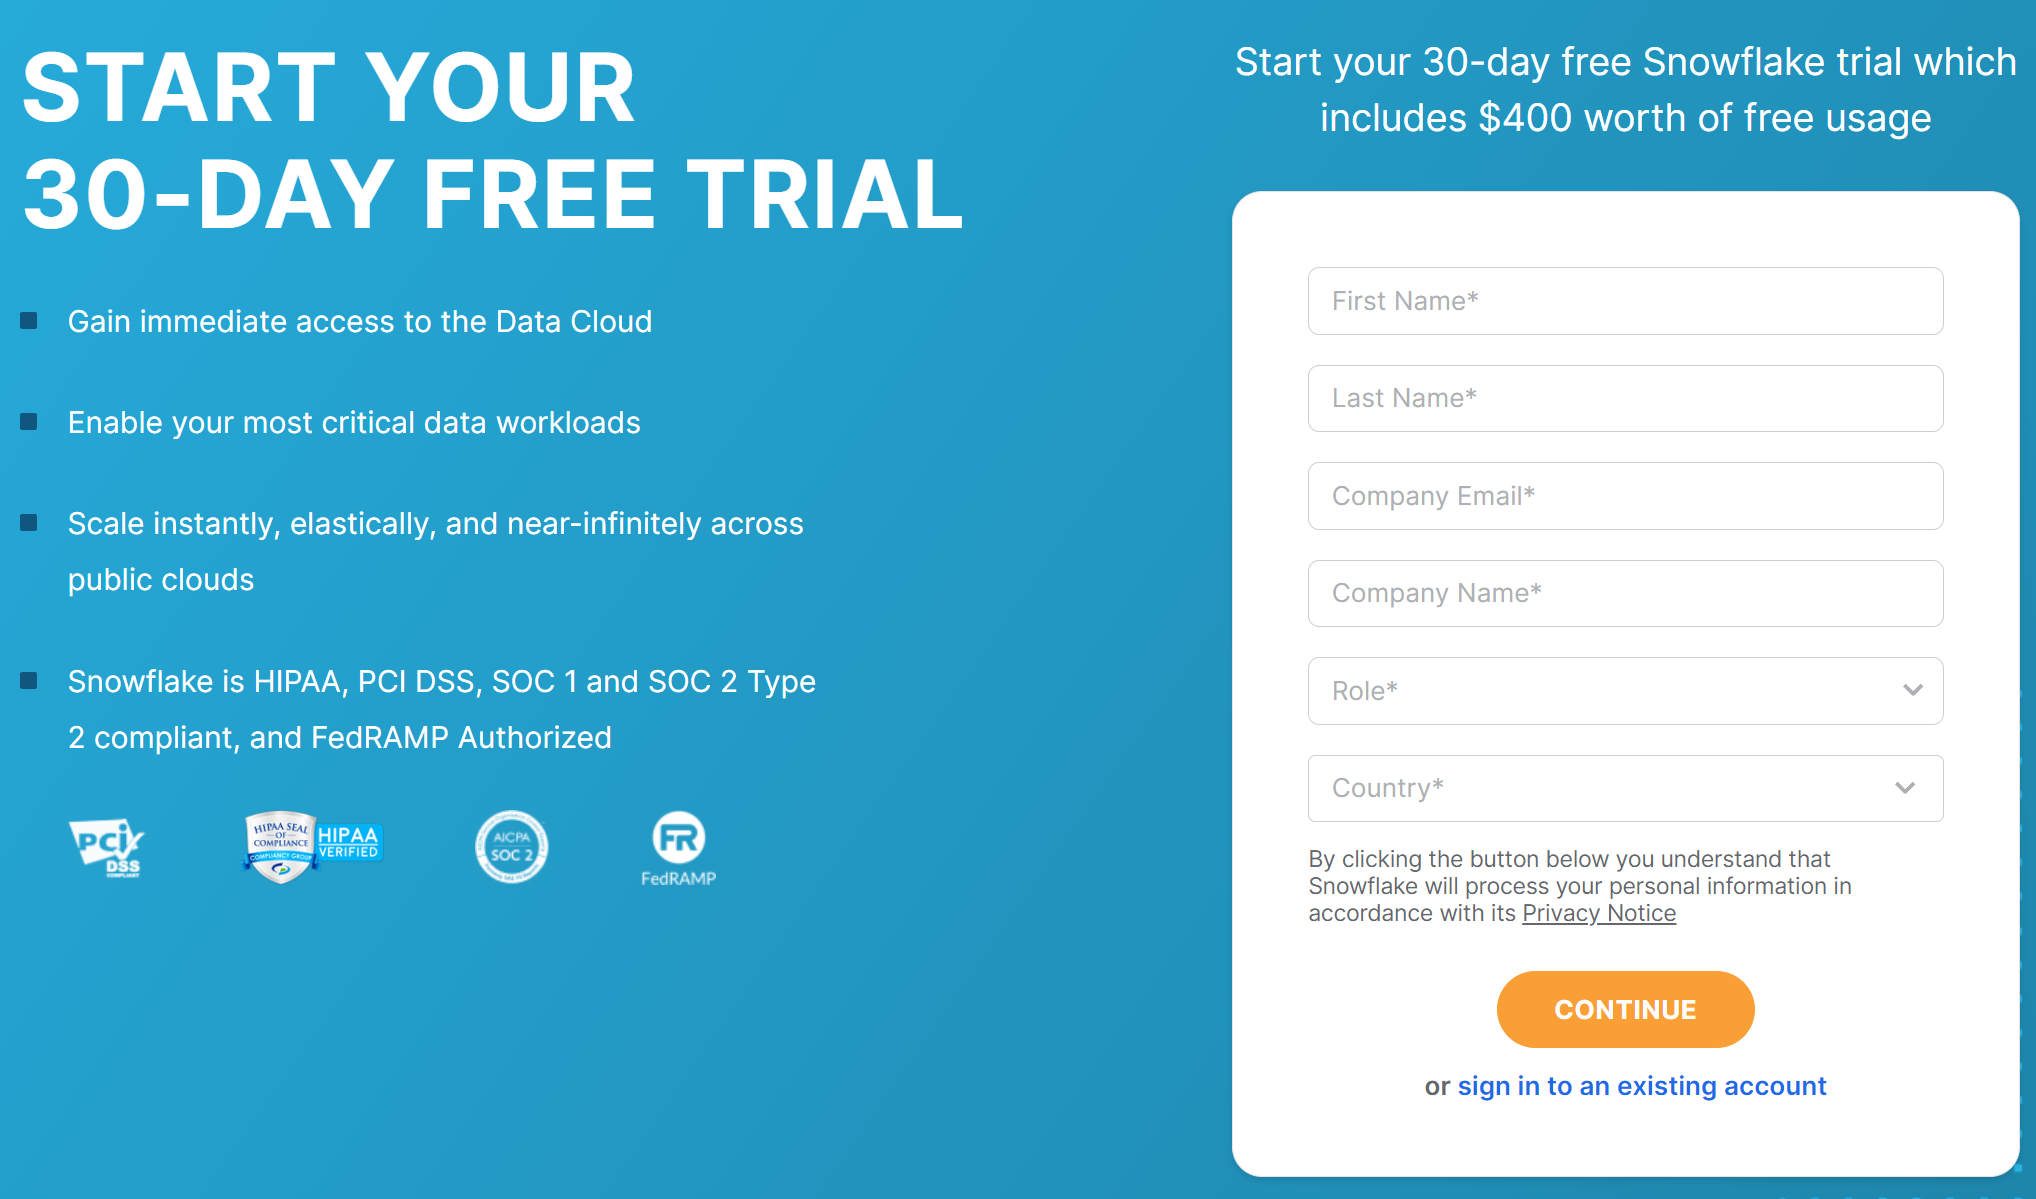
Registration website: www.snowflake.com, click "START FOR FREE" to start registration.
A.2 Fill in registration information
A.3 Choose a cloud service provider
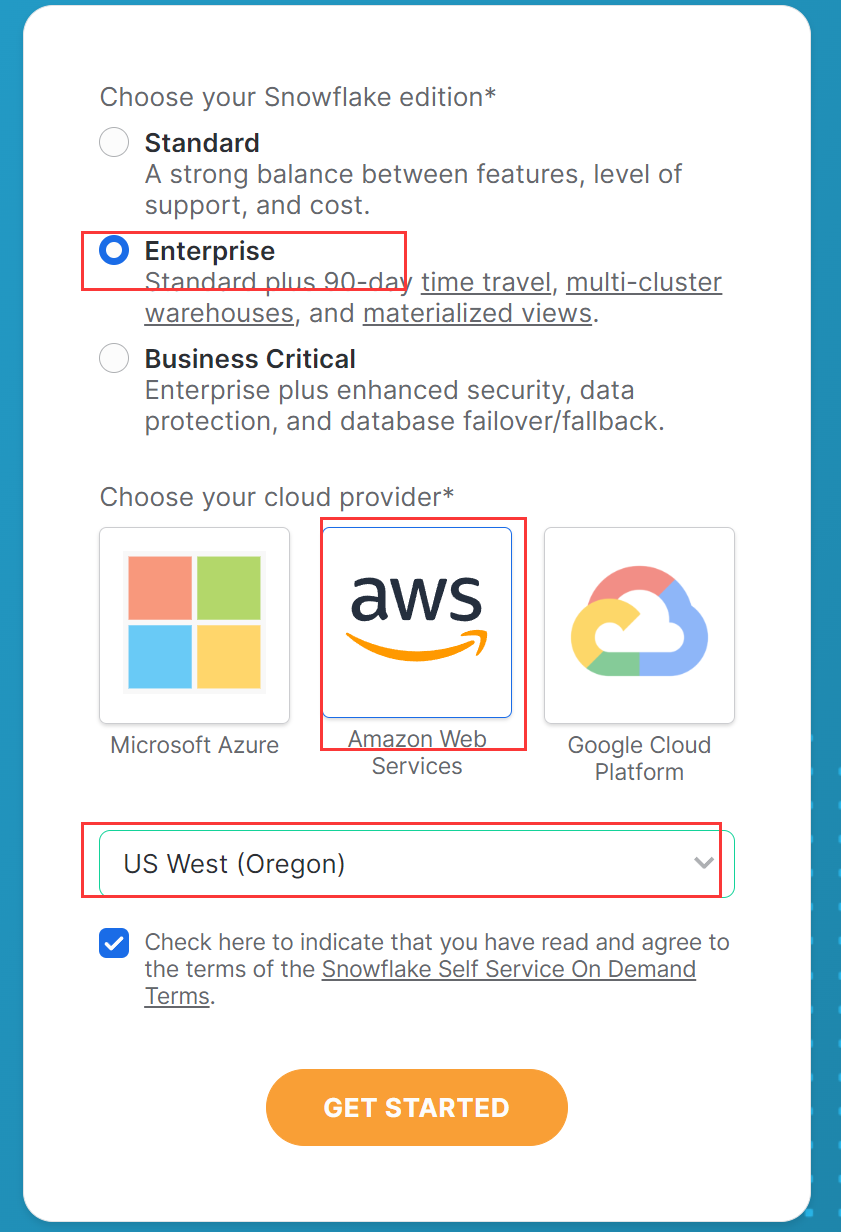
A.4 Set Password
After registration, the reserved email will receive a confirmation URL. Open the URL, enter the account used during registration, set the password, and follow the instructions to operate. After completion, log into the snowflake operation interface.Appendix B: Login Verification Settings
When using the tools provided by Snowflake, such as Snowsql, client remote connection, and JDBC connection, login verification detection is required. If only used under snowsight Sql WorkSheet, this step can be skipped. Reference documents:
https://docs.snowflake.com/en/user-guide/key-pair-auth https://streamsets.com/blog/snowflake-key-pair-authentication/
B.1 Generate public and private keys
Generate private and public key files using the openssl tool. (For later testing with SnowSQL and Java)A. Generate private key:
openssl genrsa 2048 | openssl pkcs8 -topk8 -inform PEM -out rsa_key.p8 -nocrypt
Enter passwd: rootpwd to generate the file rsa_key.p8.
B. Generate public key:
openssl rsa -in rsa_key.p8 -pubout -out rsa_key.pub
Generate the file rsa_key.pub.
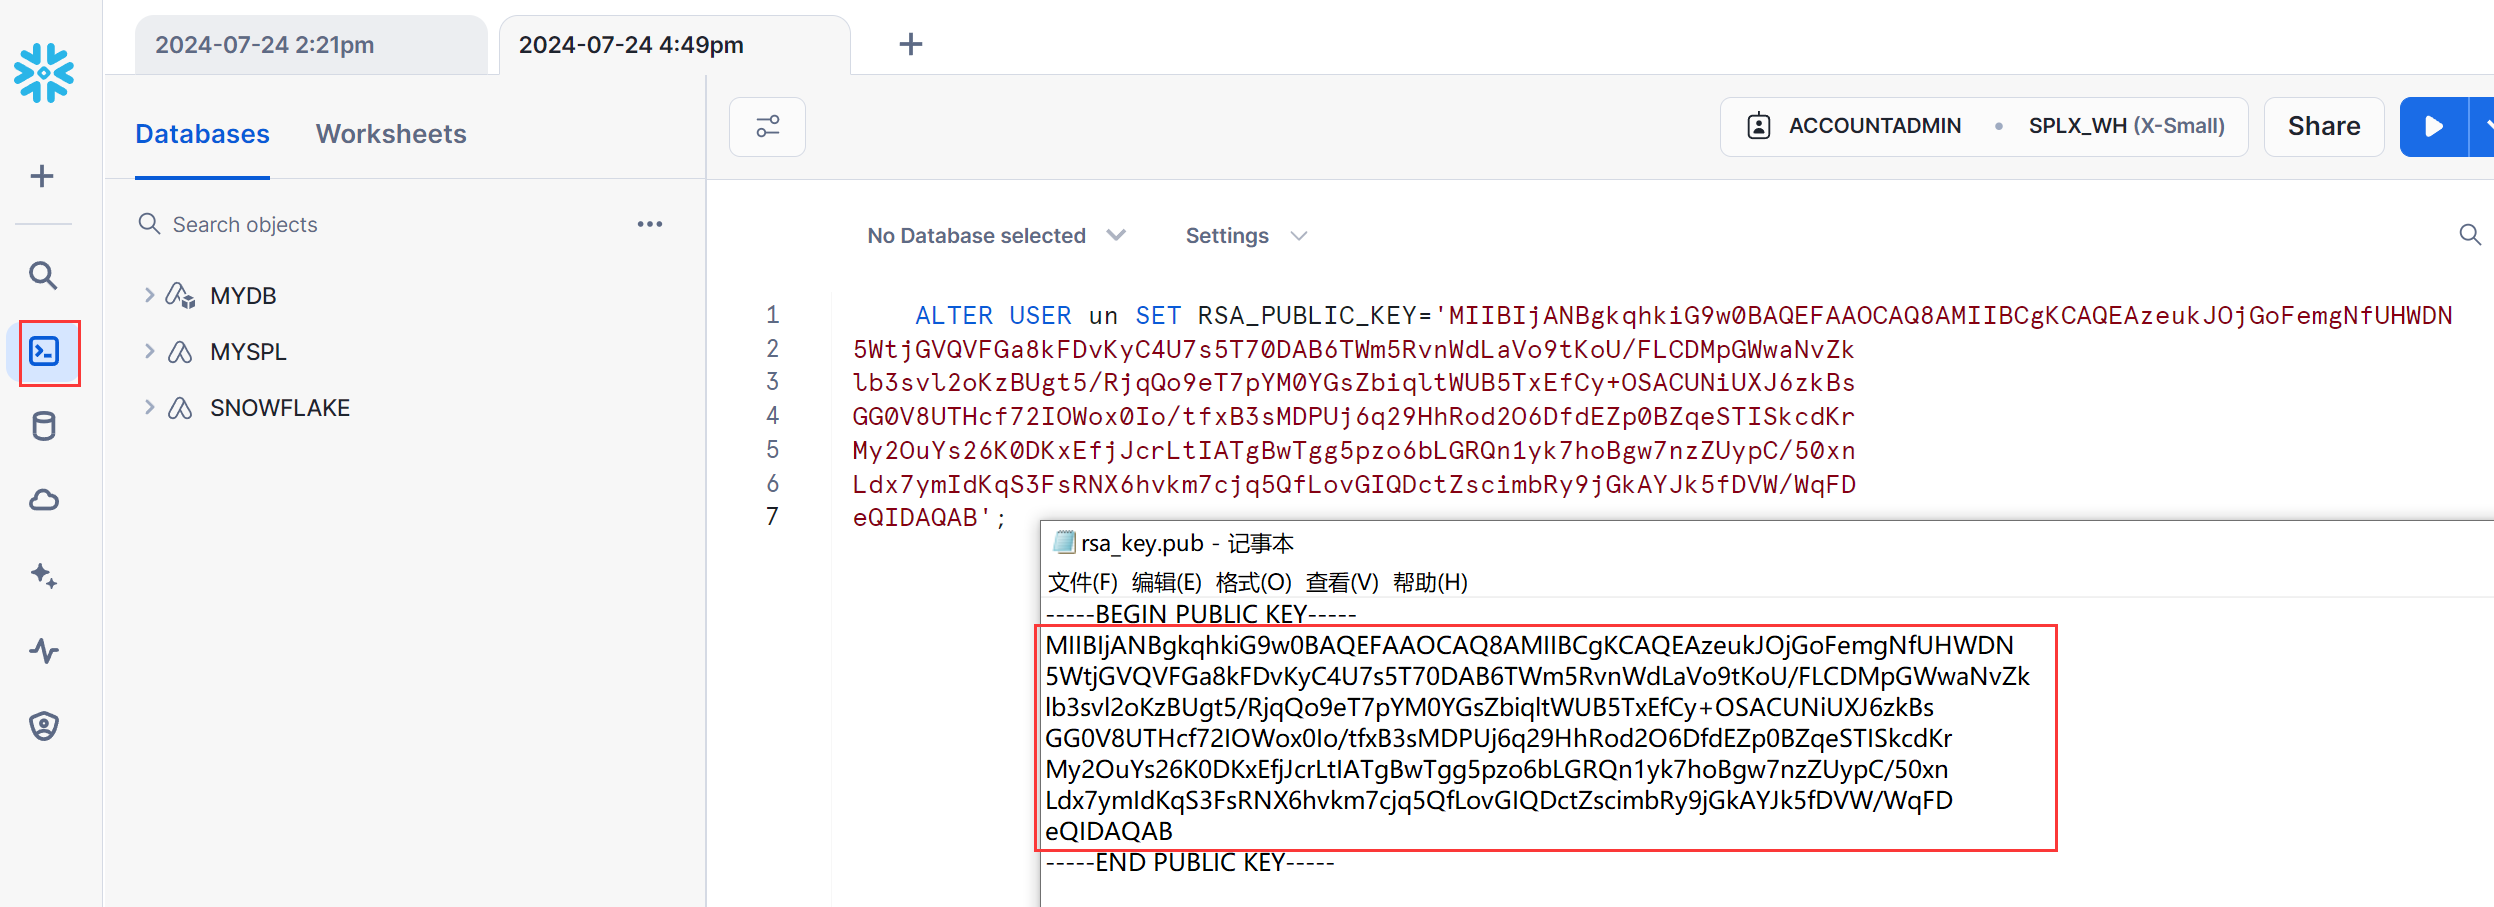
B.2 Set Public Key
Bind the public key to the account and operate in snowsight. The username is the login account, and the RRSA_PUBLIC_KEY value is the content of the file rsa_key.pub.
Appendix C: Using SnowSQL Tool
SnowSQL is used for managing the Snowflake database, uploading and downloading files, etc.Install snowsql,
Reference documents: https://docs.snowflake.com/en/user-guide/snowsql-install-config,
https://docs.snowflake.com/en/user-guide/admin-account-identifier
Download and install to use.
Login under the console:
snowsql.exe -o log_level=DEBUG -a UUTXYFY-RWB64272 -u pamire120 --private-key-path D:\dev\workspace\snowflake\MySnowFlake\secret\rsa_key.p8a
The parameter -a is Account identifiers,

When logging in, you need to enter the password string rootpwd used to generate the public key.
Appendix D: Creating Warehouse
If the user does not already have their own warehouse, they need to create a new warehouse to specify the VM environment in which it will run. Create a new warehouse named SPL_DEMO under Admin ->Warehouse.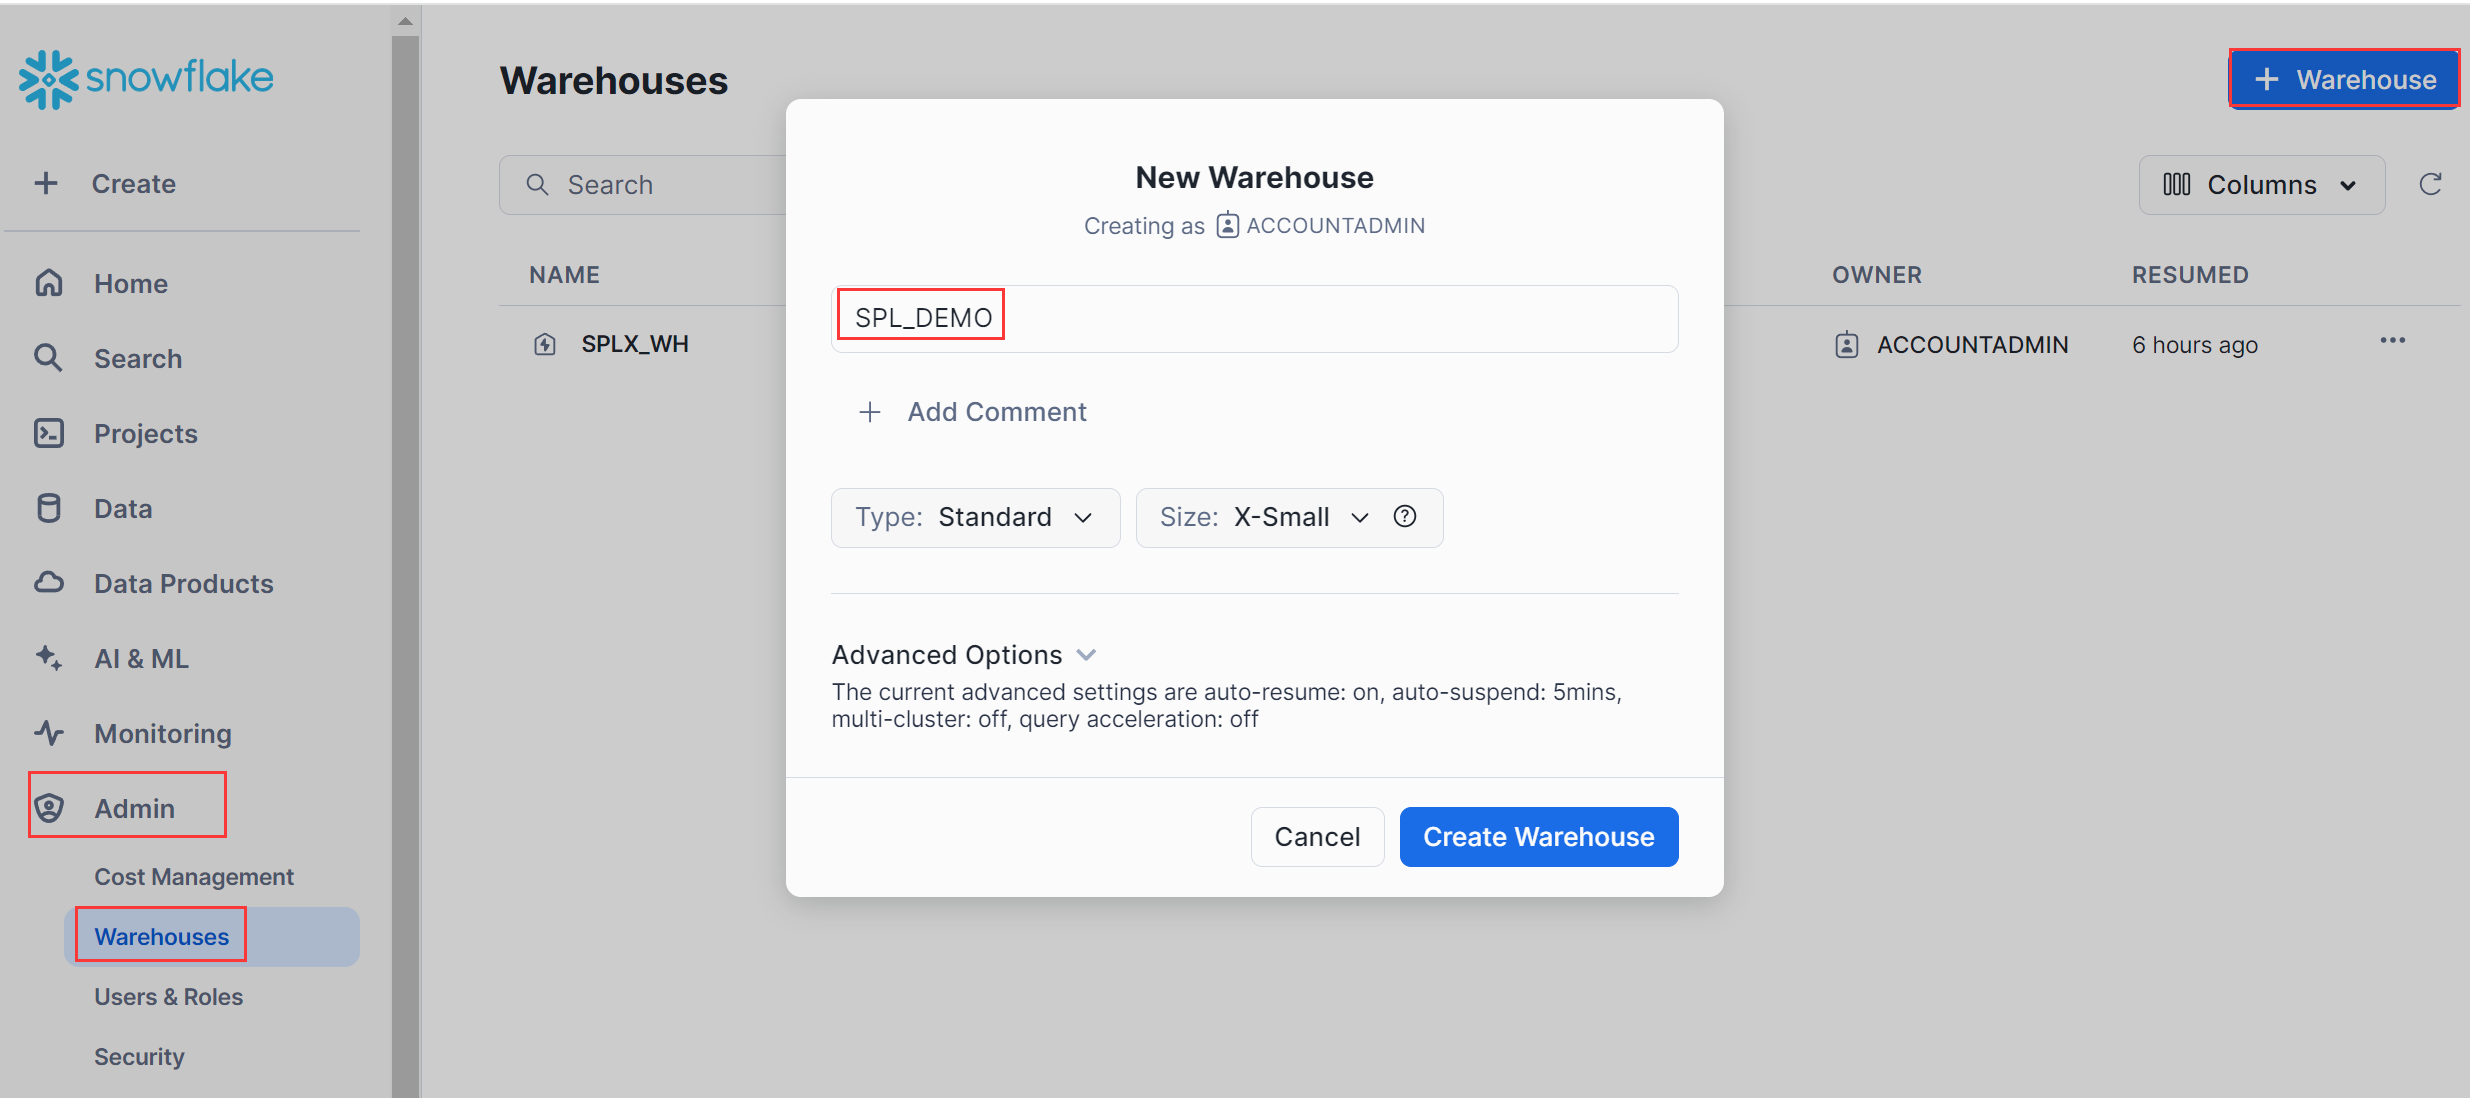
Appendix E: Tracking Log
Execute scripts or SQL queries on the Snowflake platform, and if there are any issues with execution, there are no output logs from Java programs in log management Monitoring-> Query History, and there is no specific information about exceptions. Snowflake provides a log event mechanism that stores program output logs in a user-defined event table, which can be queried and tracked in case of issues.
E.1 Create an event table
Create a new database, create an event table called 'myevents', and associate it with the current account.
CREATE OR REPLACE DATABASE spl_log_trace_db;
CREATE OR REPLACE EVENT TABLE myevents;
ALTER ACCOUNT SET EVENT_TABLE = spl_log_trace_db.public.myevents;
ALTER SESSION SET LOG_LEVEL = INFO;
E.2 View logs
After calling the SPL interface, view the logs through SQL statements:
SELECT
TIMESTAMP AS time,
RESOURCE_ATTRIBUTES['snow.executable.name'] as executable,
RECORD['severity_text'] AS severity,
VALUE AS message
FROM
spl_log_trace_db.public.myevents
WHERE
RECORD_TYPE = 'LOG' ;
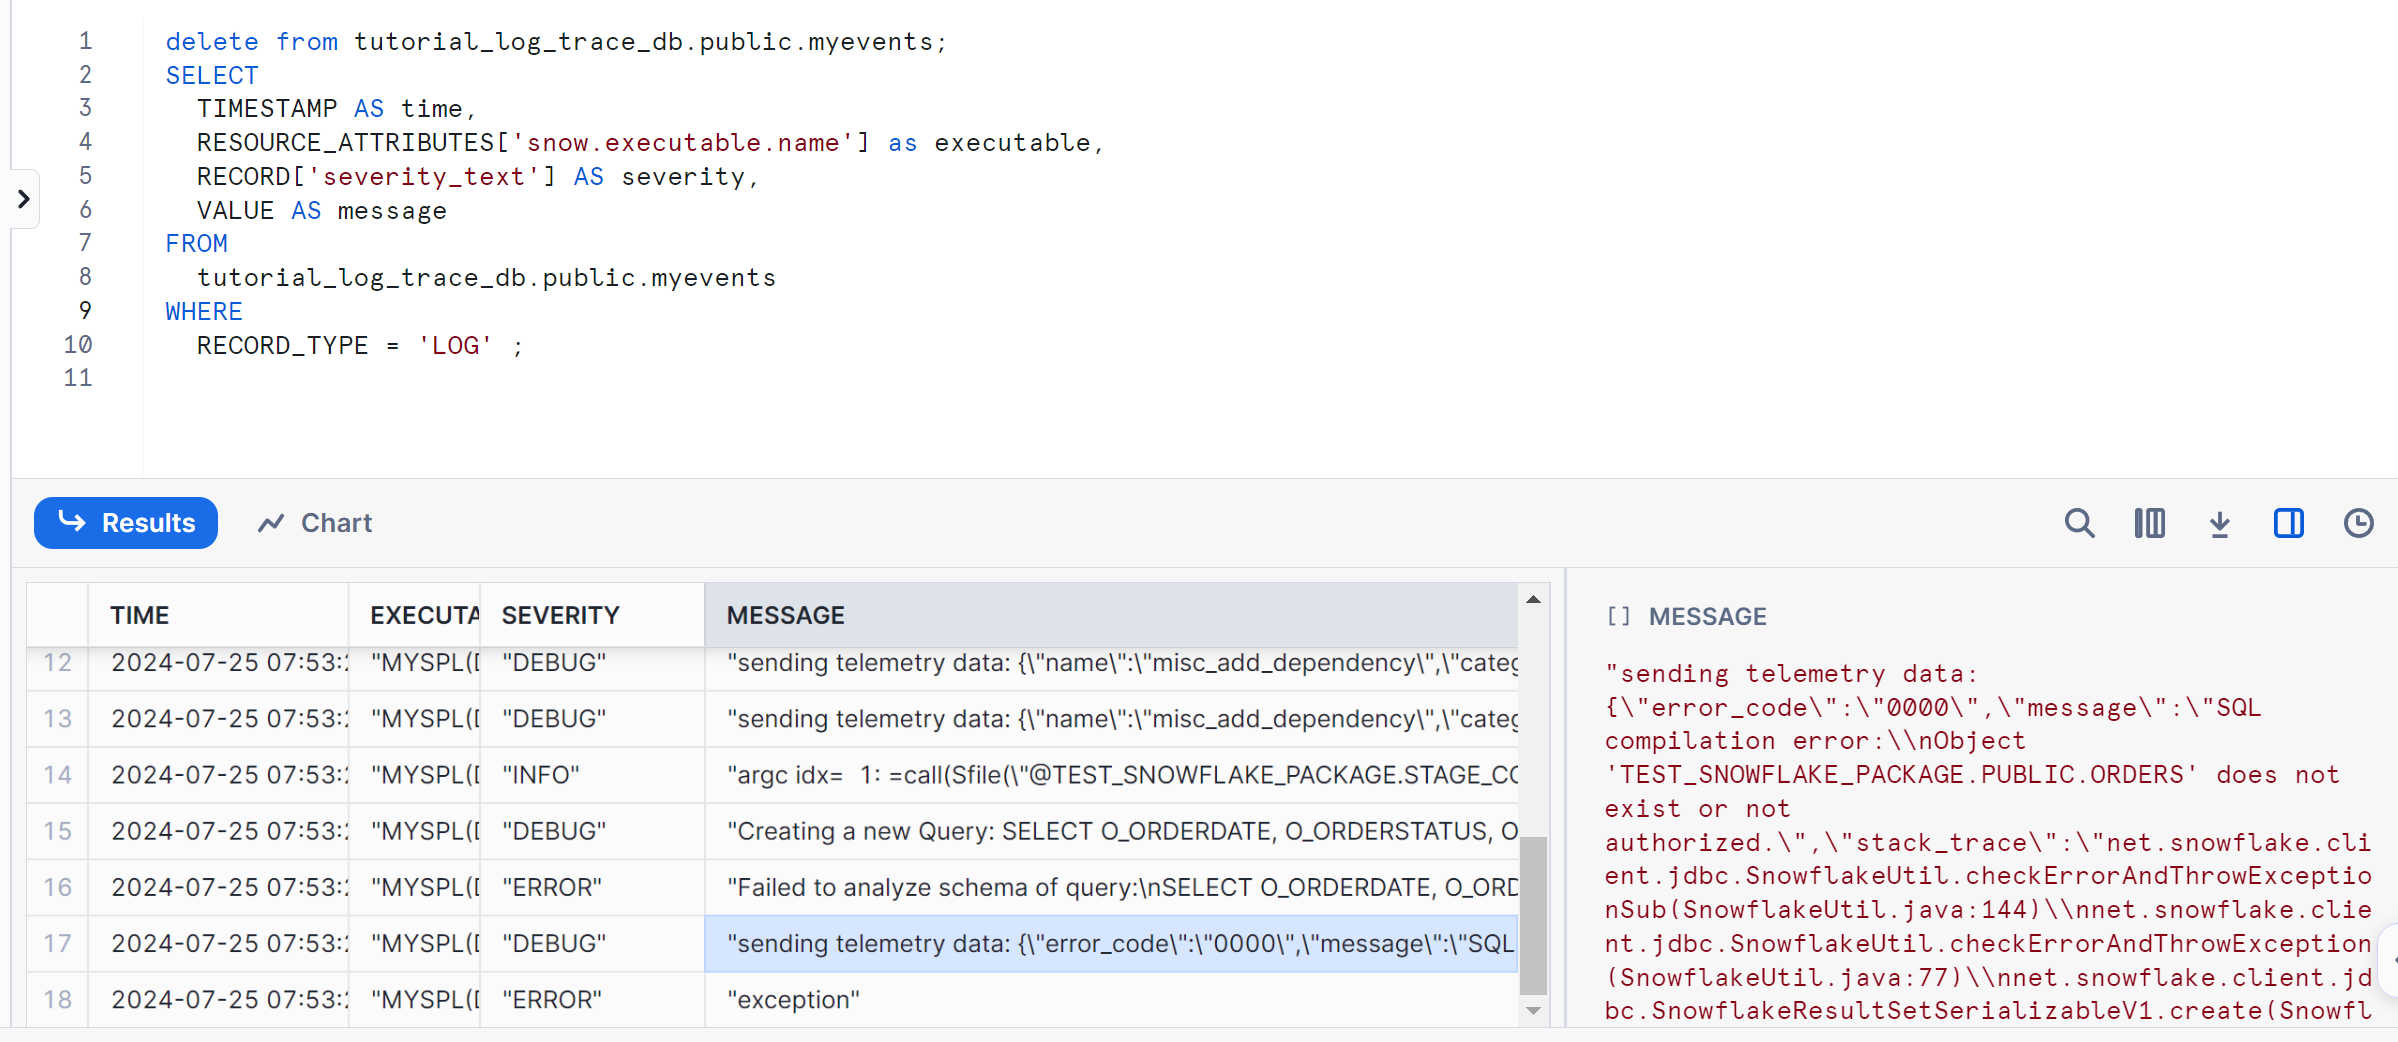
You can see the program output log and details of the error cause.
E.3 Delete logs
When tracking, if there are too many logs or before calling the SPL interface, the logs can be deleted to facilitate finding the required logs.
delete from spl_log_trace_db.public.myevents;
Appendix F: Creating a Consumer Account:
When generating an app installation package using a trial account, it is necessary to specify the consumer account. At the same time, another user needs to use a consumer account to install App and use the SPL interface on the consumer end.
Create a consumption account in the Admin ->Accounts menu bar.
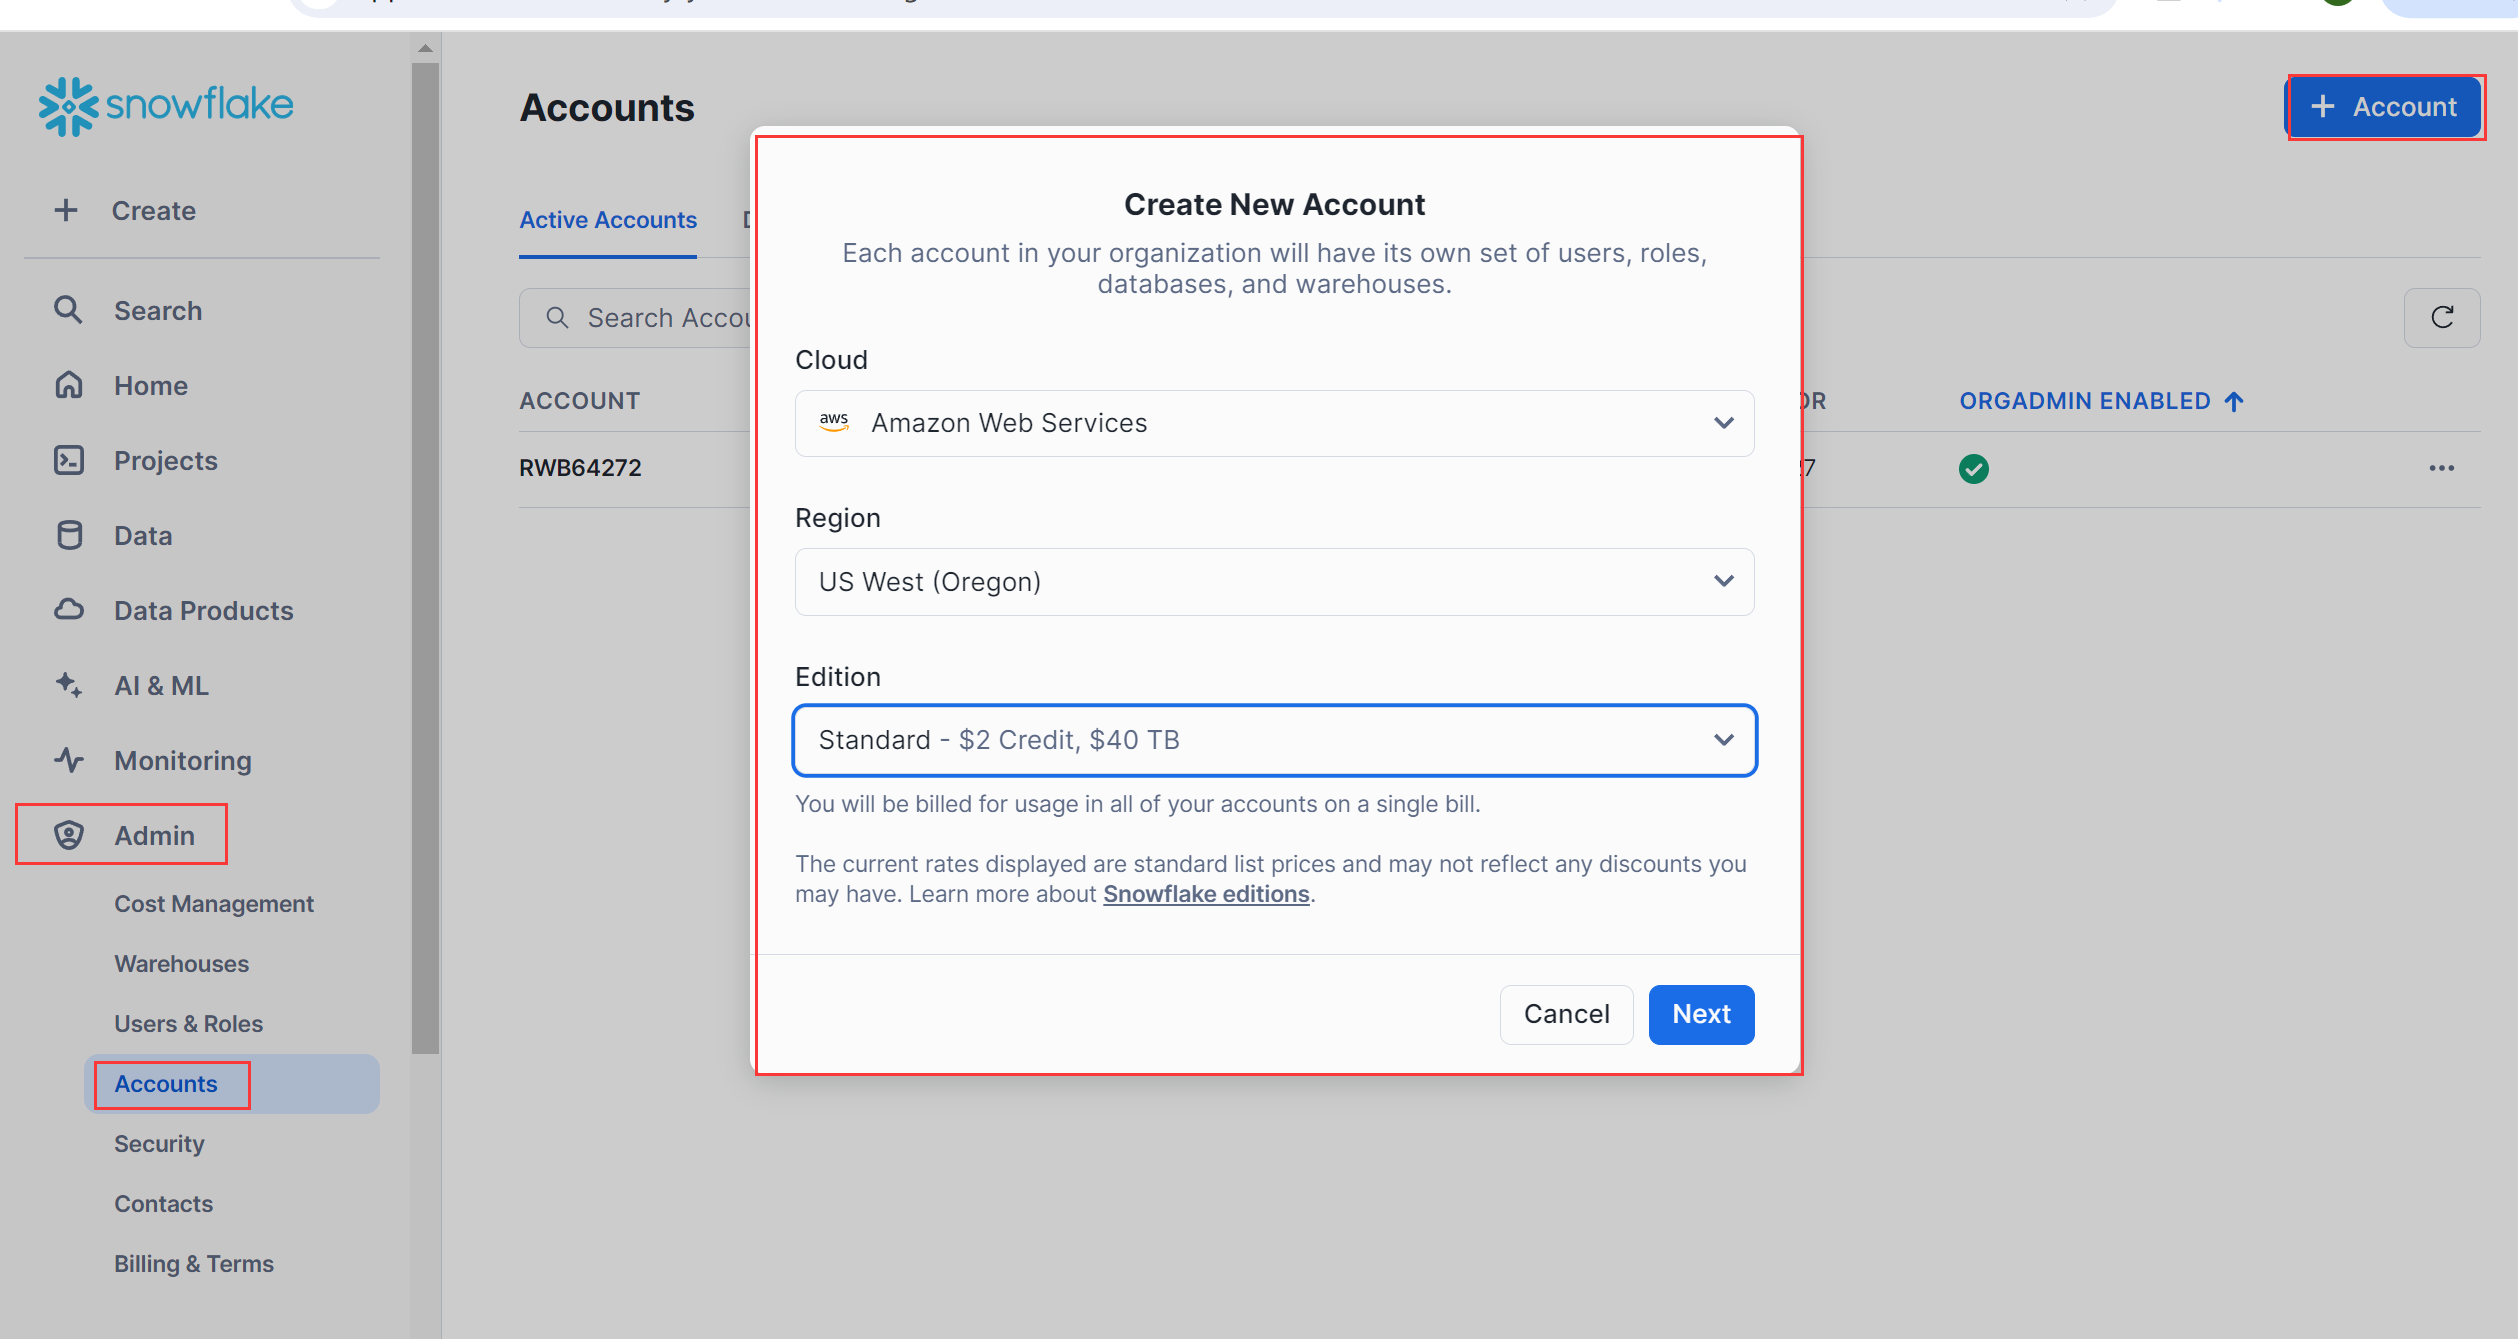
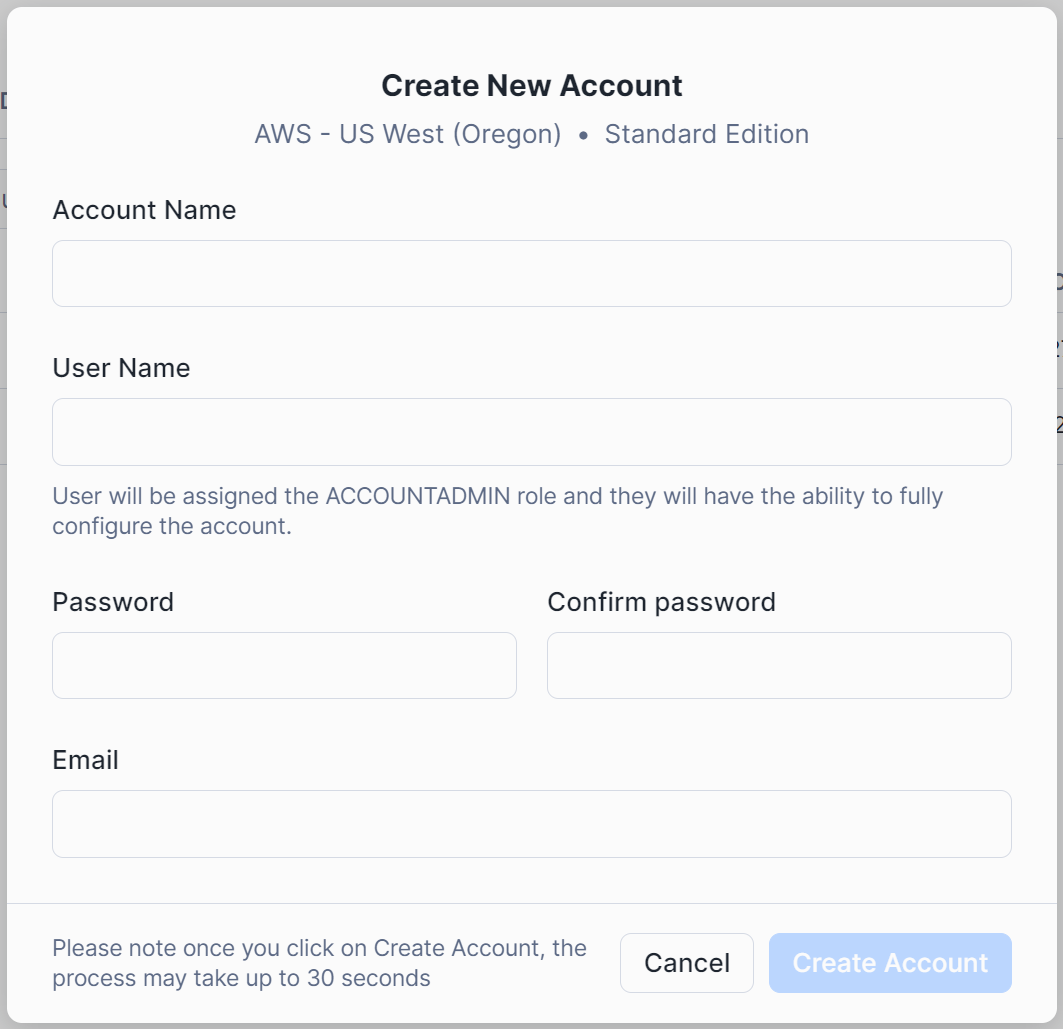
Fill in consumer account information:
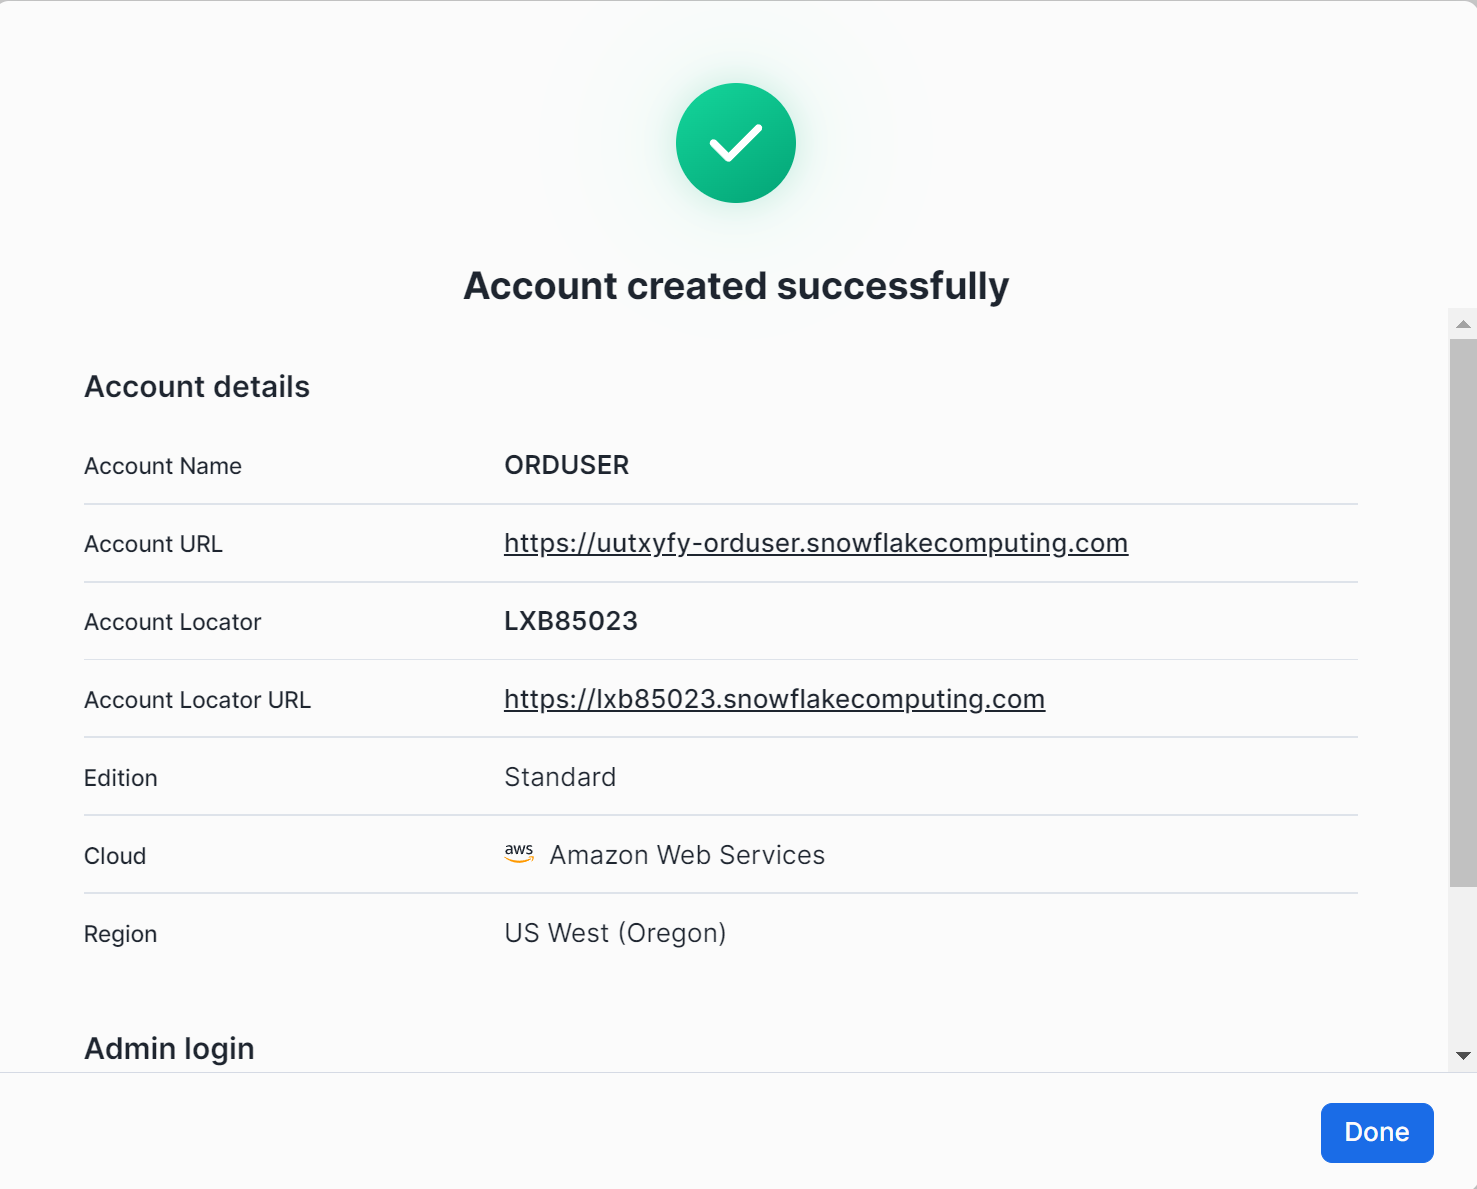
The successful creation of the consumer account returns the following message:
attachments: splShell.zip
SPL Official Website 👉 https://www.scudata.com
SPL Feedback and Help 👉 https://www.reddit.com/r/esProcSPL
SPL Learning Material 👉 https://c.scudata.com
SPL Source Code and Package 👉 https://github.com/SPLWare/esProc
Discord 👉 https://discord.gg/2bkGwqTj
Youtube 👉 https://www.youtube.com/@esProc_SPL


Chinese version