Docker Server Installation and Setup Guide
The Docker Server (dockerServer.zip) works to combine esProc cluster and Docker to bring in efficient computations, and reasonable resource allocation and management.
After successfully logging onto Docker through esProc’s Docker login, both Docker container and esProc service will be started up. Then you can call the splx file at the Client side to perform computation.
Before the login, you need to first download, install and set up the Docker Server.
Installation directions
Step1: Install esProc mirror
Import esProc mirror, likedocker load -i esproc.tar
Note: Refer to About package directory for creating a custom Docker image for information about the package directory for creating a custom Docker image.
Step 2: Install and set up Docker Server
dockerServer is responsible for management of user login, and Docker container startup and exit.Download and decompress dockerServer.zip, and put the decompressed files in the main directory /home/docker/java configured in server.sh. Below is a list of setup files and their descriptions:
File |
Description |
dockerServer.jar |
The jar file used by dockerServer |
go.sh |
Access Docker container script |
raq_get_image.sh |
Check the currently used Docker container script |
raq_start.sh |
Start Docker container script |
raq_stop.sh |
Close Docker container script |
server.sh |
The dockerServer startup file |
docker_server.xml |
Docker service configuration file, where only the main server has the <NodeType> item |
docker_users.xml |
Docker user management file; only the main server has this file |
Here are roles of those setup files in the process of working with esProc:
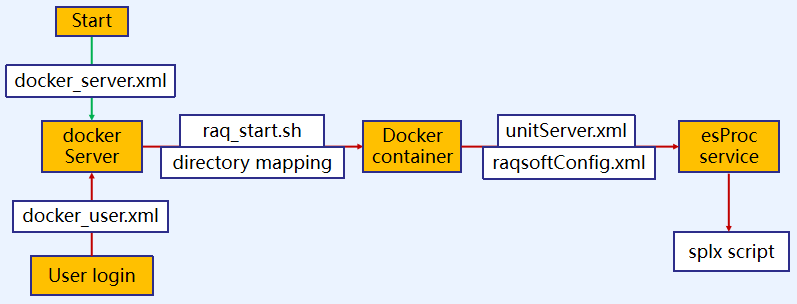
Step 3: Prepare host node directory
After esProc mirror is installed, its contents are read-only, and the data in Docker container will be lost when the container is closed. In order to read and write esProc user data, the shared directory and user directory in the host node will be mounted under the Docker container. In view of this, make sure there is the shared directory in the host node directory. The user directory will be automatically created after the login if there isn’t a ready one. Here are mapping relations between host node directory and Docker container directory: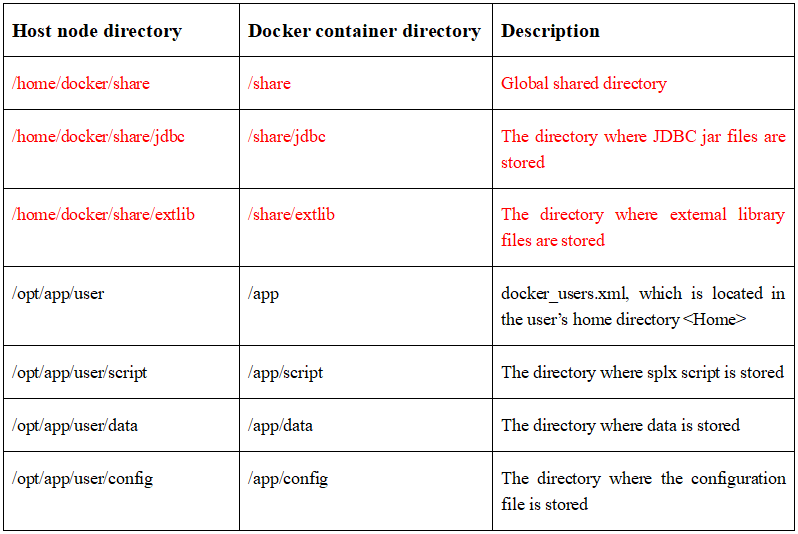
Modify and set up the shared directory in docker_server.xml and the user directory in docker_users.xml .
Step 4: Configure resource files
Put the resource files displayed in the following figure in the corresponding directories on the host node as needed. And the application will first read them from those directories: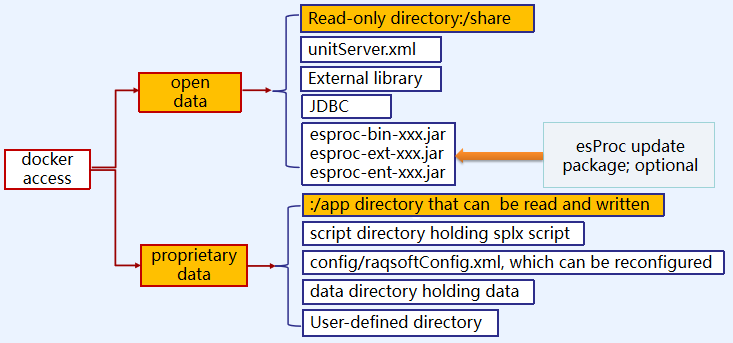
Open data: Managed by Docker admin. Can be accessed by all users and read-only.
Proprietary data: Managed by Docker users themselves and can be accessed only by the corresponding user, who can read, write and modify the data; cannot be accessed by any other users. The data can be stored in the host node directory permanently; it won’t be lost after the Docker container is closed.
Step 5: Configure server management in docker_server.xml
docker_server.xml configuration example:
<?xml version="1.0" encoding="UTF-8"?>
 <Config>
 		<Server>192.168.18.161:9001</Server>
 		<Share>/root/docker/share</Share>
 		<NodeType>manager</NodeType>
 </Config>
Note:
<Server> tag: The IP and port number for Client side’s access to Server side. Below is an example:
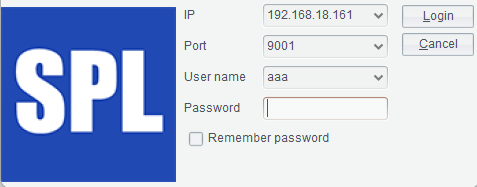
<Share> tag: Shared directory.
<NodeType> tag: When the property’s value is manager, this physical machine is a host.
Scenario 1: Configure one or more Dockers on one physical machine
Set value of property <NodeType> tag as manager
Scenario 2: Configure multiple Dockers on multiple physical machines
Since communication is needed between physical machines, the use of communication port number (9001or another) should be consistent across them. Set property value of tag as manager for the host physical machine There isn’t the tag on the other physical machinesStep 6: Configure user administration in docker_users.xml
docker_users.xml configuration example:
<?xml version="1.0" encoding="UTF-8"?>
 <Users>
 	<User>
 		<Name>aaa</Name>
 		<Alias>James</Alias>
 		<Pwd>123456</Pwd>
 		<Memory>500m</Memory>
 		<CPU>512</CPU>
 		<Home>/opt/app/aaa</Home>
 		<Unit>192.168.18.161:8281</Unit>
 	</User>
 	<User>
 		<Name>bbb</Name>
 		<Alias>Emma</Alias>
 		<Pwd>123456</Pwd>
 		<Memory>100m</Memory>
 		<CPU>256</CPU>
 		<Home>/opt/app/bbb</Home>
 		<Unit>192.168.18.162:8282,192.168.18.162:8283</Unit>
 	</User>
	……
</Users>
Note:
<Name> tag: The username used for the Client side to access the Server side. It should be unique. Docker does not allow the simultaneous use of namesake usernames.
<Pwd> tag: The password used by the Client side to access the Server side.
<Alias> tag: Username alias, for the convenience of remembering and distinguishing usernames.
<Memory> tag: Set up Docker memory size, whose minimum is 4M; the parameter value should be followed by unit m.
<Home> tag: Set up the directory storing user data in the host node; it should support both read and write. The directory has three subdirectories – config, script and data, which store configuration files, splx file and data files respectively.
<Unit> tag: The Docker (inbound/outbound) mapping port is the node allocated to each user. The ip:port should be unique in case that resource collisions occur. Each ip:port corresponds to a Docker container; and one or more Docker containers will be allocated to each user.
Scenario 1: Configure one or multiple Dockers on one physical machine
<Unit>192.168.18.161:8281,192.168.18.161:8282</Unit>
Scenario 2: Configure multiple Dockers on multiple physical machines
<Users>
    <User>
         <Unit>192.168.18.161:8281</Unit>
    <User>
    <User>
         <Unit>192.168.18.162:8282,192.168.18.162:8283</Unit>
    <User>
    ……
<Users>
Step 7: Configure unitServer.xml used by esProc
unitServer.xml is esProc cluster resource configuration file for allocating ip:port resources. The file can be obtained from dockerServer.zip, configured and put in the share directory set up in docker_server.xml.unitServer.xml configuration example:
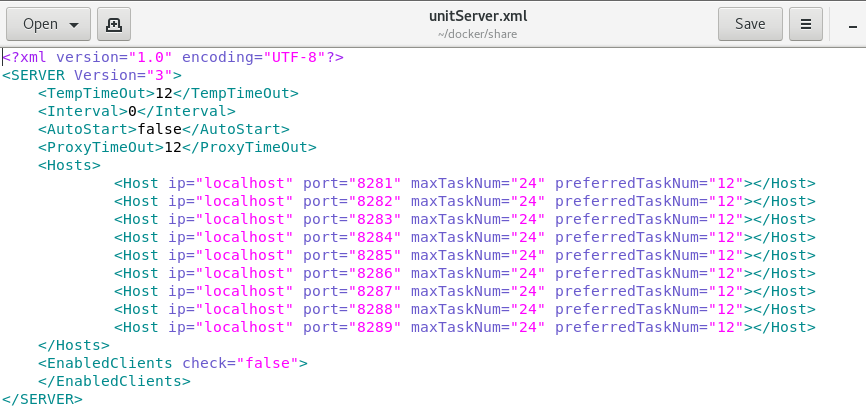 The Docker admin allocates ports for accessing esProc nodes in a centralized and unified way, making Docker access ports map to esProc ports and thus allowing users to access esProc from Docker. In the configurations, Host ip value is localhost; each Host is allocated an available and unique port.
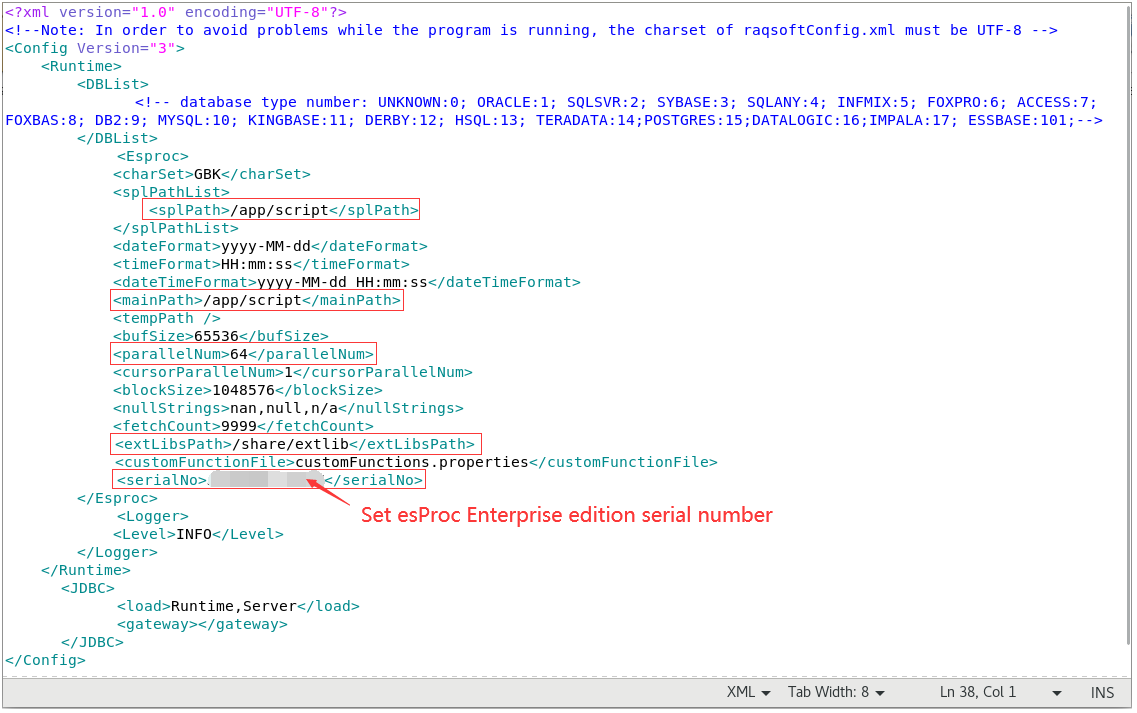
Step 8: Configure raqsoftConfig.xml used by esProc
raqsoftConfig.xml is esProc configuration file, where you configure search path, main directory, serial number, data source, external library and other information. This file can be obtained from dockerServer.zip, configured and put in user Home’s config directory, such as /opt/app/aaa/config, set up in docker_users.xml.raqsoftConfig.xml configuration example:(Note: The content highlighted in red box is required)
Step 9: Start dockerServer
Before using Docker, dockerServer on each server needs to be started.Start dockerServer:
# /home/docker/java/server.sh
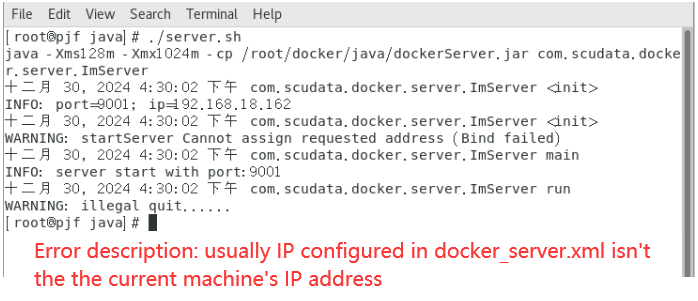
After dockerServer is successfully started, the following information will be printed:
Commonly seen errors:

About package directory for creating a custom Docker image
Download the latest esProc Enterprise Edition for Linux in the official website. Under Linux, install the application under /scudata directory according to directions. Then you can use scudata directory as the package directory for creating a Docker image.Note:
1. The prerequisite of creating an esProc Docker image is that the Docker is already installed.
2. Create the esProc image file according to the regular way of making a Docker image. Here we only offer explanations about the use of package directory for creating custom images.
3. In Dockerfile, make sure RUN directory location is consistent with the esProc for Linux installation directory location, and set the work directory for all subsequent WORKDIR instructions as esProc for Linux installation directory/esProc/bin.
(1) Copy esProc installation directory to the same directory containing Dockerfile, as shown below: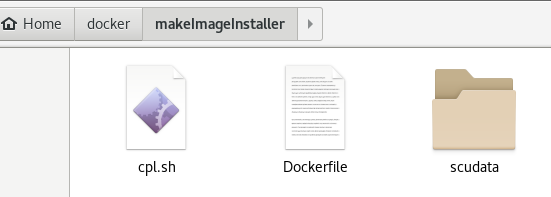
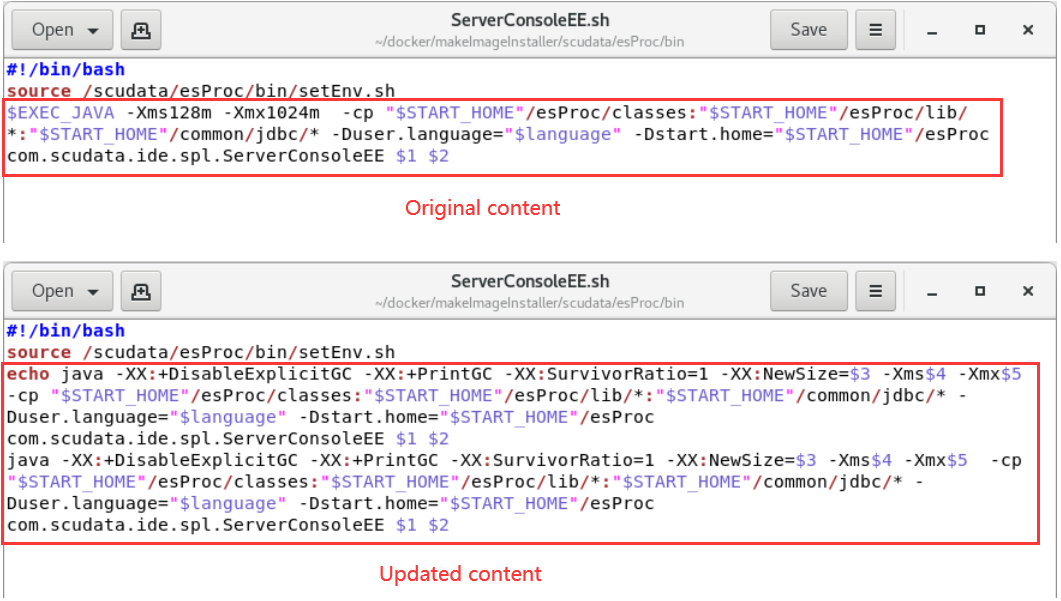
(2) Update description:
Updated content in scudata/esProc/bin/ServerConsoleEE.sh is as follows:
echo java -XX:+DisableExplicitGC -XX:+PrintGC -XX:SurvivorRatio=1 -XX:NewSize=$3 -Xms$4 -Xmx$5  -cp "$START_HOME"/esProc/classes:"$START_HOME"/esProc/lib/*:"$START_HOME"/common/jdbc/* -Duser.language="$language" -Dstart.home="$START_HOME"/esProc com.scudata.ide.spl.ServerConsoleEE $1 $2
java -XX:+DisableExplicitGC -XX:+PrintGC -XX:SurvivorRatio=1 -XX:NewSize=$3 -Xms$4 -Xmx$5  -cp "$START_HOME"/esProc/classes:"$START_HOME"/esProc/lib/*:"$START_HOME"/common/jdbc/* -Duser.language="$language" -Dstart.home="$START_HOME"/esProc com.scudata.ide.spl.ServerConsoleEE $1 $2
Under scudata/esProc/lib/ directory, rename esProc-related jars with names that do not contain dates:
For example:
  esproc-bin-20241126.jar	renamed: esproc-bin.jar
  esproc-ent-20241126.jar	renamed: esproc-ent.jar
  esproc-ext-20241126.jar	renamed: esproc-ext.jar

SPL Official Website 👉 https://www.scudata.com
SPL Feedback and Help 👉 https://www.reddit.com/r/esProcSPL
SPL Learning Material 👉 https://c.scudata.com
SPL Source Code and Package 👉 https://github.com/SPLWare/esProc
Discord 👉 https://discord.gg/2bkGwqTj
Youtube 👉 https://www.youtube.com/@esProc_SPL


Chinese version