Perpetual Calendar
This article will discuss how to make a full-year calendar for a given year (e.g., 2020). Requirements: the calendar should be outputted as strings, formatted like a common calendar with each month displayed separately, and should include date and day-of-the-week information.
Loop through each of the twelve months. First, calculate the month header and the weekday header, and add them to the perpetual calendar. Then, loop through all the days of a month, concatenating the dates by week, using 5 spaces to separate days. After concatenating a week, append the result to the perpetual calendar and move on to the next week.
A |
B |
C |
D |
|
1 |
2020 |
>y=A1,c=["Year"/y], w=day@w(date(y, 1, 1)), s=" ", d=6 |
[Sun, Mon, Tue, Wed, Thu, Fri, Sat] |
=C1.concat(pad("",s,d-3)) |
2 |
[January,February,March,April,May,June,July,August,September,October,November,December] |
|||
3 |
for 12 |
>c|=["\n",pad("",s,d*3)+A2(A3), D1] |
>r=pad("",s,d*(w-1)) |
|
4 |
for days(date(y,A3,1)) |
>w+=1 |
>r/=pad@r(string(B4),s,d) |
|
5 |
if w==8 |
>c|=r, w=1, r="" |
||
6 |
if r!="" |
>c|=r |
||
7 |
=c |
|||
http://try.scudata.com.cn/try.jsp?splx=ExA007wnl.splx
A1 sets the year for which the calendar to be generated. B1 defines several parameters to be used: y represents year; c stores the calendar result, with the first row recording the year; w represents the day of the week and is initialized to the result corresponding to January 1st; s is the padding character used for alignment, which is a space here; and d defines the number of characters each day will occupy in the calendar, which is set to 6 here.
C1 represents the abbreviations for each day of a week. D1 generates the header row, which is used in every month. The pad function here uses the padding character s to fill the remaining space in each day’s header, and uses concat to concatenate the members of C1 to a string, inserting separators between them. A2 lists the names of the twelve months.
A3 loops through each month, generating the calendar of each month. In B3, add the month row and header row to the calendar result c, using \n to insert a blank row before each month. The code in B3 is equivalent to >c=c|["\n",pad("",s,d*3)+A2(A3), D1]. In SPL, the calculations like a=a?b can be abbreviated to a?=b, where ? represents an operator. C3 defines the parameter r to represent the string of the current row. On the first day of each month, the initial space needs to be filled with a padding character, based on the day’s position in the week.
B4 performs a loop according to the number of days of the current month. C4 increments w. D4 writes the current day’s date to r, with trailing spaces appended to occupy d positions. C5 determines if a full week’s data is ready; if so, D5 records it to c while initializing w and r to prepare for outputting the following row calendar.
After the traversal of the dates of one month, it is possible that the current row r contains less than a full week of data. In this case, B6 checks if the remaining data needs to be added to c.
In SPL, you can use for statements to execute a loop and if/else statements to perform a conditional check. When executing loop or branch statements, the scope of the statement is determined by the position of the cell.
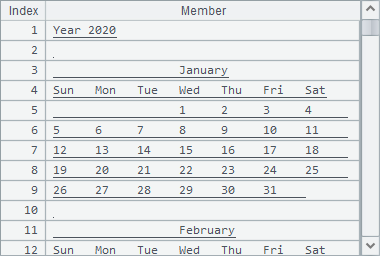
After execution, you can view the data in the calendar c. Special characters, such as tabs, are not displayed. The results of A7 are shown below:

To ensure proper display, you need to choose a monospaced font where spaces and all English letters have the same width, such as Courier, Consolas, or SimSun, otherwise, alignment issues may occur.
SPL Official Website 👉 https://www.scudata.com
SPL Feedback and Help 👉 https://www.reddit.com/r/esProcSPL
SPL Learning Material 👉 https://c.scudata.com
SPL Source Code and Package 👉 https://github.com/SPLWare/esProc
Discord 👉 https://discord.gg/2bkGwqTj
Youtube 👉 https://www.youtube.com/@esProc_SPL


Chinese version